SC 056/12…

Happy Father’s Day to all the Dads out there!  Hope you all have a great day & are spoilt rotten!
 
What a great little challenge Gwen set us this week.  Once I knew what I was going to use to creat my little card, it literally took about 5 minutes.  This size card is perfect for a little Thank You Note, slip inside or attach to a small gift bag.  The ideas are endless……  I also opted with a colour combination that I don’t think I have used for a really long time.

Measurements –
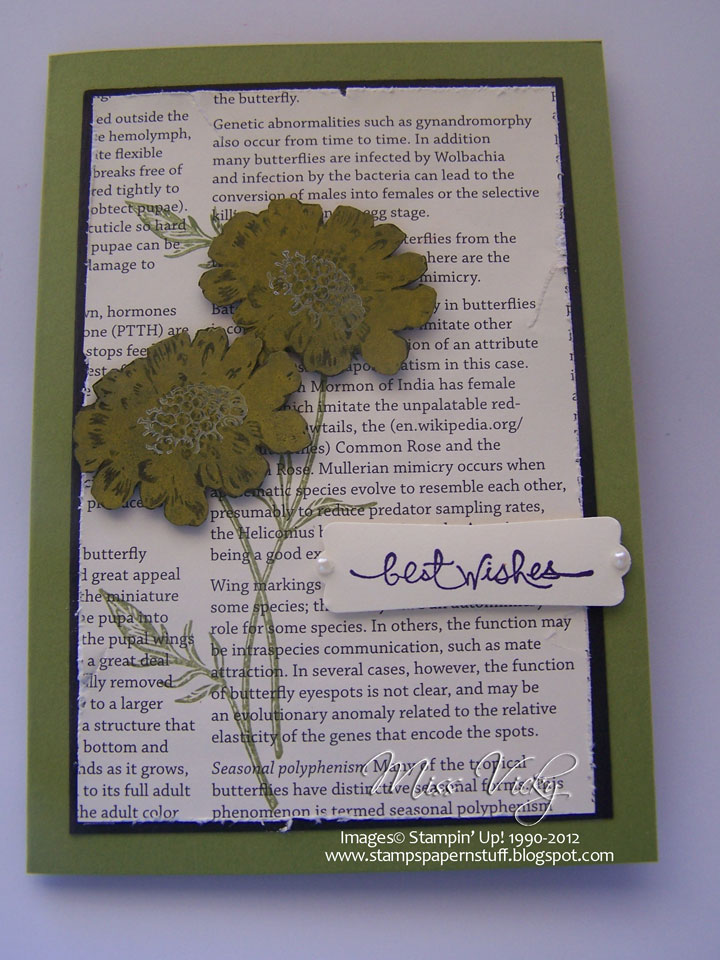
Base Card – So Saffron – 4″ x 8″ or 10cm x 10cm – Score in half & folded in middle
Layer 1 – Basic Black – 3 3/4″ x 3 3/4″ or 9.5cm x 9.5cm
Layer 2 – DSP – 3 5/8″ x 3 5/8″ or 9cm x 9cm

Supplies –
Stamp Set – Mixed Bunch
Ink – Basic Black, So Saffron
Cardstock – So Saffron, Very Vanilla, Basic Black
DSP – First Edition Speciality
Ribbon – 5/8″ Victoria Crochet Trim, 1/8″ Basic Black Taffeta
Punches – Blossom, 3/4″ Circle, 1 3/4″ Circle, 1 3/8″ Circle
Accessories – Snail Adhesive, Stampin’ Up! Dimensionals, Rhinestone

 I adhered the piece of DSP to the piece of Basic Black Cardstock before running first a piece of Crochet Trim across the bottom part of the card.  Once this Crochet Trim had been adhered to the layers, I then decided to run a piece of Taffeta Ribbon on top of that, tied a bow & adhered the whole piece to the Base Card – So Saffron using Snail Adhesive.

I stamped my image twice onto a scrap piece of Very Vanilla Cardstock, once in Basic Black which I punched out with the matching Blossom Punch.  The 2nd image was stamped in So Saffron, where I punched the middle out with the 3/4″ Circle Punch.  This small piece was attached to the centre of the larger image with a Stampin’ Dimensional.

A large circle was punched in Basic Black from the 1 1 3/4″ Circle Punch & the smaller using the 1 3/8″ Circle Punch.  These were layered on top of each other & then to the card with Snail Adhesive.  The punched images were layered on top of the circles with Stampin’ Dimensionals.

For my black Rhinestone, I coloured a Clear Rhinestone with a permanent Black Marker & popped it in the middle of the So Saffron image.

Don’t forget to pop on over to Sunny Challenges & Creations to check out what Kris, Gwen, Christine & Leah have created.  Create your card and add to Mr Linky.  I would really love to see what you can come up with using the challenge.

Have a great week

Challenge Card….

Today’s card is for the challenge over at Stampin’ Fun & Friends.  Click on the link to register for this great event.  It is not too late to do so.  There have been so many great ideas for creating lovely card sets including a matching box/bag to go with them. 

Our first challenge CherylAnn set us is to create a Project, Card, 3-D Item or Scrapbook Page going by this lovely spring photo. Isn’t that flower just gorgeous?

Measurements –
Base Card – More Mustard – 8 1/4″ x 4 1/8″ or 21cm x 15cm – Scored in the middle & folded in half
Layer 1 – Bravo Burgandy – 5 3/8″ x 3 7/8″ or 14cm x 10cm
Layer 2 – Very Vanilla – 5 1/4″ x 3 3/4″ or 13.5cm x 9.5cm

Supplies –
Stamp Set – Nature Walk, French Foliage
Inks – Bravo Burgandy, Garden Green, More Mustard, Always Artichoke
Cardstock – Bravo Burgandy, More Mustard, Very Vanilla
DSP – First Edition Speciality
Punches – Scallop Oval
Ribbon – 1/2″ Seam Binding – Always Artichoke
Accessories – Regal Buttons – More Mustard, Snail Adhesive, Mini-Glue Dots, Sponge Dauber, Very Vanilla Spritz, Paper Piercer, Silver Brad

Close up of Flower with Button
poking through….

I randomly stamped my images onto the piece of Very Vanilla Cardstock using Garden Green, Always Artichoke, More MustardBravo Burgandy Inks.  With the Always Artichoke Ink, I did stamp off twice prior to stamping onto the Very Vanilla Cardstock.

Inside Card….

I punched 5 scallop circles from the DSP with the Scallop Circle Punch, sponged around the edges using Bravo Burgandy Ink & Sponge Dauber prior to spritizing all 5 circles with the Very Vanilla Spritzer. This wet my circles so that I could scrunge & play with them.  It also made the sponging run a little & lighten the sponged Bravo Burgandy.
I carefully layered all pieces on top of each other, pierced a hole in the middle with my Paper Piercer, added a Silver Bard to the centre & squashed my flower until I was happy with the shape.

Once the flower was dry, I added a small button to the centre with a Mini-Glue Dot, tied a double bow with the Ribbon, attached to the card with another Mini-Glue Dot & adhered the flower in the centre of the bow, so that it looked a little like leaves.

Since the photo was taken, I again sponged the edges of the flower in Bravo Burgandy to bring out the colour a little more & to take away the pink tinge.

I haven’t added a greeting/sentiment to my card as you are probably all aware, I mostly post blank cards or will add the greeting later when I know what I am going to use it for.

Until next time, Happy Stampin’

Technique Class….

One of our techniques last sunday arvo was the “Reverse Spotlighting“.  what a fun, fun technique & we all enjoyed creating this card.  Not only was the technique used on the card, but we created an “Easel Card” as well.

Bottom of Easel…
Aren’t the colours gorgeous on this card.  This is the first time, this stamp set has been inked, but think it will be seeing a lot more ink somehow, as it stamps such beautiful images.
Have a great day!

Array of Sunshine…

I’ve had this set for a long time, but I am ashamed to say that it has not seen a lot of ink!  I have never been too sure if I liked it or, but after using it on today’s card, I have to admit that I love it!  I’ve found that it is the perfect set for layering.

The layout is the one we completed at our class at the Community Centre last Friday.  Included in the class was distressing & sponging.

Inside of Card…

Measurements –
Base Card – Very Vanilla – 8 1/4″ x 5 7/8″ or 21cm x 15cm – Scored in middled & folded in half
Layer 1 – Basic Black – 4″ x 5 3/4″ or 9.5cm x 14.5cm
Layer 2 – DSP – 3 7/8″ x 5 5/8″ or 9cm x 14cm
Layer 3 – Basic Black – 4″ x 3″ or 10.5cm x 7.5cm
Layer 4 – DSP – 3 7/8″ x 2 7/8″ or 10cm x 7cm

Supplies –
Stamp Set – Array of Sunshine (Hostess Set)
Ink – More Mustard, Elegant Eggplant, Always Artichoke
Cardstock – Very Vanilla, Basic Black
DSP – First Edition Speciality
Punches – Scallop Trim Border
Ribbon – Crochet Trim Chantilly
Accessories – Snail Adhesive, Stampin’ Dimensionals, Sponge, Antique Brads, Cutter Kit, Mini Glue Dots
NON-SU – Pearls

The Base Card – Very Vanilla was punched along the bottom using the Scallop Trim Border Punch.

I stamped the large flower image 3 times onto scrap Very Vanilla Cardstock, 3 in Elegant Eggplant  & 3 in More Mustard.  I cut around each image, so that I had 3 different layers for all 6 images.  The cut out pieces were then layered using Stampin’ Dimensionals & set aside.  The leaf was stamped onto scrap Very Vanilla Cardstock using Always Artichoke Ink, cut out & set aside.

I distressed all edges of both pieces of DSP using my Distressing Tool from the Cutter Kit & then sponged around the edges with Stampin’ Up! Sponge & More Mustard Ink.

The large piece of DSP was adhered to the large piece of Basic Black Cardstock, while the smaller piece of DSP was adhered to the smaller piece of Basic Black Cardstock, then to the top of the large piece of DSP, Crochet Trim adhered across the centre, ends tucked under & finally to the Base Card with Snail Adhesive.

A large leaf was stamped direct onto the DSP with Always Artichoke Ink, images adhered to the card with Stampin’ Dimensionals.  The cut out leaf was tucked under the Crochet Trim.

An Antique Brad was applied to the bow prior to adhering to the card with a Mini Glue Dot.  3 Pearls were applied to the top of the card & 3 to the bottom of the card.  I applied a Pearl to the centre of each flower which had been found in my stash of Pearls.  The fitted perfectly to the centre shape of the flowers.

I’ve left the card blank, but there is room for a sentiment/greeting to be added once I decide what I am going to use it for.

Until next time, Happy Stampin’

Technique Class…

I’ve suddenly realised I haven’t been posting our cards we have been creating in the Technique Class which is held every second Sunday at the Caloundra Community Centre.  In this class we created 2 cards using the technique, although they may be slightly variations from card to card.

Today’s card was held a couple of weeks ago now, but still think it a beautiful card.  The inspiration for the card came from our current catalogue.  The Technique we used was Black Magic….. 

I know what you are syaing “Why would I do green flowers?”  Yep, I thought the same.  I used a yellow on the flowers, but because of dark Cardstock & the Old Olive Cardstock used for the Base Card, over about an hour or so, the colour slowly turned to green.

I know, going mad, you say.  Well I had convinced myself that I used a green pencil to colour, but much to my relief the same thing happened to the ladies in the class…..

Don’t forget to pop back in a couple of days & I will show you the 2nd card we created using the same fun technique.

Until next time, Happy Stampin’