My Journal

This is another book I covered a couple of weeks ago.  They are great for your notes, etc.  I am always asked “where did I buy my book?”

Again, as with my last notebook, I have used retired DSP.  Yep, you have probably gathered – I have lots of the stuff left, but it is all good as I use it for the markets, my volunteer card class & also for family.  Great way to use it all up!

The colours for the journal were taken from the Ribbon, which was hanging in my stash from years ago & sort of just jumped out & into my hands!003blog

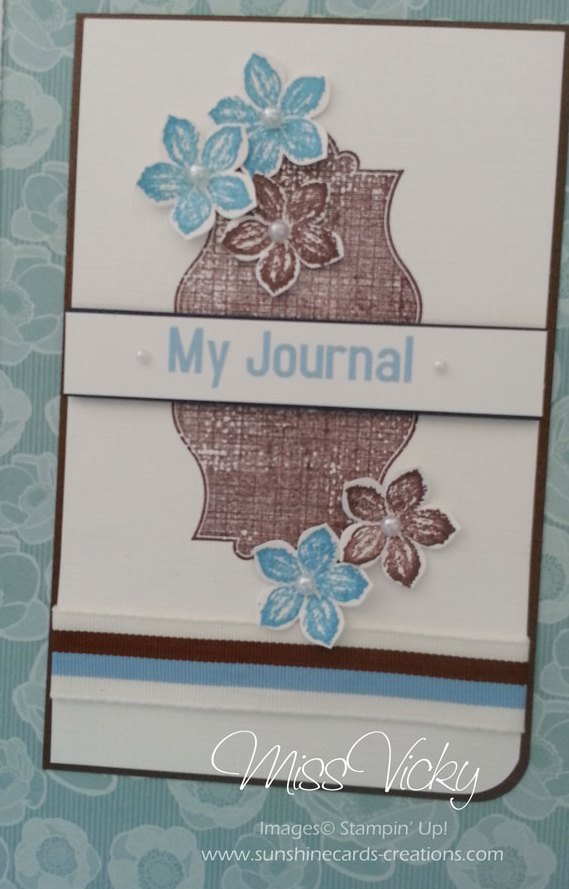
After covering the book with retired “Urban Garden” DSP, I added a bit of Night of Navy CS down the spine.  I thought the colours would pick up the blue in the DSP.  I then added the Ribbon down the front so that it worked as a Bookmark too.

I stamped the image shape from “Everything Eleanor” Stamp Set direct onto Whisper White CS in Chocolate Chip Ink.  The flowers from Petite Petals were stamped in Chocolate Chip & Marina Mist Inks, punched with the corresponding Petite Petals Punch & adhered to the top of the stamped shape with Stampin’ Dimensionals.

I rounded the bottom left corner of the Whisper White & the Chocolate Chip Layer with the Project Life Corner Punch prior to adhering Ribbon across the bottom part of the stamped Whisper White.  The Chocolate Chip Matt was adhered to the Whisper White & finally to the notebook front cover.

My Journal” was created using MDS, printed onto a scrap piece of Whisper White CS, adhered to a mat of Chocolate Chip CS prior to being adhered to the front with Stampin’ Dimensionals.

To complete the front, I added small Pearls to the centre of the flowers & one either side of “My Journal“.

Blues & Browns are some of my favourite colour combinations & I don’t think you can ever get bored with them.

Until next time, Happy Stampin!

Vicky

004blog

For You…

G’Day Stampers,
Another challenge & this time Ive sort of created 2 cards using the one layout, but with one small difference.
 

Challenge # 1 – Monday Lunchtime Challenge may be found @ http://technostamper.blogspot.com/2010/03/technostamper-monday-lunchtime-sketch.html

Challenge # 2  – Sympathy Cards  

While we don’t like making them, unfortunately there are times when they are required and should always have a couple on hand

Only stipulation for this challenge – all products must be 100% Stampin’ Up!®

I’ve combined the 2 challenges together


Surprise yourself and have a go!

Card 1 – 
Supplies –
Stamp Set – Great Friend, All a Flutter*
Inks – Baja Breeze, Not Quite Navy
Cardstock – Whisper White, Not Quite Navy, Baja Breeze
DSP – Urban Garden
Punches – Eyelet Border
Accessories – Snail Adhesive, Uni-Ball White Gel Pen


* Autumn-Winter Mini-Catalogue – 1 April – 31 August 2010

Card 2 –
 
 Supplies –
Stamp Set – Great Friend
Inks – Baja Breeze, Not Quite Navy
Cardstock – Whisper White, Not Quite Navy, Baja Breeze
DSP – Urban Garden
Punches – Eyelet Border
Accessories – Snail Adhesive, Mat Pack

Until next time, Enjoy!

A Note to Say….

I’ve just completed a set of 4 Thank You Cards – very easy, basic but a better look than just a plain piece of paper.  Have a look yourselves & see what you think!
Notes
Close Up
Supplies Used –
Stamp Set – Great Friend
Card Stock – Whisper White
DSP – Urban Garden, Urban Oasis
Ink – Pink Pirouette
Accessories – Snail Adhesive
Non-SU – Rhinestones
I love black & pink together, so I gathered my little bits & pieces of cardstock & DSP to make these notes.  What better way to use your small pieces of scrap? 
The “A Note to Say “Thank You” has been typed on the pc & printed.
Until next time, Enjoy
Vicky

Tutorial…

 I have finally managed to finish off the tutorial for the long notebook I posted Here!  I did have it all written up, but had not taken any photos.
Note – You will find I have used both metric & standard measurements for this tutorial! Whatever was easiest!

Supplies Required –
? Cardstock – Kiwi Kiss, Baja Breeze, Whisper White
? Ink – Going Gray, Kiwi Kiss, Baja Breeze
? Stamp Set – 5th Avenue
? Punches – Scallop Oval, Oval
? Accessories – Snail Adhesive, Sprinkles, Uni-Ball Gel Pen, Grosgrain Ribbon – Kiwi Kiss
? Magnet

Instructions –
Cover – as per photo
1. Cut Cardstock – 17cm x 27cm
2. On the 27cm side, score up from bottom – 8cm
3. On the 17cm side, score at ½”, 3 ½” & 3 5/8”
4. Starting from bottom score line, score at 4”
5. Fold score lines
Pocket – as per photo
1. Cut along ½” LHS score line to bottom of line
2. Cut along LHS score line to ½” score line
3. Cut along RHS bottom score line to 2nd score line – Spine
4. Cut “V” shape both side from bottom line
5. Fold along score lines in towards inside of cover
6. Adhere flaps
7. Decorate/Embellish as required
Notebook – as per photo
1. Cut Kiwi Kiss – 2 ¾” x 1 ¼”
2. Score Kiwi Kiss at 2 ½” x 1”
3. Fold along score lines
4. Adhere to top of notebook, ensuring that the score lines fit firmly against the spine of the notebook
5. Cut DSP 2 5/8” x 1 1/8”
6. Adhere to Kiwi Kiss
7. Apply snail adhesive to spine & back of cover
8. Adhere notebook to back cover
9. Decorate/ Embellish top of notebook as required
Labels – as per photos
1. Type Labels on PC & print onto Whisper White
2. Using Oval Punch, punch Whisper white
3. Using Scallop Oval, punch 2 pieces of Kiwi Kiss
4. Adhere Whisper White to Kiwi Kiss
5. Adhere “Receipt” Label to inside pocket
6. Adhere “Shopping List” Label to outside cover
Cover – as per photo
1. Cut Kiwi Kiss 2 ½” x 7 ½”

2. Cut DSP – 2 3/8” x 7 3/8”
3. Adhere DSP to Kiwi Kiss
4. Attach ribbon across centre of cover , ensuring there is enough either side to tie a bow/knot
5. Adhere Kiwi Kiss to Baja Breeze
6. Stamp 5th Avenue onto Whisper White
7. Cut flowers & adhere to cover of notebook as required

TipAdhere magnet to back cover if required for fridge – shopping list always at hand!
If you have trouble understanding, please do not hesitate to contact me

Enjoy

Vicky

2nd for the Day…

Crikey, this is the 2nd posting for the day!  I must get out of this office & be on my way or I will be late – yet again!

This has been done for a very special person, but as yet I haven’t given it to her.  I know for a fact she doesn’t come onto the blog, so am safe to show it.  I have yet to stamp the notes!

Supplies –
Stamp Set – Fifth Avenue
Cardstock – Pacific Point, Very Vanilla
DSP – Urban Garden
Ink – Kiwi Kiss, Pacific Point 
Ribbon – Bashful Blue Grosgrain
Accessories – Snail Adhesive, Dimensionals, Bone Folder

I will post a Tutorial later on next week so that if any of you want to have a go at making them, you are able to.  Very easy project!

Happy Stampin’
Vicky