Faux Leather…

…  What a fun technique & one we did a couple of weeks ago in our Technique Class.

Not only did we get to make a big mess with Embossing Powder, but we got to play with the Stampin’ Up! Wheels, which a couple of the ladies had not used previously. 

I did do a similar car to the one here sometime ago, so decided to step it up a bit using new products.  Of course, we had to create it using “girly” colours.  The best part is I think this colour – “Melon Mambo” really showcases the Faux Leather Technique to perfection.

 
Until next time, Happy Stampin’

SC 026/12…

I hope you will join us in this week’s challenge over at Sunny Challenges & Creations.  Along with the sketch we had to create a card with a Wedding Theme.  Both Kiris & Shirley (who bought us the challenge this week) would love for you to pop over to see what they have created this week.
Now this worked perfectly for me, as I have a wedding to do in a couple of weeks, so I’ve created my card using their colours.
It is a very CAS (Clean & Simple) one, but i am happy with the final result!
Measurements –
Base Card – Not Quiet Navy – 11 3/4″ x 4 1/8″ or 30cm x 10.5cm – scored in the middle & folded in half
Layer 1 – Whisper White – 5 3/8″ x 3 7/8″ or 13.5cm x 10cm
Layer 2 – Not Quiet Navy – 4 1/2″ x 1 3/4″ or 11.5cm x 4.5cm
  
The Not Quiet Navy piece was cut to a point in the middle of one end, about 3/4″ or 2cm.
This piece & the Whisper White were run through the Bigshot using the Embossing Folder – Perfect Polka Dots.  Not Quiet Navy was adhered to the embossed piece of Whisper White prior to adhering to the Base Card – Not Quiet Navy using Multipurpose Glue.
I stamped my sentiment onto a scrap of Whisper White in Not Quiet Navy Ink, punched with the Oval Punch & adhered to a piece of Not Quiet Navy which had been punch using the Scallop Oval Punch.  I adhered this to the card using Stampin’ Dimensionals.
To add a bit of bling, I adhered a Pearl to the middle of the greeting.
Actually, this card would make a great Make & Take for a Beginners Class!
Supplies –
Stamp Set – Oval All
Ink – Not Quiet Navy
Cardstock – Not Quiet Navy, Melon Mambo, Whisper White
Embossing Folder – Perfect Polka Dots
Punches – Oval, Scallop Oval
Accessories – Bigshot, Multipurpose Glue, Basic Jewels – Pearls
Don’t forget to create your card using the sketch provided, along with a Wedding Theme, post to your blog or on-line group or forum, add your link to Mr Linky & you could be our next Ray of Sunshine when it is announced on Saturday arvo.
Until next time, Enjoy!

SSC 217…

I am in the middle of doing Wedding Reception Stationery so shouldn’t really be doing any cards, let along attempt sketches, but while the paint is drying, the mouse will play.  Anyhow, I have to make the bride & groom a “Congratulations” Card, so this is a good excuse!
This card has been created for the challenge over at 
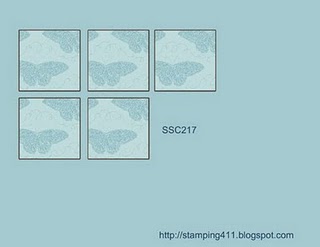
Stamping 411 I finally inked a stamp set which has been sitting on my shelf for a little time now.  After seeing it in ink, I now have a million ideas to use it, but alas as it is a Hotess Set, so will be retiring at the end of the month.
This week Stamping 411 not only have 2 sketches but they have a “Contest” so to speak.  The winner will receive a FREE Level 3 Hostess Set from the previous Idea Book & Catalogue – “Playful Pieces“. 
If I get the time, I will attempt to have a go at the other sketch too, as a few ideas popped into my head while making the card for #2 sketch
As always, measurements have been supplied for us –
Base: 11 x 4 1/4″, scored and folded in half at 5 1/2″ – Basic Black
Layer 2: 5 x 3 3/4″  – Riding Hood Red
Layer 3: 4 7/8″ x 3 5/8″  – DSP
Layer 4: 3 1/8″ x 4 1/8″ – Basic Black
Layer 5: 3×4″ – Very Vanilla
Layer 6: Ribbon or cardstock
Layer 7: ANY shape punch
I stamped my images direct onto Very Vanilla Cardstock using Basic Black Ink.  Thinking I would try something a little different & not do the 2-step stamping technique onto the image, I coloured the images using my Aqua Painter, Riding Hood Red & Crumb Cake Inks.  I think it come out ok.  I very roughly coloured the images, as I think the stamp set calls for that, not to keep your colouring within the lines, so to speak!
I put the card through the Bigshot using Embossing Folder – Perfect Polka Dots, layered it to Basic Black, then to DSP & then to Riding Hood Red Cardstock.  A piece of Ribbon was adhered across the bottom about 1/4 way up & a bow tied.
I stamped my sentiment using Basic Black Ink onto Very Vanilla, punched using Oval Punch & run it through the Bigshot, again using the same Embossing Folder.  The piece was then adhered to a piece of Crumb Cake Cardstock which had been punched using the Scallop Oval Punch.  I adhered to the card using SU Dimensionals.
The whole piece was then adhered to the Base Card – Basic Black.
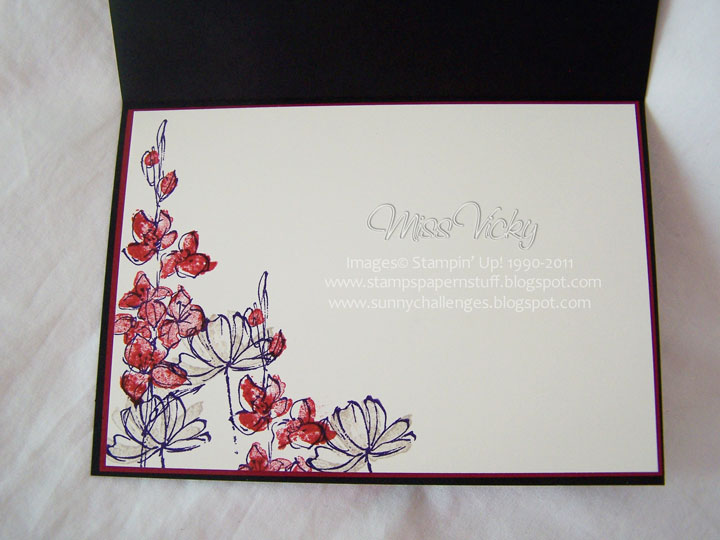
For my inside, I did the 2-Step Stamping Technique using Basic Black, Riding Hood Red & Crumb Cake Inks onto Very Vanilla, adhered to layer of Riding Hood Red Cardstock & then to the Base Card.
What looks like a hard sketch, is really a great one to do!
Supplies –
Stamp Set – Fast & Fabulous, Oval All
Inks – Basic Black, Riding Hood Red, Crumb Cake
Cardstock – Very Vanilla, Crumb Cake, Riding Hood Red, Blasic Black
DSP – Love Letter
Embossing Folder – Perfect Polka Dots
Punches – Oval, Scallop Oval
Ribbon – 1/8″ Taffeta – Basic Black
Accessories – SU Dimensionals, Bigshot, Snail Adhesive, Aqua Painter
Until next time, Enjoy!

Crimping…

I created this card a couple of weeks ago but didn’t get round to posting it.  I remember seeing this card ages ago & it has always stuck in my mind.  It has been CASEd from another SU Demonstrator, whose names slips my mind as her details were not on the card.  Once I find out, I will give her the much credit she deserves as it is a beautiful creation.  I changed mine using the colours of Concord Crush & Not Quiet Navy.
It is such a long long time since I last used my Crimper.  A technique long past revisiting.
After sealing my envelope, I cut it about 1 1/2″ or 4cm from top – shorter side.  Ink your image using Concord Crush Ink & stamp image onto bottom part of envelope.  Stamp 2nd image again using Concrush Crush Ink & randomly stamp around the edges of your card – top & bottom.  For the top, I also stamped off a couple of times, just to give it another look.

I sponged around the edges of both top & bottom using my SU Sponge & Concord Crush Ink.  Are you sick of Concord Crush yet?????  I wrapped Satin Ribbon – Not Quiet Navy around the top part of the envelope & tied a bow off centre at the front.

These instructions sound very familiar that I could have sworn that I had posted this, but after searching my blog high & low, no result!  So on with the story….

Placing the bottom half of the card into the Crimper sideways, I proceeded to put it through the Crimper.

I stamped my greeting onto a piece of Whisper White Cardstock in Not Quiet Navy – yep, I’ve changed colours……  Punched the greeting out using my Large Oval Punch, sponged around the edges with Not Quiet Navy, adhered to card with a SU Dimensional & placed a small Pearl in the center of the greeting, as well as a larger Pearl to the centre of the Medallion Stamp.

For the inside, I cut a piece of Concord Crush Cardstock – 4 1/2″ x 4″ or 11.5cm x 10cm.  I cut another piece using Whisper White Cardstock – 4 3/8″ x 3 7/8″ or 11cm x 9.5cm.  I stamped my image using Not Quiet Navy Ink, sponged the edges in the same colour & adhered to the Concord Crush Cardstock.  I placed a couple of small Pearls to the centre of the flowers.

All in all a really lovely creative card using a techinque which has been around for yonks, but not seen that much now.  It is still one of my favourites & probably always will be.  Note to selfstart using Crimper more often!

Supplies –
Stamp Set – Medallion, Just Believe, Oval All
Cardstock – Whisper White, Concord Crush
Ink – Not Quiet Navy, Concord Crush
Punches – Large Oval
Ribbon – Satin – Not Quiet Navy
Accessories – Crimper, SU Envelope, Snail Adhesive, Basic Pearls, SU Sponge, SU Dimensionals

Until next time, Enjoy!

An Old Favourite…

It has been some time since I’ve used one of my favourite stamps – 5th Avenue Floral.  With some stamps, it doesn’t seem to matter how you use them you are guaranteed that your card will always come up “roses” – so to speak.

I’ve never attempted a “Step Card” before & as usual I didn’t go by any instructions to make mine, although there are heaps of instructions & tutorials out in blog land for you to follow.  I also made mine to fit our standard envelope in Australia.  As I really enjoyed making this type of card, I don’t think it will be my last.

Cut A4 Cardstock – Bashful Blue – 11 3/4″ x 4 1/4″ or 29.5cm x 15cm

Back section of card for your greeting or note…
Score & fold from bottom along the longer side at 1″, 2″, 4″, 6″ & 10 1/4″ or 2.5cm, 5cm, 10cm, 15cm & 26cm

Cut Bashful Blue Cardstock 5 7/8″ x 4 1/4″ or 15cm x 10.5cm
Adhere to back section of card – will give you a section for your card to fold out & stand
Cut 2 pieces of Wild Wasabi Cardstock – 5 3/4″ x 4″ or 14.5cm x 10cm & adhere 1 piece to the above section of card
Cut 2 pieces of Whisper White Cardstock 5 5/8″ x 3 7/8″ x 14cm x 9.5cm – stamp image onto 1 piece of card & adhere to Wild Wasabi
This section is the part you are able to write your greeting onto ie the inside of a normal card

Back Section
I randomly stamped my images onto the 2nd piece of Whisper White Cardstock using Wild Wasabi, Bashful Blue & Crumb Cake Inks.  After dying my Whisper White Taffeta Ribbon with Crumb Cake Re-Inker & allowing to dry, I adhered this across the top half of the Whisper White Cardstock, adhered to Wild Wasabi & then to the Base Card.  I tied a bow & adhered this to the card too.

Middle Section
I stamped the wording using Crumb Cake Ink onto Whisper White Cardstock, cut it out & adhered to Wild Wasabi, which was then adhered to the middle section.  I allowed a little bit of the wording sit above the fold, instead of flat against the card.  I made 2 flowers using retired Felt Flowers, small white flower which I dyed using Bashful Blue Re-Inker & a Silver Brad.  These were attached to the centre section of the card.

Front Section
I cut a small piece of Wild Wasabi Cardstock & adhered to the Bashful Blue.  Using the Scallop Oval Punch & Crumb Cake Cardstock, I punched a piece of Whisper White which I had stamped the sentiment using Wild Wasabi Ink, & adhered to the Scallop punched piece.  I used the Large Oval Punch for the Whisper White.  I again dyed 3 small white flowers using the Bashful Blue Re-Inker, applied a silver brad in each & adhered to the card.

I’ve used a couple of retired products making this card, but they are able to be substituted for current products.  The flowers come from a big box of misc flowers – pre-SU – I have & dye from time to time so that I am able to use them up.

Supplies –
Stamp Set – 5th Avenue Floral, Oval All
Inks – Bashful Blue, Wild Wasabi, Crumb Cake
Re-Inkers – Bashful Blue, Crumb Cake
Cardstock – Whisper White, Wild Wasabi, Bashful Blue
Punches – Scallop Oval, Large Oval
Ribbon – 3/8″ Taffeta Ribbon – Whisper White
Accessories – Multipurpose Glue, Silver Brads, Felt Flowers – Old Olive
Non-SU – Small White Flowers

Until next time, Enjoy!