SC 059/12…

We have a great challenge beginning today over at Sunny Challenges & Creations.  Along with the sketch, we are to create an Easel Card.  I love making these, but don’t do them often enough.
Not sure on how to create this type of card, then click onto tis link & it will take you straight there – http://www.splitcoaststampers.com/resources/tutorials/easelcard/

I started out with the design in mind of a certain stamp set.  After grabbing all my supplies & colours which I thought would really suit the set, couldn’t find the set I wanted.  After searching for about 10m, suddenly realised I don’t have that stamp set.  Does this happen to anyone else????

Measurements –
Easel
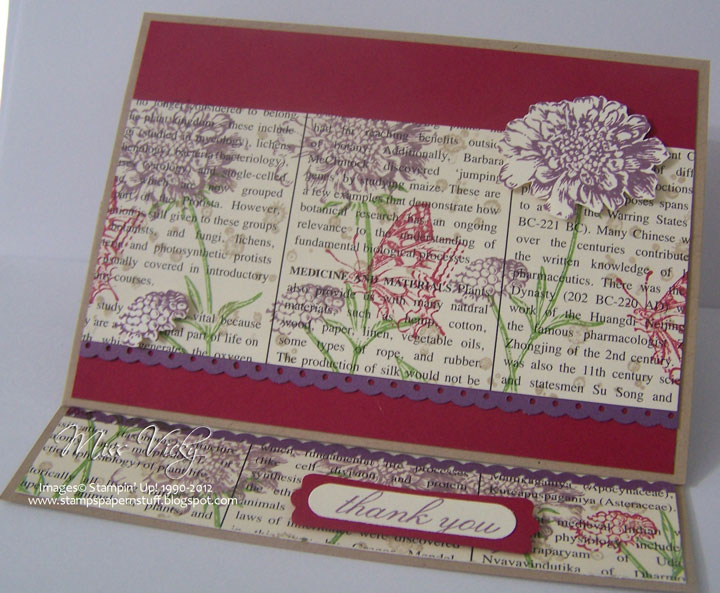
Base – Crumb Cake – 8 1/4″ x 4 1/8″ or 22cm x 15cm – Score at 4 1/8″ & 2′

Card Front –
Layer 1 – Crumb Cake – 4 1/8″ x 5 7/8″ or 15cm x 10.5cm
Layer 2 – Raspberry Ripple – 3 7/8″ x 5 5/8″ or 14cm x 9.5cm
Layer 2 – DSP – 5 5/8″ x 2 1/2″ or 9.5cm x 6cm
Layer 3 – Perfect Plum – 5 5/8″ x 1″ or 9.5cm x 2.5cm

Inside –
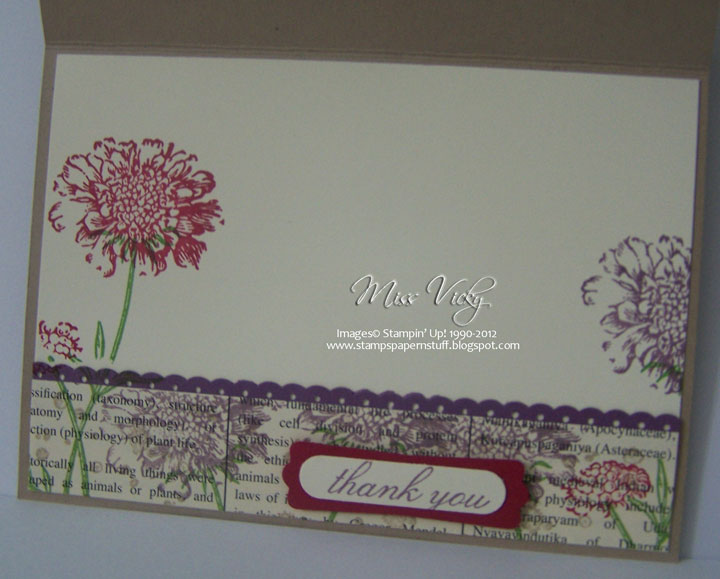
Layer 1 – Very Vanilla – 4″ x 5 3/4″ or 14.5cm x 11cm
Laer 1 – Perfect Plum – 1″ x 4″ or 2.5cm x 14.cm
Layer 2 – DSP – 1″ x 4″ or 2.5cm x 14cm

Supplies –
Stamp Set – Field Flowers, Because I Care (Retired), French Foliage
Ink – Raspberry Ripple, Crumb Cake, Perfect Plum, Gumball Green
Cardstock – Crmb Cake, Perfect Plum, Raspberry Ripple, Very Vanilla
DSP – First Edition Speciality
Punches – Dotted Scallop Border, Word Label, Modern Label
Accessories – Snail Adhesive, Stampin’ Dimensionals

For the front panel of my card, I adhered the large piece of Raspberry Ripple onto the single piece of Crumb Cake Cardstock with Snail Adhesive.

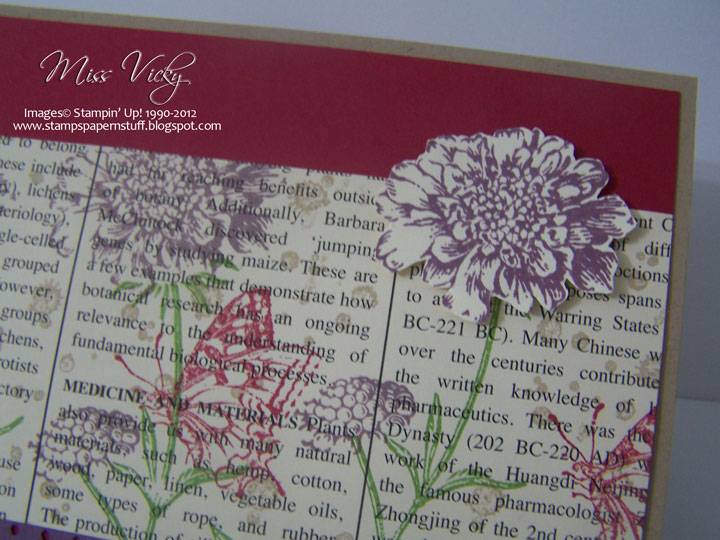
I stamped my images randomly onto the piece of DSP using Gumball Green, Raspberry Ripple & Perfect Plum Inks.  I punched along the edge of the piece of Perfect Plum Cardstock with the Dotted Scallop Border Punch, adhere it to the bottom of the DSP, prior to adhering to the front of the card.

I stamped the small image onto a scrap of Very Vanilla Cardstock in Perfect Plum Ink, cut around & adhered it to the bottom left hand corner of the card with Stampin’ Dimensionals.  The large flower was completed the same way.

The whole piece was adhered to the Easel Base with Snail Adhesive.

For my Easel Base, I adhered the piece of Very Vanilla Cardstock to the bottom of the Crumb Cake with Snail Adhesive, then punched along the edge of the Perfect Plum with the Scallop Dotted Border Punch, adhered to the DSP & finally to the bottom of the Very Vanilla Cardstock.

With Perfect Plum, Raspberry Ripple & Gumball Green Inks, I stamped the images direct onto the DSP allowing some of the images to go onto the piece of Very Vanilla Cardstock.

My greeting was stamped onto a scrap of Very Vanilla Cardstock in Perfect Plum Ink, punched with the Word Label Punch & then to a piece of Raspberry Ripple Cardstock which had been punch with the Modern Label prior to adhering to the bottom of the card with Stampin’ Dimensionals.

We hope you will join us this week.  Don’t forget to pop on over to Sunny Challenges & Creations & check out what GwenKris and Christine have created.  These are fun cards to create!

 
Until next time, have a great week
 

SC 03412…

Happy April’s Fool!!!!!

Yep, today is April 1 & marks April Fools Day!!!  So look lout for all those pransters that you have around you or know!!!!

Today also brings the start of our weekly challenge over at Sunny Challenges & Creations & was created by Kris.  Very easy this week, so we would love to see heaps of creations posted…..

Measurements –
Base Card – Whisper White – 8 1/4″ x 4 1/8″ or 21cm x 15cm – Scored in the middle & folded in half
Layer 1 – Basic Black – 5 1/2″ x 3 7/8″ or 14cm x 10cm
Layer 2 – Whisper White – 5 5/8″ x 3 3/4″ or 13.5cm x 9.5cm
Layer 3 – Basic Black – 5 1/4″ x 2″ or 13cm x 5cm
Layer 4 – Pear Pizzazz – 3″ x 3/4″ or 8cm x 2.5cm
Layer 5 – Pear Pizzazz – 2 1/2″ x 2 1/2″ or 6.5cm x 6.5cm
Layer 6 – Whisper White – 2 3/8″ x 2 3/8″ or 6cm x 6cm

I did start out to use Night of Navy & Pear Pizzaz.  By the time I come to the ribbon, I realised what I had done, but by then it was too late, so I continued with it.  I quiet like like the colours together.  Do you ever do that?  I seem to do it all the time!  I did want to use more of the Pear Pizzazz Cardstock, but suddenly realised that I only had 2 small bits left to complete my card!

Envelope & Inside Card…

I run the small piece of Basic Black through the Bigshot using Embossing Folder – Vintage Wallpaper.  I repeated the same for the smaller piece of Whisper White using Embossing Folder – Perfect Polka Dots.  The embossed Basic Black was adhered to the embossed Whisper White with Tombow Glue, then to the larger piece of Basic Black before adhering to the Base Card – Whisper White.

I punched along one edge of the small piece of Pear Pizzazz using the Scallop Trim Border Punch, adhered a piece of Ribbon along the middle, tucked ends under, tied a bow & adhered to the card with Tombow Glue.

Close Up of Flower Image…

I inked my image with Pear Pizzazz Ink & for a little bit of a different look, I randomly applied my Basic Black SU! Marker to the inked image before stamping onto a scrap piece of Whisper White Cardstock.  I again stamped the image in Pear Pizzazz Ink, stamped onto the square piece of Whisper White, adhered to the square piece of Pear Pizzaz & finally to the Base Card using Tombow Glue.

I cut around the 2-coloured stamped image & adhered to the top of the stamped image using Stampin’ Dimensionals.  I applied small Basic Pearls to the centres of the flowers.  I think I missed a couple, but me being me, had to fix immediately as it was annoying me!!!!!!!

Again, no sentiment.  This would be the perfect card for Mother’s Day.

I really love how the flower come out & will be doing more this way.  It gives such a lovely effect to your image.

Supplies –
Stamp Set – Because I Care
Ink – Pear Pizzazz
Cardstock – Whisper White, Pear Pizzazz
Punches – Scallop Trim Border
Embossing Folder – Perfect Polka Dots, Vintage Wallpaper
Ribbon – 1/8″ Taffeta – Basic Black
Accessories – SU! Marker – Basic Black, Pearls, Stampin’ Dimensionals, Tombow Glue

Don’t forget to hop on over to see what the other girls have created, as well as our weekly guest designers.  We have a new guest designer for the month of Aptil too!
Until next time, Happy Stampin’


Challenge # 99….

Over at A La Card Monkey, they are one off reaching their 100th challenge.  I have been keeping my eye out for it so that I could create something for their big 100, but when I saw this great little sketch, thought I would have a go.  I’m not too sure about it at the moment, but will sit on it for awhile.  Usually if I am like this, I find it is best to leave it alone & not add as sometimes you will ruin it….
Measurements –
Base Card – Crumb Cake – 11 3/4″ x 4 /8″ or 29.5cm x 10.5cm – Scored in middle &folded in half
Layer 1 – Pink Pirouette – 5 3/4″ x 4″ or 15cm x 10cm
layer 2 – Whisper White – 3 3/4″ x 3 7/8″ or 9.5cm x 14.5cm
Layer 3 – Crumb Cake – 5 3/8″ x 3 1/4″ or 13.5cm x 8.5cm

Envelope & Inside Card…

Supplies –
Stamp Set – Because I Care
Ink – Crumb Cake
Cardstock – Cumb Cake, Whisper White, Pink Pirouette
Ribbon – 1/2″ Seam Binding – Crumb Cake
Punches – Scallop Trim Border
Accessories – Pearls, Snail Adhesive, Antique Brads, Mini Glue Dots

Method –
Punch along one long side of Whisper White Cardstock using the Scallop Trim Border Punch.  Adhere to Pink Pirouette Cardstock, leaving a wider space on the RHS – Right Hand Side

Randomly stamp the piece of Crumb Cake Cardstock with Crumb Cake Ink & adhere to Whister White piece
Adhere piece of Ribbon across top of stamped Cardstock, tucking ends under & tying a tripple bow.  Apply an Antique Brad around the bow & apply to card with Mini Glue Dot
Adhere the whole piece to Base Card – Crumb Cake
Adhere Pearls down the Border Trim
Stamp sentiment or greeting if desire.  I usually leave mine until I go to use it

Until next time, Happy Stampin’

Mojo Monday on a Saturday…

Happy New Year!

I completed this card a couple of days ago & realised that I had not posted it, so here goes.

The card is for a challenge over at Mojo Monday –  I elected to go with the Square one.

For my card I used the Level 1 Hostess Set – Because I Care

Cut Whisper White Cardstock & score to form a square fold
Cut smaller piece of Whisper White Cardstock
Cut 4 x squares in Whisper White & run through your Bigshot using the Perfect Polka Dots Embossing Folder
Using Stampin’ Dimensionals, adhere these 4 pieces to the smaller piece of Whisper White
Adhere Taffeta Ribbon – Whisper White across the centre of 4 squares & tuck ends under
Adhere to base card
Cut square piece of Cardstock using Blusing Bride
Cut smaller piece of Cardstock in Whisper White
Using Blushing Bride ink, stamp image onto Whisper White
Adhere to Blushing Bride
Adhere to base card
Cut butterflies using your Embosslits Die – Beautiful Wings
Attach smaller butterfly to larger butterfly
Adhere to card
Attach Jewels – Basic Pearls

Tip – When layering same colour on same colour, use Stampin’ Dimensionals.  This will highlight your card!
Supplies –
Stamp Set – Because I Care
Inks – Blushing Bride
Cardstock – Whisper White, Blushing Bride
Embosslit Dies – Beautiful Wings
Embossing Folders – Perfect Polka Dots
Ribbon – Taffeta – Whisper white
Accessories – Snail Adhersive, Multipurpose Liquid Glue,
Stampin’ Dimensionals, Jewels – Basic Pearls
Until next time, Enjoy!