SSC214…

For a card which started out as a bit of an idea in my head, it turned into a very complicated one.  After colouring, ripping, tearing, stamping, then stamping, colouring, inking, embossing I think I am happy with the final result but….
The card was created from the challenge over at Stamping 411 and you know wthat that means – All measurements have been done for you.
 
Here’s some possible measurements to get you started:

1.Layer One – Card Base cut at 5.5 x 8.5, scored and folded

2.Layer Two – 4 x 5.25”
3.Layer Three – Die Cut or other Shape – approximately 3.5”
4.Layer Four – 3.25”
5.Layer Five – 3”

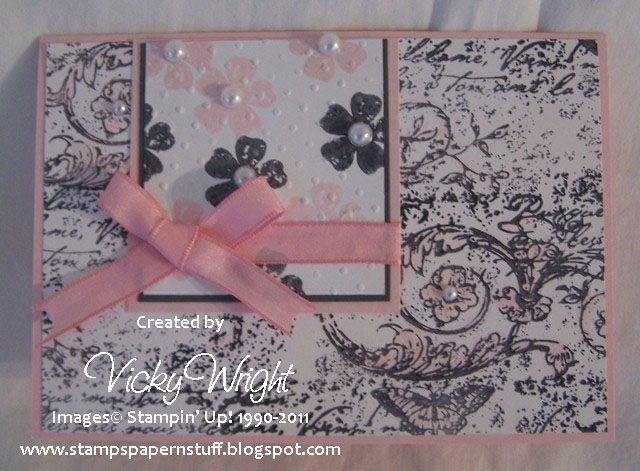
I cut my 2nd layer using Whisper White Cardstock, stamped using my SU Wheel & Basic Grey Ink.  It has been so long since I have used a Wheel that I quiet enjoyed it again & must remember to use them more often.  I randomly coloured the image using my Aqua Painter & Pink Pirouette Ink. I wasn’t too concerned about going out of the lines or how I coloured it as I think it looks a little better this way.  This was adhered to my base card – Pink Pirouette Cardstock.
 
I cut my 3rd layer using Pink Pirouette Cardstock but didn’t do a border as it looked a little too much when I did, so I skipped it.  I do hope the operators will forgive me for this.  I then stamped the flower images using Basic Grey & Pink Pirouette Inks stamping randomly over Whisper White Cardstock.  This piece was run through my Bigshot using Embossing Folder – Perfect Polka Dots.  I adhered this to a piece of Basic Grey, adhered to the Pink Pirouette, added a piece of Satin Ribbon, tied a bow & then adhered to the base card.  I applied Basic Pearls to the middle of the flowers. 
 
Now you ask how could this take me hours to create & finish, but believe me it did!  I nearly gave in a number of times, but wouldn’t let it get the better of me.  This is for a special 50th Birthday.  I know it has no greeting, etc but I like them to be blank sometimes, especially for such a special occasion!
 
Supplies –
Stamp Set – Vintage Vogue
Ink – Basic Grey, Pink Pirouette
Cardstock – Pink Pirouette, Basic Grey Whisper White
Embossing Folder – Perfect Polka Dots
Ribbon – 5/8″ Satin Pretty in Pink
Wheel – Very Vintage
Accessories – Snail Adhesive, Bigshot, Basic Pearls, Aqua Painter
 
Now, I must go & do what I am supposed to be doing – printing & creating invitations!
 
Until next time, Enjoy!
  

Challenge 126…

Challenge 126 for my Yahoo group is all about Animal Antics.
We have to create a card, scrapook page or projcet that features an animal – even bugs are allowed. 

I wasn’t going to do it as I seemed to have so many ideas going around in my head that I was getting a little confused, but then wanted to try a Criss-Cross Card.  I’ve never done one of these previously.  I have seen them around “blog world” for some time.  As usual, I’ve adapted my card to fit the Australian standard envelope.

Once I put the Card together, I adhered Ribon around the bottom half & tied a bow.  I stamped my image onto a piece of Very Vanilla Cardstock using Basic Black Ink.  I coloured the image using my Aqua Painter, Basic Grey & Rose Red Inks.  This was adhered to a piece of Rose Red Cardstock.  Using SU Dimensionals, the whole piece was placed on the front of the card just a little off centre.

For the inside of my card, I again stamped the image in the bottom right hand side on Very Vanilla Cardstock & coloured the same as the front.  I sponged Rose Red around the end of the Very Vanilla Cardstock using my SU Sponges & Pastels.  This piece was adhered to a piece of Pumpkin Pie Caardsock.  Using Rose Red Re-Inker, I dyed 2 flowers & kept one of them the natural colour.  I adhered these together & mounted top left hand side of the card ensuring that the flower was not too far over so that I couldn’t slide the card into its pocket.  A Basic Pearl was stuck in the middle.

Supplies –
Stamp Set – Pun Fun
Ink – Rose Red, Basic Grey, Basic Black
Cardstock – Very Vanilla, Pumpkin Pie, Rose Red
DSP – Sweet & Sour Speciality
Ribbon – 5/8″ Organza – Whisper White
Accessories – Multipurpose Glue, Basic Pearls, Flowers, SU Sponge, Aqua Painter, Pastels
Until next time, Enjoy!

SSC 199…

I know, 2 days in a row, wonders will never cease!

Today’s card is taken from the sketch challenge over at Stamping 411  They always have a great sketch, not to mention the measurements!

Layer 1: 5-1/2 x 8-1/2″, scored at 4-1/4″ – Very Vanilla

Layer 2: 4 x 5-1/4″ – Wild Wasabi
Layer 3: 2-3/4 x 3-1/4″ – Rose Red
Layer 4: 2-5/8 x 3-1/8″ – Watercolour Paper

I stamped random images from “Growing Green” onto Wild Wasabi Cardstock, using Wild Wasabi Ink

I stamped the same image onto Water Colour Paper in Chocolate Chip Ink & using my Aqua Painter, coloured the image with Wild Wasabi Ink.  The flower image was stamped onto a scrap of Water Colour Paper again using Chocolate Chip Ink, coloured it with Rose Red Ink & my Aqua Painter.  I cut around the flower & adhered it to the Water Colour Paper using SU Dimensionals.  I stamped the sentiment in Chocolate Chip Ink.

I adhered this to a piece of Rose Red Cardstock, tied my ribbon across the top & adhered the whole section to my base card which is Very Vanilla Cardstock.

Supplies –
Stamp Set – Great Friend, Growing Green
Ink – Rose Red, Wild Wasabi, Chocolate Chip
Cardstock – Very Vanilla, Wild Wasabi, Rose Red, Watercolour Paper
Ribbon – 3/7″ Taffeta Real Red
Accessories – Multipurpose Glue, SU Dimensionals, Aqua Painter

Until next time, Enjoy!

Note Cards…

I had to quickly make a couple of cards the other day.  I love these for notes to friends or customers.

I decided to use the current “IN Colours” & Fifth Avenue Floral Stamp Set, along with my Aqua Painter.  This is the end result.

Coloured Card – 3 1/2″ x 5 1/2″
Whisper White Card – 3 3/8″ x 5 3/8″
I stamped the images onto Whisper White using my Versamark Ink Pad.  After applying White Embossing Powder over the images, I heated these with my Heat Tool.
I then decided to colour the flower images using my Aqua Painter & to match the inks with the “In Colour” Cardstock
Once dry, I adhered the Whisper White to the Coloured Card Stock.
All in all, a great way to create some quick cards.  In fact, they were posted the same day & now it is back to the drawing board for more ideas.
Supplies –
Stamp Set – Fifth Avenue Floral
Inks – Blusing Bride, Peach Parfait, Concord Crush, Poppy Parade, Versamark
Cardstock – Whisper White, Poppy Parade, Blushing Bride, Peach Parfait, Concord Crush
Accessories – Embossing Powder – White, Snail Glue, Aqua Painter, Heat Tool
Until next time, Enjoy!

Thinking of You…

It has been a couple of days since my last post.  I have been busy out in the garden, but now it is just too hot again, so with all housework, etc completed, music in the backbround, Tennis on TV – sound turned down, and my stamps everywhere, I can play!  What better way to spend Sunday arvo, except the beach or maybe fishing!

The inspiration for this card comes from the new sketch over at Stamping 411 and I have combined my group’s weekly challenge where we have to make a Sympathy card – see Here for the 1st card posted.

Again Stamping 411 have supplied the measurements for the sketch –

Base: 11 x 4 1/4″, scored and folded in half at 5 1/2″

Layer 2: 5 3/8″ x 4 1/8″ *** note: this is an extra layer, you could skip this one.. 😀
Layer 3: 5 1/4″ x 4″
Layer 4: 3 3/4″ x 3″
Layer 5: 3 5/8″ x 2 1/2″

For my card I used the Bigshot, Embossing Folder – Perfect Polka Dots – I am loving this folder, but you have probably guessed by now – and embossed Whisper White Cardstock

Taking a piece of Watercolour Paper, I randomly applied Shimmer Paint and allowed to dry.  If you are too impatient, this is where your Heat Tool comes in handy, but I am happy to do something else while waiting for Shimmer Paint to dry.  Wipe your Embossing Buddy over the Paper.  With your image, stamp over Watercolour Paper using Versamark.  While still wet, apply Embossing Powder – White, over the image.  Tap excess into your Tray, and heat image using your Heat Tool.  I love embossing as I love to watch the Powder change colour….

Using an Aqua Painter and Poppy Parade, colour your image.  This is the best part, as you can pick up the ink and with your Painter, lighten or darken your image until you are happy with the result.  I kept mine light as I wanted to keep the whole card very clean.  I then stamped my sentiment directly over the Shimmer.

I’ve found using Shimmer Paint, even the bright colour inks will look soft once stamped.  It also gives a completely different to Watercolour Paper.

Adhere this stamped paper to Poppy Parade Cardstock.  Adhere ribbon to the Embossed Whisper White RHS and adhere Poppy Parade to this piece of Cardstock.  Tie bow and adhere to card.

Supplies –
Stamp Set – Fifth Avenue Floral, Sincere Salutations
Inks – Poppy Parade
Cardstock – Whisper White, Poppy Parade, Watercolour Paper
Embossing Folder – Perfect Polks Dots
Ribbon – 3/8″ Taffeta – White
Accessories – Multipurpose Liquid Glue, Embossing Powder – White, Shimmer Paint,
Embossing Buddy, Aqua Painter, Heat Tool, Bigshot
Tip – Sentiments like “Thinking of You”, “For You”, etc make for great cards,
as they cover all types of occasions.
Until next time, Enjoy!