SC 04112…

Our challenge over at Sunny Challenges & Creations proved a lot harder for me than I thought it would.  I had an idea in my mind from the first time I saw the sketch, but when it come to creating it, well that idea went out the window & I ended up just winging this one.

The challenge was brought to us by Kris in the way of the sketch & using current “In Colours

Measurements –
Base Card – Whisper White – 8 1/4″ x 4 1/8″ or 21cm x 15cm
Layer 1 – Wisteria Wonder – 5 3/4″ x 4″ or 14.5cm x 10cm
Layer 2 – Whisper White – 5 5/8″ x 1 7/8″ or 14.5cm x 5cm
Layer 3 – DSP – 5 5/8″ x 2 1/8″ or 14.5cm x 5.5cm

Supplies –
Stamp Set – Delicate Doilies, Short & Sweet
Ink – Wisteria Wonder, Blushing Bride
Cardstock – Whisper White, Wisteria Wonder
DSP – In Colours
Ribbon – 3/8″ Ruffled – Wisteria Wonder
Punches – Modern Label, 2 1/2″ Circle
Accessories –  Snail Adhesive, Basic Pearls, Stampin’ Dimensionals, Tombow Multipurpose Glue
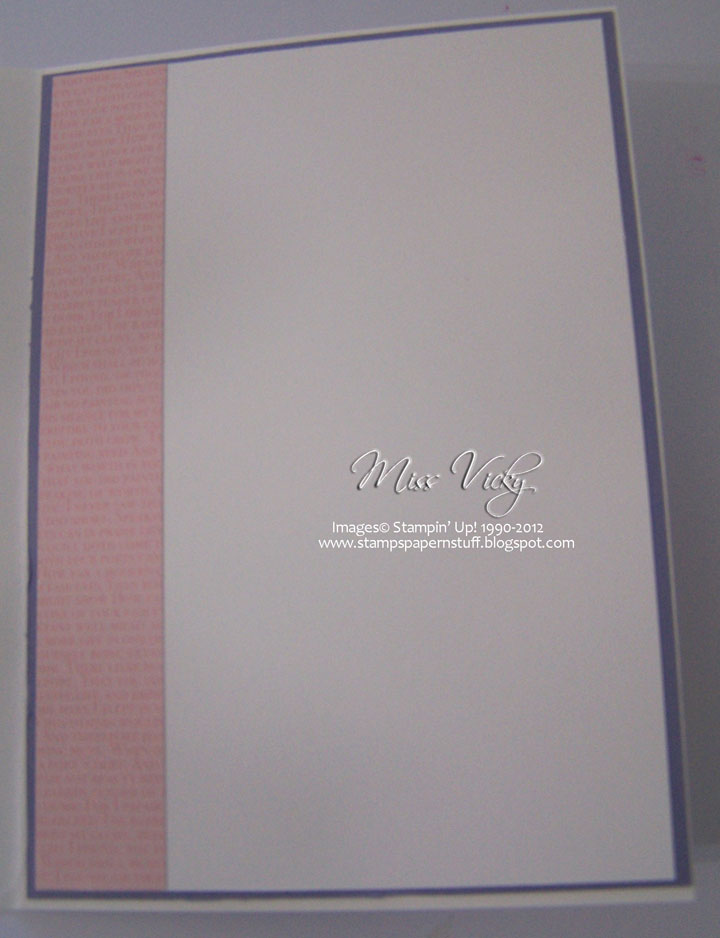
Inside…

I randomly stamped an image from Delicate Doilies using both Wisteria Wonder & Blusing Bride Inks.

I adhered the piece of DSP to the RHS piece of Wisteria Wonder Cardstock & then the stamped piece of Whisper White Cardstock using Snail Adhesive.  This piece overlapped the piece of DSP a little so that I wouldn’t have a space down the middle.

Ribbon was adhered along the bottom part of the Cardstock using Snail Adhesive, tucked the ends under & tied a bow.

I stamped the sentiment onto a scrap piece of Whisper White Cardstock with Wisteria Wonder Ink, punched out with the Modern Label Punch, applied 2 small Basic Pearls, one each side, added a couple of Stampin’ Dimensionals & adhered to the bottom RHS side of the card.

The whole piece was adhered to the Base Card – Whisper White with Snail Adhesive.

For my centre piece, I stamped the image 3 times onto a scrap piece of Whisper White Cardstock, and once onto another piece.  The last piece was punched using the 2 1/2″ Circle Punch.  I realised that I don’t use this punch nearly enough!  This large punched piece was adhered to the card with Tombow Multipurpose Glue.

With the 3 stamped images, I cut around them at different areas of the stamp.  I did confuse myself a little here as I wasn’t too sure where I was going, but the idea had been in my head since seeing this stamp set & finally got to do it!

The 3 images were then layered on top of each other using Stamping Deimensionals.  I applied a Basic Pearl to the centre to finish it off.

I love the Ruffled Ribbon from Stampin’ Up!  Another item I don’t use enough of.

I’m really happy with the card & the soft look it has.  I think this stamp set calls for a soft delicate look.

Now it is your turn to pop over to Sunny Challenges & Creationsto check out what Gwen Kris & Tanya have created, as well as our weekly guest designers.  Create your project using the challenge & link back with Mr Linky.

Until next time, happy stampin’

SC 040/12…

Happy Mother’s Day to all the mums of the world!  Hope you all have a great day & get spoilt rotten!

Our new weekly challenge over at Sunny Challenges & Creations starts today.  This week we have only the sketch to go by.  Gwen has been very easy on us!

I started out with a completely different card in mind, had it all made up in my head & then blow me down if I couldn’t find the stamp set.  I then convenienced myself that I didn’t even have the set I wanted to use!  The final result turned into a very quick 5 minute card, but these are good to do.

In fact, this card is going in the mail today!

Measurements –
Base Card – Chocolate Chip – 8 1/4″ x 5 7/8″ or 21cm x 15cm – Scored in the middle & folded in half
Layer 1 – DSP – 5 1/2″ x 3 7/8″ or 14cm x 10cm
Layer 2 – Chocolate Chip – 2 1/2″ x 2″ or 6.5cm x 5.5cm
Layer 3 – DSP – 2 3/8″ x 1 7/8″ or 6cm x 5cm
Layer 4 – Chocolate Chip – 4 1/2″ x 1 7/8″ or 11.5cm x 5cm
Layer 5 – Whisper White – 4 3/8″ x 1 3/4″ or 11cm x 4.5cm

Supplies –
Stamp Set – Forever Young, A Word for You
Ink – Chocolate Chip, Pool Party
Cardstock – Chocolate Chip, Pool Party, Whisper White
DSP – In Colours DSP
Punches – Modern Label
Accessories – Snail Adhesive

I adhered the smaller piece of DSP to the small piece of Chocolate Chip Cardstock prior to adhering to the large piece of DSP & then to the Base Card – Chocolate Chip.

I stamped my greeting onto a scrap piece of Whisper White Cardstock in Chocolate Chip Ink, punched using the Modern Label Punch &adhered to the DSP with Snail Adhesive.  My image was stamped direct onto Whisper White Cardstock with Pool Party Ink & adhered to the long piece of Chocolate Chip Cardstock & then to the Base Card.

As I said a very easy 5 minute card!

I hope you can join us this week over at Sunny Challenges & Creations as we would love to see what you come up with using the sketch.

What some inspiration????  Then why not pop over & see what Gwen, Kris & Tanya have created as well as our very talented Weekly Guest Designers.  They are fantastic!!!!!!

Until next time, Happy Stampin’

SC 038/12…

Crikey these weeks come round fast.  It just seems like yesterday that I posted the card for the challenge, but of course a new week sees a new challenge over at Sunny Challenges & Creations.

Along with the sketch we had to use the current “In Colours“.  I chose to use a couple of colours that will be retiring come September.  I will admit I have not used these colours as much as I should have.

Measurements –
Base Card – Poppy Parade – 8 1/4″ x 5 7/8″ or 21cm x 15cm – Scored in the middle & folded in half
Layer 1 – Whisper White – 5 1/2″ x 3 7/8″ or 14cm x 10cm
Layer 2 – Poppy Parade – 2 1/8″ x 3 1/2″ or 9cm x 5,5cm
Layer 3 – DSP – 2″ x 3 3/8″ or 8.5cm x 5cm
Layer 4 – Poppy Parade – 3 7/8″ x 2 3/4″ or 10cm x 7cm
Layer 5 – Whisper White – 3 3/4″ x 2 5/8″ or 9.5cm x 6.5cm

Supplies –
Stamp Set – Growing Green
Ink – Pear Pizzazz, Peach Parfait, Poppy Parade
Cardstock – Whisper White, Poppy Parade
DSP – In Colours Designer Series Paper Patterns
Punches – Itty Bitty
Embossing Folders – Square Lattice
Ribbon – 1/2″ Stitched-Poly – Peach Parfait
Accessories – Tombow Multipurpose Glue, SU! Dimensionals, Rhinestones, Mini Glue Dots, Blender Pen

I inked my image with Pear Pizzazz Ink & stamped direct onto the small piece of Whisper White Cardstock.

Envelope & Inside Card…

Using my Blender Pen, I coloured my image with Peach Parfait, inking my Pen a little at a time.  Feeling that it needed a little bit of a lift, I then added dashes of Poppy Parade Ink & blended with my Blender Pen.  The piece was run through the Bigshot using the Square Lattice Embossing Folder & adhered to the piece of Poppy Parade Cardstock with Tombow Multipurpose Ink.

I punched 3 small flowers using flower punch from the Itty Bitty Punch Set, worked out where I wanted to place them, applied Tombow to the back of each & adhered to the larger piece of Whisper White Cardstock.  I adhered the piece of DSP to the piece of Poppy Parade Cardstock &then to the large piece of Whisper White Cardstock. The whole lot was then run through the Bigshot & Embossing Folder – Square Lattice.

I adhered the piece of Ribbon across the width of the embossed piece, adhered the stamped piece to the top of the card with SU! Dimensionals, tied a bow, adhered to the card with Mini Glue Dots, & adhered 3 Rhinestones to the DSP flowers

All in all a very easy card, once which I am really happy with.  When making it, I didn’t realise that it would be so clean & white!  My type of card!

Want to be our next Ray of Sunshine & become a Weekly Guest Designer?  Then hop on over to see what Gwen, Kris & our Weekly Guest Designers have created for you, create your project & link back using Mr Linky.  We love seeing your creations & leaving you all comments. 

Until, next time, Happy Stampin’

Friday’s Case…

Our task today was to create a crad using the Technique – Faux Silk.  I love this technique that I thought we would try using tissue for our flowers too…..  I love the final look of the card.  I have cased the idea from Lori.

Measurements –

Base Card – Pear Pizzazz Cardstock – 11 3/4″ x 4 1/8″ or 30cm x 10.5cm – Scroed in middle & folded in half
Layer 1 – Whisper White Cardstock – 5 5/8″ x 4″ or 14.5cm x 10cm
Layer 2 – DSP – 5 1/2″ x 3 7/8″ or 14cm x 9.5cm
Layer 3 – Pear Pizzazz Cardstock – 3 3/8″ x 2 3/8″ or 8.5cm x 6cm
Layer 4 – Whisper White Cardstock – 3 1/4″ x 2 1/4″ or 8cm x 5.5cm

I adhered my DSP to Whisper White Cardstock, layered a piece of Ribbon towards the bottom half of the DSP, tucked the ends under & adhered to the Base Card – Pear Pizzazz.

I will do up a tutorial on how I did my Faux Silk & flowers so be sure to check back tomorrow…….

After adhering all my flowers together with a Brad & applying a Pearl to the centre using Crystal Effects, adhering to the Base Card, I stanped my sentiment onto Whisper White Cardstock, punched using the Large Oval & adhered to a piece of Pretty in Pink Cardstock which had been punched with the Scallop Oval Punch.

My butterflies were cut using my Bigshot & the Embossit Dies, adhered together & a Pearl applied to the centre before being adhered to the top of the card…..
Supplies –
Stamp Set – Just Believe, Short & Sweet
Ink – Pear Pizzazz, Pretty in Pink
Cardstock – Pear Pizzazz, Pretty in Pink, Whisper White
DSP – In Colours Designer Series Pattern Stack
Embosslits Dies – Beautiful Wings
Punches – Scallop Oval, Large Oval
Ribbon – 1/2″ Stitched-Poly – Pear Pizzazz
Accessories – Pearls, Snail Adhesive, Crystal Effects, Brads
Non-SU – Tissue Paper
Until next time, Enjoy!

MC 94…

I am in the middle of creating a couple of cards for my cousin, but as usual got a bit side tracked.  Sometimes it is good to be do this, or so I tell myself, as it refreshes your mind.

??
I went in search of a challenge & thought I would have a go at the one over at A La Carte Monkey, one which I’ve never done before.  Anyhow, this week it is all about Birthdays.  We can never have enough Birthday Cards in our stash!
Measurements –
Base Card – Whisper White – 11 3/4″ x 4 1/4″ or 30cm x 10.5cn – Scored in the middle & folded in half
Layer 1 – Night of Navy – 5 3/4″ x 4″ or 14.5cm x 10cm
Layer 2 – DSP – 5 5/8″ x 3 7/8″ or 14cm x 9.5cm
Layer 3 – Night of Navy – 4 1/2″ x 3 1/2″ or 11.5cm x 9cm
Layer 4 – Whisper White – 4 3/8″ x 3 3/8″ or 11cm x 8.5cm
?
Envelope & Inside…

?Using Staz-On Ink, I stamped my image 3 times onto the piece of Whisper White Cardstock.  I wanted to fill the white space while at the same time, keep the white space, if that makes any sense.

??
Grabbing my Blender Pen & SU! Marker – Poppy Parade, I coloured parts of the sails, along with a small part of the boat.  I drew a couple of birds with my Stampin’ Write Journal?er.
I adhered this piece to the smaller piece of Night of Navy, then to the DSP & finally to the larger piece of Night of Navy with Snail Adhesive.  I adhered a piece of Ribbon down the Left Hand Side of the card, tied a knot & adhered the whole lot to the Base Card, again with Snail Adhesive.
My greeting was stamped onto a scrap of Whisper White using the Night of Navy SU! Marker and cut into the shape of a flag.  I threaded a piece of Linen Thread through a button prior to adhering to the banner & finally to the card.
Supplies –
Stamp Set – Seaworthy, Under the Big Top
Ink – Staz-On
Cardstock – Whisper White, Night of Navy
DSP – Poppy Parade
Ribbon – 1/4″ Grosgrain – Night of Navy, Linen Thread
Accessories – Snail Adhesive, Blender Pen, Stampin’ Write Journaler
Non-SU – Button 
Until next time, Happy Stampin’