Journal, Diary or …

… just a Notebook!006aablog

Today’s post is one I created last month for a local market I attend each month.  It was of the first items I sold.  I am even thinking of redoing it for myself!

I love the colours of the book.  I’ve used a lot of retired stuff – DSP, Ribbon & Stamp Set, but I was happy with the final result.

The word “Journal” was created using MDS along with the blue line.  the flowers are from the lovely retired Stamp Set – Oh, Hello which I have coloured with Marina Mist & Wild Wasabi Markers prior to stamping around the Oval, Ribbon from 2013 SAB & the DSP is the Gorgeous “Walk in the Park“.  I did say that I have a lot of retired DSP!  The Cardstock down the spine is Soft Sky.

Until next time, Happy Stampin!

Vicky

Another Niece….

Are you sick of my scrapbooking yet????  As I previously stated, I am loving getting back into my photos…  so many that I had forgotten, so many that bring back memories – happy & sad!!!!!

For this layout, I went into my albums to find inspiration.  It is always a great source of inspiration to go looking at your old pages for ideas.  All you have to do is revamp with newer papers, cardstock & embellishments.  Believe me, you will think they are completely different layouts!

I do a lot of colour-blocking for my pages and for this one I used retired DSP, although it is from the same pack.  After SU retires its papers, you think that they could not possibly bring out nicer DSP, but how wrong you are.  Each year, the DSP is just as great or better than the previous year.

I wanted to keep with the greys, as in Bonnie’s cardigan while at the same time pick up the little bit of cream/yellow/lemon on the temple walls.  I think I succeeded without going over the top!  This is of Bon on her big school trip to Sydney!!!!!

With colour-blocking, you don’t have to use a lot of embellishments.  I kept this page to a minimum, only going with ribbon & the metal tag….

For what looks like a 5 minute page, it did actually take me about an hour….  I know, I like to play with this & that, try my papers this way & that until I feel that I have captured the photo.

Supplies –
Cardstock – Textured Riding Hood Red, Whisper White
DSP – Walk in the Park
Ribbon – 3/8″ Taffeta – Riding Hood Red
Accessories – Snail Adhesive, Sticky Strip, SU Marker – Basic Black
Non-SU – Metal Tag
Until next time, Enjoy!

Happy New Year…

I hope you all had a great new year & didn’t celebrate too much!!!!  I had a very quiet one & didn’t even see the new year in!

After some thinking, toing & froing, I have decided to start “Scrappy Saturday” once again.  I do realise I am a little late in posting this one.  I have been busy doing their wedding invitations.
It has been so long since I did this, that I thought it would be a great way for me to get into my scraping again & who knows may even give you some incentive to start your journey too……
Along with a sketch each Saturday & my take on it, I will be offering some tips, techniques, storage ideas both for albums, photos, etc along the way.  Hey, every little bit helps!!!!!!
Again I’ve used a photo of my niece & her finance….  I have so many lovely photos of their pre-engagement that it just seems a waste not to put them into a lovely album.  You will probably be sick of looking at them by the time I am through, but I will try & mix them up a little.
I used Crumb Cake Textured Cardstock for my base, layered a piece of DSP to the top half with a piece of Riding Hood Ribbon across the join.
I matted a piece of DSP onto a piece Garden Green Cardtsock, then to a piece of Riding Hood Red Cardstock before adhering to the Layout. 
I decided not to matt the photo, but left a small trim of the photo paper around to make a small  edge.  In real life, it looks like it has been matted onto Whisper White.  It gives a little bit of a different look & also introduces a little white into the layout as Dannii has her white dress.
I cut 2 long thin strips of DSP, adhered them to the layout.  
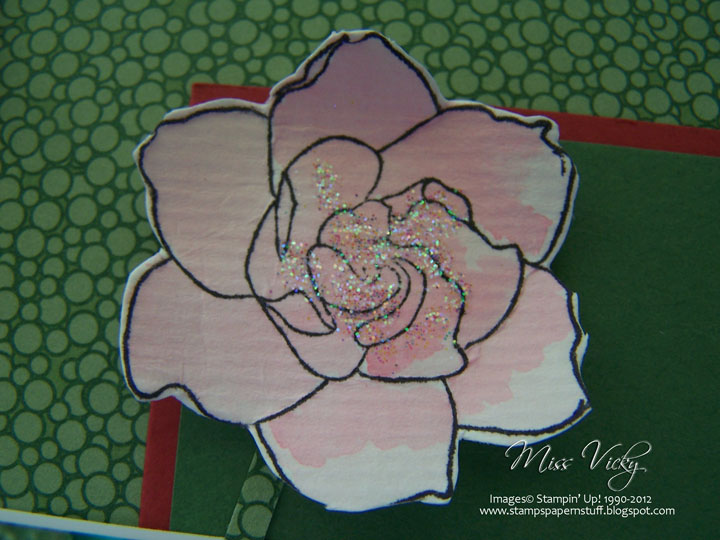
I stamped the images onto Watercolour Paper with Staz-On & using my Aqua Painter, coloured one with Pretty in Pink & Regal Rose, while the other is So Saffron.  I added a little Dazzling Diamonds with 2-Way Glue to both centres.  These images were cut out & adhered to the page with Stampin’ Dimensionals.
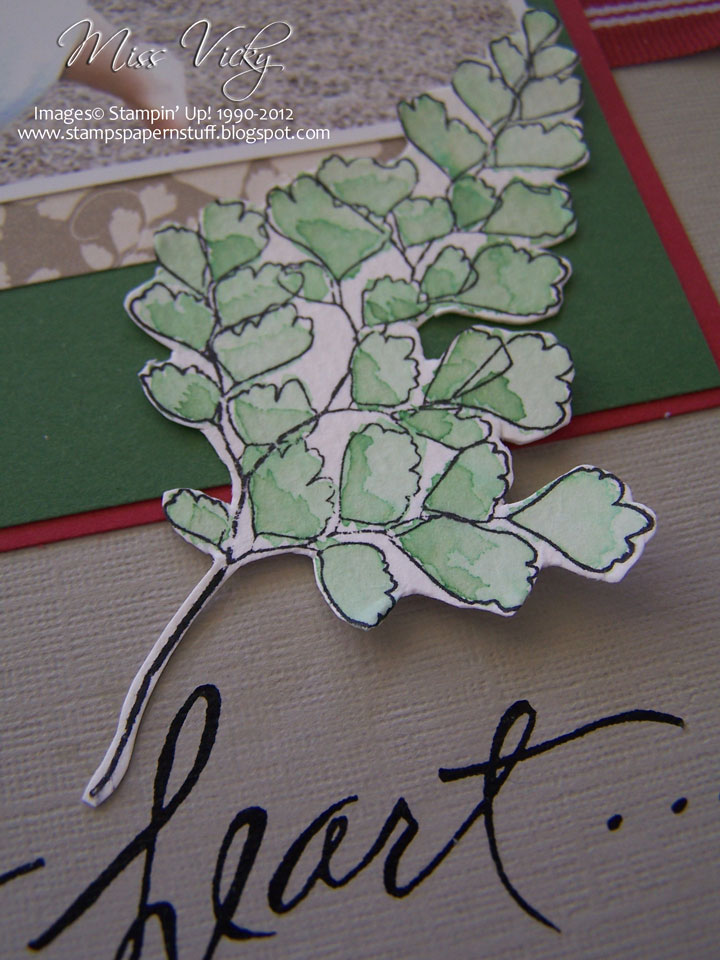
For the leaf, I again coloured with my Aqua Painter & Garden Green Ink, before cutting around the image & adhering to the layout with Multipurpose Glue.
The wording is from from stash before Stampin’ Up!
While cleaning up, I have come across albums of “Stuff” which I have not used in years, so this will be a great opportunity to use it.  You will also be seeing some retired DSP – I thought it a good way to use it up, as I don’t use it for classes or workshops.
Supplies –
Stamp Set – Growing Green
Ink – Staz-On, Garden Green, So Saffron, Regal Rose, Pretty in Pink
Cardstock – Textured Crumb Cake, Garden Green, Riding Hood Red, Watercolour Paper
DSP – Woodland Park (Retired)
Ribbon – 5/8″ Grosgrain Striped – Riding Hood Red (Retired)
Accessories – 2-Way Glue, Multipurpose Glue, Snail Adhesive,
Dazzling Diamonds, Aqua Painter, Stampin’ Dimensionals
Non-SU – Rub-On
This layout also fits the current challenge over at Sunny Challenges & Creations…. to create anything but a Christmas Theme.  Why not give it a try.  You have until Saturday arvo!
Until next time, Enjoy!

Post-It Notes

Today, I’m in the middle of making a couple of pressies, but lucky the friends don’t read this blog, so I am able to show them.  This is the first part, being Posist-It Notes.
 

Post-It Notes –
Vintage Vogue –
– Open –
Supplies –
Stamp Set – Vintage Vogue
Ink – Always articholke
Cardstock  – Close to Cocoa, Whisper White
DSP – Walk in the Park
Punches – 1″ Circle
Accessories – Sticky Strip, GRosgrain Ribbon – Always Artichoke
Non-SU – Post-It Notes

Cottage Garden –
Supplies –
Stamp Set – Cottage Garden
Inks – Rich razzleberry, Almost Amethyst
Cardstock – Kiwi Kiss
DSP – Cottage Wall
Accessories – Sticky Strip, Polka Dot Grosgrain Ribbon – Rich Razzleberry
Non-SU – Post-It Notes, Magnets
 

Tip – I’ve used magnets which I’ve had lying around the house.  On the Cottage Garden one, I cut them in a rectangle, while on the Vintage Vogue sample, I’ve used the 1″ Circle Punch.  Both ways work well!
 

Until next time when I will post the remaining part of the gifts, enjoy!


Challenge – TSSC101

Hello Stampers,
I have finally manged to get home – for a couple of hours – chasing up stuff, etc & then on my way again!
I did this challenge late last night when it come through.  Not exacly what I had planed but still I am happy with it – maybe????
Card Sample
Supplies –
Stamp Set – Always
Cardstock – Whisper White, Pink Pirouette, Riding Hood Red
DSP – Walk in the Park – Retired
Ink – Pink Pirouette, Going Gray
Punches – 1 3/8″ Circle, 1 1/4″ Circle, 1/2″ Circle
Accessories – Snail Adhesive, Dimensionals, Pretties Kit

All in all this turned out to be a very easy 5 minute card, ie once I knew what colours I was going to use.  I have just realised that the DSP is not current, although it can always be replaced with one of the lovely current Designer Papers. 

To lift the card a little, I added the small gray flower inside the “Always”.
  It looked a little dull prior to that & I didn’t want to used Dazzling Diamonds.  I seem to be overloading on that stuff at the moment!

I have tried to vere away from the traditional colours of Valentine – to a certain extent I have! 
Until next time, Happy Stampin’
Vicky