Challenge 126…

Challenge 126 for my Yahoo group is all about Animal Antics.
We have to create a card, scrapook page or projcet that features an animal – even bugs are allowed. 

I wasn’t going to do it as I seemed to have so many ideas going around in my head that I was getting a little confused, but then wanted to try a Criss-Cross Card.  I’ve never done one of these previously.  I have seen them around “blog world” for some time.  As usual, I’ve adapted my card to fit the Australian standard envelope.

Once I put the Card together, I adhered Ribon around the bottom half & tied a bow.  I stamped my image onto a piece of Very Vanilla Cardstock using Basic Black Ink.  I coloured the image using my Aqua Painter, Basic Grey & Rose Red Inks.  This was adhered to a piece of Rose Red Cardstock.  Using SU Dimensionals, the whole piece was placed on the front of the card just a little off centre.

For the inside of my card, I again stamped the image in the bottom right hand side on Very Vanilla Cardstock & coloured the same as the front.  I sponged Rose Red around the end of the Very Vanilla Cardstock using my SU Sponges & Pastels.  This piece was adhered to a piece of Pumpkin Pie Caardsock.  Using Rose Red Re-Inker, I dyed 2 flowers & kept one of them the natural colour.  I adhered these together & mounted top left hand side of the card ensuring that the flower was not too far over so that I couldn’t slide the card into its pocket.  A Basic Pearl was stuck in the middle.

Supplies –
Stamp Set – Pun Fun
Ink – Rose Red, Basic Grey, Basic Black
Cardstock – Very Vanilla, Pumpkin Pie, Rose Red
DSP – Sweet & Sour Speciality
Ribbon – 5/8″ Organza – Whisper White
Accessories – Multipurpose Glue, Basic Pearls, Flowers, SU Sponge, Aqua Painter, Pastels
Until next time, Enjoy!

SSC 204…

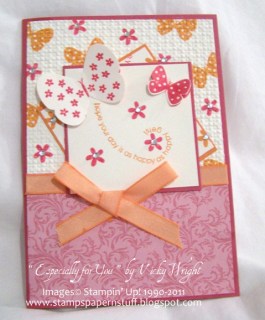
While all my craft stuff is out & about – usually spread over 2 rooms – thought I would give the challenge over at Stamping 411 a go.  I haven’t done one of these for quiet some time.  Mind you, I am still tossing up about this card.  I think it may be the colours, as I find it very hard to get my head around these colours.  In saying that, I think it would make for a great girl’s card!
Once again Stamping 411 have done all the measurements required for this card.  Don’t you just love that?
Layer 1: 5-1/2 x 8-1/2″, scored at 4-1/4″ and folded in half – Rose Red

Layer 2: 4 x 5-1/4″ – Very Vanilla & DSP

Layer 3: 3 x 3″ square, tilted a bit – Pumpkin Pie & Very Vanilla
Layer 4: 3 x 3″ (or other shape) – Rose Red & Very Vanilla

Don’t forget your ribbon/bow combo!

I randomly stamped flower images using Rose Red Ink & Pumpkin Pie for the Butterfly images onto Very Vanilla.  I run the Very Vanilla through the Bigshot using an Embossing Folder.  The DSP was then adhered to the bottom of the card.  I adhered Taffera Ribbom along where the 2 textures meet.
Using Pumpkin Pie Ink, I randomly stamped the flower images & the verse using Rose Red onto the Very Vanilla square & ahered it to the Pumpkin Pie square.  I then stamped a small butterfly onto a spare piece of Very Vanilla using Rose Red, cut it out & set it aside.  I repeated the same with larger butterfly image, except I punched an image using my Punch

Using Pumpkin Pie Ink, I stamped the words onto the 2nd piece of Very Vanilla, Butterflies & flowers images were stamped using Rose Red Ink.  I then adhered the spare butterfly images over the top of the images on the Very Vanilla Cardstock & attached over the top of the 1st square.  The whole lot was then adhered to the Base Card – Rose Red.

To pick the look up & to give it a little bit of depth, I added Rhinestones to the centre of the flowers – gotta love these Rhinestones….  I tied a bow & adhered to card.

Supplies –
Stamp Set – Flight of the Butterfly
Ink – Rose Red, Pumpkin Pie
Cardstock – Very Vanilla, Pumpkin Pie, Rose Red
DSP – Sweet & Sour Speciality
Punches – Butterfly
Embossing Folder – Square Lattice
Ribbon – Taffera – Pumpkin Pie
Accessories – Multifpurpose Glue, Snail Adhesive, Bigshot, Basic Rhinestones

Until next time, Enjoy!

CCMC 149…

Yes, another posting & another challenge.  You may need your sunglasses for this one.  When I saw the challenge, I wanted to use the DSP – Sweet & Slumber, while at the same time using Basic Black Cardstock.
This challenge comes from Create with Connie & Mary  Why not hop over & have a go yourself!
Base Card – Basic Black – 5 7/8″ x 4 1/8″ or 15cm x 10.5cm – Score & Fold in half
Layer 1 – Daffodil Delight – 4 1/2″ x 3 1/2″ or 11.5cm x 6.5cm
Layer 2 – DSP – 4 3/8″ x 3 3/8″ or 11cm x 6cm
Layer 3 – Tangerine Tango – 3″ x 2 3/8″ or 9cm x 6.5cm
Layer 4 – Whisper White – 2 7/8″ x 2 1/4″ or 8.5cm x 6cm

I randomly spread Shimmering Paint – Frost White over the Whisper White Cardstock & allowed to dry.

Prior to adhering DSP to my Daffodil Delight Cardstock, I punched corners of both pieces using my Corner Edge Punch.  This was adhered to the Base Card, as per the sketch. 
Using Tangerine Tango & Daffodil Delight Inks & SU Sponges, I sponged over the top of the Shimmer Paint.  I stamped the butterfly image using Basic Black Ink.  This was adhered to Tangerine Tango & then to the card.
I cut a small piece of Daffodil Delight Cardstock & punched one side using my Scallop Edge Punch.  I then attached Basic Black Grosgrain Ribbon along the middle of this piece & tied a bow prior to adhering to the card.

Again, I have no sentiment.  I find this sometimes covers a lot of occasions.
Supplies –
Stamp Set – All a Flutter
Ink – Basic Black, Daffodil Delight, Tangerine Tango
Cardstock – Whisper White, Daffodil Delight, Basic Black, Tangerine Tango
DSP – Sweet & Sour Speciality
Punches – Scallop Edge, Corner Edge
Ribbon – Grosgrain 1/4″ – Basic Black
Accessories – Multipurpose Glue, Shimmer Paint – Frost White, SU Sponges

Until next time, Enjoy!

FTL 136…

Today’s card is for the challenge over at Clean & Simple Stamping  On seeing this sketch, “DSP – Sweet & Sour Speciality” jumped into my hands.

Base Card – Rose Red – 5 7/8″ x 4 1/8″ or 15cm x 10cm – Fold & Score
Layer 1 – Very Vanilla – 5 3/4″ x 4″ or 14.5cm x 9.5cm
Layer 2 – DSP – 3″ x 3 7/8″ or 7.5cm x 9cm
Layer 3 – DSP – 1 1/2″ x 3 7/8″ or 7.5cm x 9cm

I adhered my 2 pieces of DSP onto Very Vanilla Cardstock & adhered this to the Rose Red Base Card

For my ribbon, I decided to use a piece of DSP, but fold it for a little bit of a different look.  I cut a strip of DSP & scored along the piece.  I then proceeded to fold the DSP so that the folds would run down the card similiar to a ladder.  I adhered this to the card.
After cutting Very Vanilla Cardstock with my Bigshot & Sizzlit Dies, I sponged the edges with Pumpkin Pie Ink & a Dauber.  I stamped the sentiment in Basic Black Ink.  I cut my butterfly with the Bigshot & Embosslit Dies & sponged using my Dauber & Pumpkin Pie.  I adhered this to the sentiment & using SU Dimensionals, adhered it to the card.  I adhered Basic Pearls to the middle of the Butterfly.

All in all a great sketch!

?Supplies –
Stamp Set – Short n Sweet
Ink – Basic Black, Pumpkin Pie, Rose Red
Cardstock – Very Vanilla, Rose Red
Embosslit Dies – Beautiful Wings, Lots of Tags
DSP – Sweet & Sour Speciality
Accessories – Multipurpose Glue, SU Dauber, Basic Pearls
Until next time, Enjoy!

Dragonflies…

What I thought would be an easy sketch ended up challenging me.  The sketch is from Cards & Things & by rights should have been a great sketch.  Well try telling that to my inactive creative side of the brain.  I think we had a bit of a sleepy day!

Anyhow, after some deliberation & toing & froing, I decided on a card for the girls.  I haven’t made that many lately & they always come in handy for the unexpected birhday.

Instead of placing circle on cirle, I placed the Very Vanilla Circle off-centre to the Pumpkin Pie Circle, giving it a little bit of a different look.  I am quiet happy with the look.  I flipped the card somewhat and come up with the following card –

Supplies –
Stamp Set – Bugs & Kisses
Inks – Rose Red
Cardstock – Pumpkin Pie, Rose Red, Very Vanilla
DSP – Sweet & Sour Speciality
Bigshot Dies – Circles # 2
Accessories – Snail Adhesive, Basic Pearls
Until next time, Enjoy!