Who doesn’t love receiving happy mail? I know I do! It is such a change to the bills we all hate receiving. I now hop out to collect the mail in anticipation of whether or not I will receive a RAK card. Mind you, I am just more than happy sending them off knowing that I may be putting a smile on someone’s face for the day than receiving.
You opt in each month as to whether or not you would like to be part of the group & then you randomly select a few people from the group who are participating for the month to send off a RAK card to. It is amazing to see how it brightens someone’s day!
I’ve made it a goal to send out no less than 2 per week. Not only does it give me great enjoyment creating the card but knowing that it may put a smile on someone’s face at the end of a long day.
My card today was created for one of my May RAK’s. No, they don’t have to be all different. I don’t have a tutorial for you today as I posted them off before I did one.
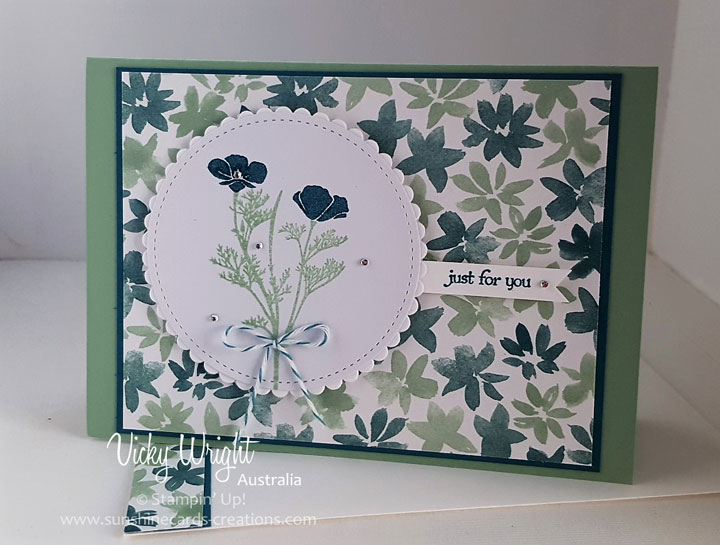
I layered a piece of “Blooms & Bliss”
DSP (retiring) to a piece of
Whisper White Card & then to the
Base Card – Island Indigo.

I stamped the stem image from the “Wild About Flowers” Stamp Set onto a piece of Whisper White Card in Mint Macaron Ink (retiring & will be very sad to see this colour go) & then stamped the flowers in Island Indigo Ink before die cutting with the oval from the Stitched Shapes Framelits.
A piece of Mint Macaron Card was die cut using the scallop oval from the same set, adhered to the stamped oval & adhered to the Card Front with Stampin’ DImensionals.
The sentiment is from “Teeny Tiny Sentiments” Stamp Set, stamped onto scrap Whisper White Card in Island Indigo Ink, punched with the Classic Label Punch & adhered to the Card Front with Stampin’ Dimensionals.
To complete my card, I tied a small bow using Whisper White Baker’s Twine (retired), attached it to the stem with a Mini Glue Dot & scattered Rhinestones to the centre of the flowers, randomly around the Card Front & to the greeting.
I was really happy with this card so fingers crossed the receiver is too.
Would you like to receive one of my cards? All you have to do is click on the link below & ask to join. No, you don’t have to be a Stampin’ Up! Demonstrator.
Until next time, Happy Stampin’
Vicky
Like this:
Like Loading...


 my colour codes in one place. I don’t know about you but I had them everywhere & was sick of trying to find them when required. I must say a big thank you to those lovely people who do the codes each year & share, share & share. They are so very helpful. Your work never goes unappreciative.
 am a little behind in posting our creations, but I am slowing getting there.
 seeing this card on

 The sentiment from “Teeny Tiny Sentiments” was stamped onto scrap Whisper White Card in Island Indigo Ink, cut down to size, banner shape cut in the right hand end & adhered to Card Front with Stampin’ Dimensionals.