Yesterday I shared with you a card using the Eclipse Technique.
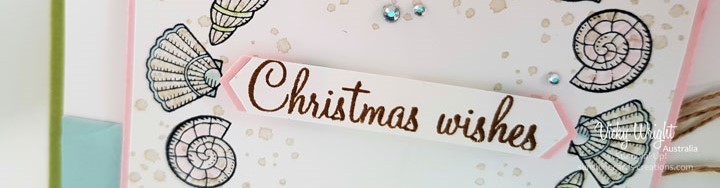
Well today, I am sharing another using the same technique but this time round it is a Christmas Card which was created in one of my classes back in February. Is it too early to make a start on our Christmas cards?
The Eclipse Technique is available to download by clicking on the Free Technique Tutorials Page. Print it out, file in a folder & keep on hand to use or to refer back to at a later date.
Yes, SU! Demos are able to use them for your classes, workshops & demonstrations. It just means that all the work is done for you, except of course your samples.
To download your free card tutorial on how I created my card, please click on the link above the photo.
Remember to use the Host Code for April when shopping Online
My post today is going to be short (on the way out the door) but a card which was created a little while ago but never shared. Anyhow, it is always to get an early start on your Christmas cards.
If you click on the link below, you will be able to download a free tutorial to create your own card. The card can be used for any occasion so all you have to do is change out the stamp & DSP.
I certainly hope you all had a lovely relaxing & happy Christmas spending time with family & friends.
I created the card today some time ago, originally for a blog hop but it completely slipped my mind.
When I first saw Beachy Little Christmas in the 2017 Holiday Catalogue, I saw a wreath using the shells. I’m quite happy with the result. In fact, we eventually did it in one of our classes & the ladies loved it especially when they could see another way of using the images. I must say the set suits our lifestyle down the coast of Australia.
Don’t forget if you click on the link below, you can download your own tutorial to create your card. The tutorial includes a list of supplies plus measurements (metric & imperial).
My card today is one I’ve cased using a number of different designs from Pinterest. I took little bits of inspiration from 4 or 5 cards & put them all on 1 card. I think it has worked & it is not too busy, but please let me know what you think?
I love the Holly Berry HappinessStamp Set which is in the 2017-2018 Annual Catalogue. I think it is one that has been missed but one with a bit of a WOW factor when you use it! You are able to create simple, yet lovely creations using the set.
I’ve actually used my Cherry Cobbler& Old Olive Stampin’ Blendsto colour the images…… Love these! Did you know you can purchase them individually or in a combo pack of 2?
By clicking on the link below, you are able to download a free tutorial to create your own card or to use the layout to create an entirely different card. Yes, the tutorial includes all measurements (metric & imperial) along with a list of supplies used.
When shopping Online, don’t forget to add in the Host Code – JW27ZGPY. Check out the Clearance Rackwhile you are there.
… meets “Christmas in the Making” which is on Page 16 of the 2017 Holiday Catalogue. I love it when I can get multiple uses from my stamps.
I actually love the “Feeling of Christmas” on the same page but left it too late for my order to arrive in time for the class, so I set about trying to recreate the card on Page 17 of the Catalogue using one of my sets in my stash. I think I did it, although a little different, but different is good!
My card today is one of the 2 we created in our “Cards @ Toogoom” class. I am happy to say the ladies loved it!
Over the past month or so I have slowly been scrapping away at my niece’s photos & getting them posted to her. Some I have kept for future Memories & More Scrapbooking Classes (check out the Class Page) while others have gone straight down to her. Bonnie is loving the surprise of opening the packages & not knowing what photos have been done or if photos have been included…
Today’s page is one we created in our class on Sunday week. It is going to be repeated later on at the request of a couple of ladies who couldn’t make it on the day but want to create the pages. There have been a few ladies saying that they will be back to do the same class again, as they have heaps of photos to scrap. This means that the pages will look totally different with new photos.
For my page I cut a piece of the retired “Peace This Christmas” DSP, adhered to a strip of Garden Green before adhering to a piece of Very Vanilla& then to Cherry Cobbler Card. The Garden Green & Cherry Cobbler are part of the with the “Be Merry” Cardstock Pack.
A piece of Very Vanilla was cut back to size so that we could fit 4 x photos on it & adhered to the Cherry Cobbler Base. Some of the ladies settled for 2 x photos which looked fine on the layout.
They were then adhered down the side of the page, the bows adhered to the tops with Mini Glue Dots& Cherry Cobbler Candy Dots (retired) adhered to the branch.
For the title, we cut a banner shape into each end, adhered a couple of the left over holly images to each end along with the Candy Dots before adhering to the bottom part of the page.
To finish off the page, some of the ladies then scattered a couple of the Candy Dots around the page.
The page would suit the new Be Merry DSPtoo. It is just that my order didn’t arrive in time. The ladies were more than happy to see how I use the retired DSP. Mind you the pages were great sellers for both the Stamp Set & DSP.
Be sure to check out the Class Pagefor our next class. We will be creating 2 beach pages. All you need to bring is yourself & or a friend. Everything is supplied.
Be sure to check back in a few days time when I will show you our 2nd page.