Lovely as a Tree……

….  meets a Gatefold Fold.

This is one of our cards we craeted in our Technique Class on Sunday – Shaving Cream!  Now if you have never used this to create a background for your creations or anything else for that matter – do it! 

We had a lot of fun on Sunday, with heaps of laughs, shaving cream everywhere including in one of the ladies hair.  The best part about this technique – everyone’s cards will be different!

 
Pop back in a coupl eof days & I will be posting the 2nd card we created using this same technique.
 
Until next time, Happy Stampin’
 

Technique Class….

I’m a little behind in posting the cards we have been doing at our Technique Class.  These have been running every 2nd Sunday arvo at the Caloundra Community Centre.  I am really enjoying them as it has gotten me out of my comfort zone & my thinking cap on as I try to cater for the tastes of everyone, while at the same time creating cards that are a little bit different. 

Each week we do one card that has a different fold & one standard card while still having fun doing our techniques.

This card was using the Acetate & Tissue Technique.  Combined with some Christmas DSP & a faithful stamp set that I don’t think you can beat – Lovely as a Tree and you have a great Christmas Card

Supplies –
Stamp Set – Lovely as a Tree, Short & Sweet
Ink – Staz-On, Old Olive
Cardstock – Old Olive, Whisper White, Bashful Blue
DSP – Letters to Santa
Punches – Oval, Scallop Oval
Ribbon – 5/8″ Satin – Chocolate Chip
Accessories – Stampin Dimensionals, Tombow Glue, Re-Inkers – Certainly Celery, Bashful Blue, Snail Adhesive, Dazzling Diamonds, White Gel Pen, Crystal Effects
Non-SU – Tissue, Acetate

Until next time, Happy Stampin’

SC 031/12…

Our challenge over at Sunny Challenges this week has been bought to us by Kris.  Along with the sketch, she wants us to use the 
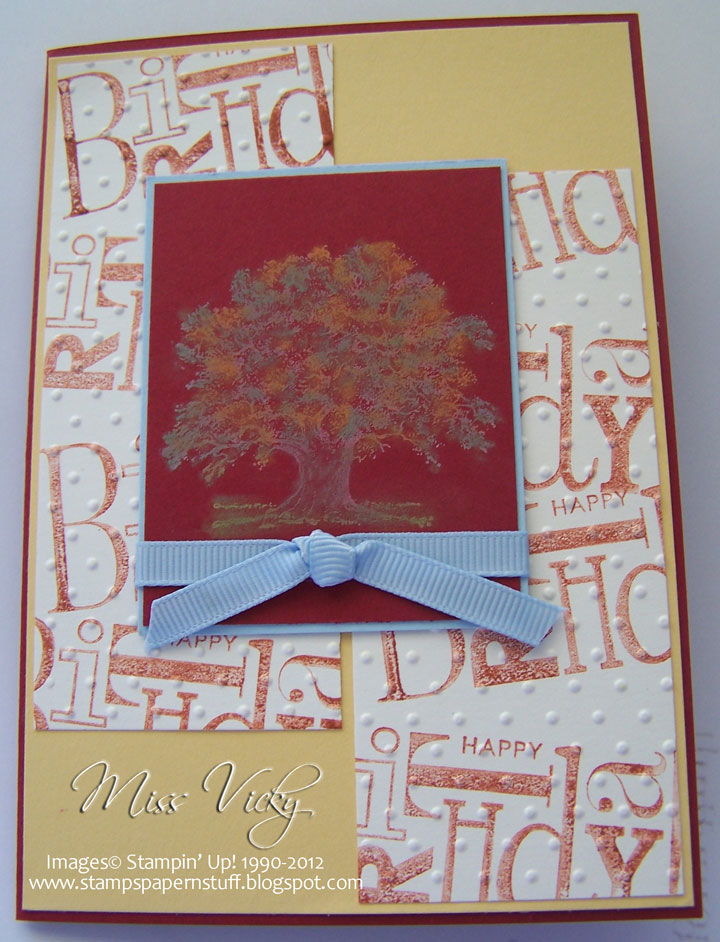
Technique – Chalkboard.  Tutorial at the end of post.  Now, I am not a lover of this technique as I find it very messy, but will be the first to admit it does leave you with a very lovely effect.  In fact, this is the first time that I have ever felt that I liked something well enough to post.
Maybe, just maybe you may find me attempting to create more using this technique.  I decided to use a Stamp Set that is a little different from the usual ones used for Chalkboard!   Using the stamp I used, I had to change the shape of the oval a little, so hopefully Kris will forgive me for this.  Mind you, that is the beauty about challenges, as long as you basically stay within the sketch, you have a free hold & it challenges you to use products, colours, techniques, etc you would not normally attempt.  In other words, “out of your comfort zone“.  I even used colours that are way out of my comfort zone!!!!!
Measurements –
Base Card – Cherry Cobbler – 8 1/4″ x 4 1/4″ or 21cm x 15cm – Scored in middle & folded in half
Layer 1 – So Saffron – 3 7/8″ x 4″ or 10cm x 14.5cm
Layer 2 & 3 – Whisper White – 4 1/2″ x 1 7/8″ or 11.5cm x 5cm
Layer 4 – Bashful Blue – 2 3/8″ x 3″ or 6cm x 8cm
Layer 5 – Cherry Cobbler – 2 1/4″ x 2 7/8″ or 5.5cm x 7.5cm

Supplies –
Stamp Set – Lovely as a Tree, Happiest Birthday Wishes
Ink – White Craft, Cherry Cobbler, Bashful Blue
Cardstock – Whisper White, Cherry Cobbler, Bashful Blue, So Saffron
Embossing Folder – Perfect Polka Dots
Ribbon – 1/4″ Grosgrain – Bashful Blue
Accessories – Stampin’ Pastels, Bigshot, Snail Adhesive, Multipurpose Glue
Non-SU – Cotton Buds
Instructions –
Stamp image onto Cherry Cobbler Cardstock using White Craft Ink
Chalk image using Cotton Buds
Adhere to piece of Bashful Blue Cardstock with Snail Adhesive
Adhere Ribbon around bottom & tie knot. Set aside
Randomly stamp sentiment onto both pieces of Very Vanilla Cardstock using Cherry Cobbler Ink Prior to stamping, stamp off onto a scrap piece of paper
Run both pieces through Bigshot using Embossing Folder – Perfect Polka Dots
Adhere to So Saffron Cardstock as per sketch using Multipurpose Glue
Adhere chalked piece to Base Card as per sketch

Technique Tutorial –
Ink a solid image onto a dark Cardstock using White Craft Ink
With SU! Pastels & a Cotton Bud, apply chalk to your image, ensuring you dab over all the white ink
Add as many colours as you wish using the above step
With a Tissue, remove the excess chalk very carefully

Tips –
When using SU! Pastels, no need for the ink to dry
When using Pencils, allow the ink to dry
Use SU! Sponges instead of Cotton Buds

Ok, now it is your turn. Pop on over to Sunny Challenges, check out what Kris & Libby have created, create your card, scrapbook page, etc & then come back to Sunny Challenges & link to My Linky.

Until next time, Happy Stampin’

Xmas Scrapbook Page…

I wasn’t going to scrap the photos I took on Christmas Day this year, but looking at them, I suddenly realised I had a photo of 4 generations……  It doesn’t happen very often, although Jill has 6 great grand kids……  the oldest being 16! She is often babysitting 3 of them, 2 of whom are twins, so they keep her on her toes. 

Mind you, she will not & has never given up her social life to babysit.  She has always said to her grandkids, she would only look after them if she has nothing on.  Well, in Jill’s social calendar that is not very often.  I can’t wait to retire!!!!!!!!!!!

The photo was layered onto a piece of Riding Hood Cardstock, leaving 1/8″ border prior to adhering to the Whisper White Textured Cardstock.  For some reason I always like to use Textured Cardstock as my main page .

I incorporated the flower that I wore in my hair on Christmas Day – made from a couple of flowers I had lying around, added Rhinestones to the middle & bamo, you have an ornament for your hair!  I then hot-glued a clip on the back.  The clip was removed as I adhered a couple of Stampin’ Dimensionals to the back.  I also sponged a bit of Riding Hood Red Ink to the flower to make it pop a little.
I stamped the tree with Garden Green Ink onto Whisper White Cardstock before adhering to a layer of Basic Black Cardstock & then to the page. 
For the Scallop Circles, I used one of the images from Circle Circus – have been wanting to use this set for something Christmas for so long – with Garden Green Ink, while the wording is in Tempting Turquoise Ink….  They were both punched using the Scallop Circle Punch.
The journalling was typed & printed onto Whisper White Cardstock, before laying onto a piece of Basic Black Cardstock & then to the page.

I used a couple of pieces of  Basic Black Ribbon to look like the journalling & embellishments were hanging from the top.

I basically wanted to keep the page simple & clean – my style of scrapbooking, while just picking up the suttle colours in the photo – Riding Hood Red, Tempting Turquoise, Garden Green, Black & White.

Supplies –
Stamp Set – Circle Circus, Perfect Punches, Lovely as a Tree
Ink – Tempting Turquoise, Riding Hood Red, Garden Green
Cardstock – Whisper White Textured, Basic Black, Riding Hood Red
Ribbon – 3/8″ Taffeta – Basic Black
Punches – Scallop Circle
Accesories – Rhinestones, Stampin’ Dimensionals, Snail Adhesive, Sponge
 Until next time, when I will show you the 2nd page!
 

My Favourite….

?

Inside…

?

Stamp Set & one of my favourite colour combinations have been combined to create this card which we made last week for at the Community Centre.  The ladies loved the colours!
Measurements –

Base Card – Rich Razzleberry – 8 1/4″ x 5 7/8″ or 21cm x 15cm – Scored & folded in half
Layer 1 – Old Olive – 5 3/4″ x 4″ or 14.5cm x 10cm
Layer 2 – Rich Razzleberry – 3 7/8″ x 2 5/8″ or 9.5cm x 6.5cm
Layer 3 – Very Vanilla – 3 3/4″ x 2 1/2″ or 9cm x 6cm

I stamped my image onto the piece of Very Vanilla Cardstock using Old Olive Ink.  I then proceeded to score lines across the piece of cardstock at 1/2″ intervals. 

I then decided to try something a little different & experiment a bit, so I covered the whole piece with Versamark & poured Clear Embossing Powder over the top. 

?

Close-Up…

? After tapping the excess off, I then heat set it with my Heat Tool.  To add a little bit more WOW, I then applied Dazzling Diamonds with my 2-Way Glue.  This piece was then adhered to the small piece of Rich Razzleberry.

I adhered a piece of Satin Ribbon just below the centre of Old Olive Cardstock & adhered to the base card – Rich Razzleberry.  I adhered the imaged to the top with SU Dimensionals.

Not wanting to stamp a greeting & deciding it needed a little more something, I tied a bow & adhered to the top of the card.

Supplies –
Stamp Set – Lovely as a Tree
Ink – Versamark, Old Olive
Cardstock – Very Vanilla, Old Olive, Rich Razzleberry
Ribbon – 5/8″ Satin – Rich Razzleberry
Accessories – SU Dimensionals,  Snail Adhesive, Bone Scorer, Heat Tool, Embossing Buddy,
Embossing Powder – Clear, 2-Way Glue, Dazzling Diamonds
Until next time, Enjoy!