SC 023/12….

Our challenge over at Sunny Challenges & Creations this week is to create a card, scrapbook page, 3-D Item, etc with a “Love” or “Valentine” Theme.  Be sure to head over to see what both Kris & Shirley  – who is our Guest Designer fo rthe next couple of weeks, while Gwen takes a little time off.

It seems like forever since I created a card as I have been enjoying my scrapbooking.  I hope you have too!

This proved more difficult than I thought it would for me, but I think I got there in the end.  I elected to go with non-traditional colours, although in the end I did throw a bit of red (Riding Hood Red) into the card.  I wanted to create a card which would maybe suit a male without being too “pretty”!

Measurements –
Base Card – Early Expresso Cardstock – 8 1/4″ x 4 1/8″ or 21cm x 10.5cm  Scored in middle & folded in half
Layer 1 – Vanilla Vanilla Cardstock – 5 5/8″ x 4″ or 14cm x 10cm
Layer 2 – Early Expresso Cardstock –  4″ x 3 1/2″ or 10cm x 9cm
Layer 3 – Very Vanilla Cardstock – 3 7/8″ x 3 3/8″

I layered my piece of Very Vanilla Cardstock onto my Base Card – Early Expresso, using Snail Adhesive.

I run the smaller piece of Very Vanilla Cardstock through the Bigshot using Embossing Folder – Perfect Polka Dots & adhered to the piece of Early Expresso Cardstock.

I stamped 2 images onto a scrap piece of Very Vanilla Cardstock using Riding Hood Red, adhered one to the embossed piece with Multipurpose Glue, while the top heart was “popped” with Stampin’ Dimensionals.

I tied a piece of Ribbon across the bottom of the 2 pieces prior to adhering to the Base Card with Snail Adhesive.

I stamped my sentiment direct onto the Base Card with Riding Hood Ink.

Supplies –
Stamp Set – I {Heart} Hearts, Well Scripted
Ink – Riding Hood Red
Cardstock – Early Expresso, Very Vanilla
Ribbon – 3/8″ Taffeta – Riding Hood Red
Embossing Folder – Perfect Polka Dots
Accessories – Snail Adhesive, Bigshot, Multipurpose Glue, Stampin’ Dimensionals

Until next time, Enjoy!

New Technique…

I did this card quiet sometime ago.  In fact, it was for Father’s Day – so I must apologise for not having any measurements.

I found this great Technique – Acetate & Tissue, over at Splitcoast Stampers.

Base Card – Garden Green Cardstock
Layer 1 – Very Vanilla
Layer 2 – DSP

Layer 3 – Tangerine Tango
Layer 4 – Very Vanilla
Using Snail Adhesive, I adhered the DSP to the piece of Very Vanilla Cardstock & then to the Base Card – Garden Green.
I stamped the boat image direct onto the piece of Acetate using Black Staz-On Ink & set aside to dry.
I stamped the tree images onto the piece of Very Vanilla Cardstock using Garden Green Ink.
With the piece of stamped Acetate, I applied Crystal Effects all over the back, ensuring the Effects were covering a large part of the Acetate.  Once this was done, using my Garden Green Re-Inker, I applied a couple of random drops onto the Crystal Effects & moved it around with my finger until I was happy with the look of the coverage. 

At this stage, I added a little of Dazzling Diamonds to give it a little bit of a lift & some sparkle behind the Acetate when finished.

I then added a larger piece of tissue over the whole lot, turned the Acetate over so that the front was now facing me & placed it over the piece of Very Vanilla Cardstock & pressed into place.  I trimed the piece to the size I wanted which in this case, was slightly smaller than the Tangerine Tango Piece I was adhering it to.

This whole piece was adhered over the top of the DSP & to the Base Card.

I stamped the greeting onto a scrap of Very Vanilla Cardstock using Tangerine Tango Ink, punched with Oval Punch & adhered to piece of Bashful Blue which had been punched with the Scallop Oval Punch.  I applied this to the card with SU Dimensionals.

The final result for this technique is really stunning & has so much potential.  I must make another card using this technique again.

Supplies –
Stamp Set – Lovey as a Tree, Sali Away, Well Scripted
Ink – Garden Green, Staz-On Black
DSP – Woodland Walk
Punches – Scallop Oval, Large Oval
Accessories – SU Dimensionals, Dazzling Diamonds, Snail Adhesive,
Crystal Effects, Re-Inker – Garden Green
Non-SU – Tissue
Until next time, Enjoy!

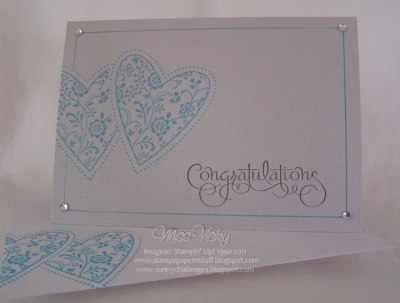
Congratulations…

?

Cloes Up…

? I have a wedding tomorrow & along with delivering the reception stationery, I like to give the Bride & Groom a card similar to or close to their colours & their own copy of the stationery.

This is a very easy card & took me all of about 3 minutes, but I am liking it all the same.  The longest part was the stamping & cutting out of the mask.

Card Base – 5 7/8″ x 4 1/4″ once scored & folded in half

I used the Technique “Masking” on this card, although it was the Basic Masking – Tutorial may be found Here…

Using Tempting Turquoise Ink, I stamped my first image off to the LHS a little.  I wanted image not to be whole.  I then placed my mask on top of this image & stamped over it using the same ink colour.

I drew a line right around the card using my SU Markers – Tempting Turquoise.  These are such handy little items & don’t use mine nearly as much as I should.

I stamped the sentiment using Early Expresso Ink & added a Basic Rhinestone to each corner of the card.

I repeated the masking for the inside & envelope.  I’ve just realised that I didn’t even using any adhesives on this card – how great is that!  It also proves you don’t have to have a lot of supplies to make a lovely card!

Supplies –
Stamp Set – Always (Retired), Well Scripted
Ink – Temption Turquoise, Early Expresso
Accessories – SU Marker – Tempting Turquoise, Basic Rhinestones
NON-SU – Cardstock

Until next time, Enjoy! 

SSC 216…

Another sketch, another card, except this time I have created a matching “something” to go with the card.  In fact, the matching “something” was created first & the card created to match the “something“.  Sorry folks, the “something” won’t be posted until tmw.
The card has been created from the sketch at Stamping 411  Such a great & very easy sketch.  Countless possibilities for this sketch.  Of course the best thing about the sketch from Stamping 411 – Measurements are provided –
Base Layer: 11 x 4 1/4″, scored and folded in half at 5 1/2″ – Pumpkin Pie

Layer 2: 5 x 3 3/4″  – Pear Pizzazz
Layer 3: 4 7/8″ x 3 5/8″  – DSP
Layers 4 & 5: 1/2″ x 4 inch strip of paper – DSP
Layer 6:  Note, you can use ANY shape on this layer! – DSP
Inside Card

Inside Card –
As I had already cut a couple of different colours & shapes of flowers which I was going to use for the front of the card, I decided instead to use one for the inside.  I applied adhesive to the back of the flower, adhered to Whisper White Cardstock, then to a piece of Chocolate Chip before adhering to the Base Card.  I think it gives it a little bit of a different look.

?

Close up of Flowers

?

Card –
I cut my 3 strips using DSP & adhered them to Pear Pizzaz Cardstock as per the sketch.  Prior to this piece being run through the Bigshot using Embossing Folder Square Lattice, I stamped my sentiment direct onto the Pear Pizzazz using Pumpkin Pie Ink.  Again, with the Square Lattice.  Sorry folks, I can’t seem to get enough of this folder.  It just seems to finish your cards off & gives them that little extra omph!

Pear Pizzazz was ahered to a piece of Chocolatecar Chip & then to the Base Card – Pumpkin Pie.  I took the liberty & added an extra layer to my card. 

?

Envelope

? For my shape, I cut 3 flowers from the DSP & adhered them to the card, using SU Dimensionals on the front 2, while adhering the background one direct to the card.  It sort of gave it a better look & more depth doing it this way.   Again, I strayed from the “master plan” a little in that I added 3 shapes, instead of the 1.

I applied a little glue to the middle of each flower with my glue pen & poured Dazzling Diamonds on top.  It immediately lifted the whole card.  Gotta love the Dazzling Diamonds.

Envelope –
I just cut a piece of DSP & adhered to the LHS side of the card.  Again, no stamps!

As I was taking the photo, I suddenly realised I hadn’t used any stamps on this card, except for the greeting.  Just goes to show that you don’t have a lot of products to create a really effective card!

Something else which crossed my mind – what a great way to use up the little bits of DSP that we can’t bare to toss out!

Supplies –
Stamp Set – Well Scripted
Ink – Pumpkin Pie
Cardstock – Whisper White, Pumpkin Pie, Chocolate Chip, Pear Pizzazz
DSP – Greenhouse Gala
Embossing Folder – Square Lattice
Accessories – 2-Way Glue Stick, Snail Adhesive, Bigshot, SU Dimensionals, Dazzling Diamonds
Until tmw, when I will post the “something“.  Enjoy!

TSSC 186…

Just as I was cleaning up my desk, which is usually a mess after my craft session, I suddenly had an urge to do another card using Black, Red & White.  Why?  Who knows, but create I did.  So to make it a little easier, I went in search of a sketch & as usual Mary-Jo to the rescue.  She always has great sketches!
Mine started off to be a male card, but after looking at the end result, it could either be male or female.  My apologies to Mary-Jo as I didn’t strictly keep to the sketch.
Base Card – Riding Hood Red – 5 7/8″ x 4 1/4″ or 15cm x 10.5cm
Layer 1 – Basic Black – 5 3/4″ x 4″ or 14.5cm x 10cm
Layer 2 – Very Vanilla – 5 5/8″ x 3 7/8″ or 14cm x 9.5cm
Layer 3 – DSP – 1 1/2″ x 3 7/8″ or 4cm x 9.5cm
?
Card Inside…

? I stamped 3 identical images onto Very Vanilla Cardstock using Basic Black Ink.  I punched 3 circles in Riding Hood Red & layered them over the top of the stamped images.  I adhered the DSP to the bottom of the Very Vanilla & run the whole lot through the Bigshot using Square Lattice Embossing Folder.  This was adhered to Basic Black Cardstock & then to the Base Card – Riding Hood Red.

I stamped 3 smaller identical images onto Very Vanilla Cardstock again in Basic Black, punched them out & adhered on top of the Riding Hood Red circles.

The greeting was inked using Basic Black Ink onto Very Vanilla Cardstock & punched with the Large Oval Punch.  I punched another large oval in Basic Black Cardstock, cut in half & adhered to the back of the Very Vanilla with just a small edge showing top & bottom.  This was adhered over the top of the DSP using SU Dimensionals.

Supplies –
Stamp Set – Circle Circus, Well Scripted
Ink – Basic Black
Cardstock – Very Vanilla, Riding Hood Red, Basic Black
DSP – Love Letter
Punches – 3/4″ Circle, 1″ Circle, Extra Large Oval
Embossing Folder – Square Lattice
Accessories – Snail Adhesive, Bigshot, SU Dimensionals
Until next time, Enjoy!

LNS 133…

After creating this card for a challenge, I suddenly realised that it was wrong for the challenge, so back to the drawing board for me. Anyhow, it has been specially created for my niece who turns the BIG 18 – she is now LEGAL!!!!! Look out Everyone!
I have also used 2 stamp sets which are retiring at the end of August – Great Friend, which has been a really great friend to me, as I love this set & Baroque Motifs.  This is a special set too, although I haven’t used it as much as what I should have.

I stuck with Whisper White for my base card, as I wanted to keep it very clean & simple, but hoping that it would turn out very elegant! I also wanted it very soft, pretty & feminie for Bonnie!

I stamped the sentiment using Marina Mist Ink, scored every 1/2″ down the card, grabbed the flower & adhered with a SU Dimensional. The butterfly was stamped in Bashful Blue Ink – so long since I have used this colour that I completely forgot how soft it is – & Marina Mist on the edges – Rock & Roll Technique, added Dazzling Dimensionals with 2-Way Glue & adhered to the top of the flower with another SU Dimensionals. I addd 3 Basic Pearls down the middle.
I wrapped the Ribbon right around the card & tied a bow. I left the ends long on purpose.
Supplies –
Stamp Set – Great Friend, Baroque Mofits, Well Scripted
Ink – Bashful Blue, Marina Mist
Cardstock – Whisper White
Ribbon – Organza – Whisper White
Accessories – Bone Folder, Snail Glue, Flowers, Basic Pearls
Congratulations Bonnie on your 18th!!!!!!!
Until next time, Enjoy!

Engagment…

???????

This card has been created for a lovely couple who come every Friday to Crafty Creations.  They have been engaged for a couple of weeks now, but have only managed to make a card.  Mind you, I have a box of cards, but no, none of those would do.
?

Inside Card

? Base Card – Pink Pirouette – 5 7/8″ x 4 1/4/” or 15cm x 10.5cm

Layer 1 – DSP – 5 3/4″ x 4″ or 14.5cm x 10cm
Layer 2 – Pink Pirouette – 3 3/4″ x 2 3/4″ or 9cm x 7cm
Layer 3 – Very Vanilla – 3 5/8″ x 2 5/8″ or 8.5cm x 6.5cm
?? I layered a piece of Lace Ribbon across the DSP just off-centre, tied a bow & adhered to base card. 
Using Pink Pirouette Ink, I stamped random images along the bottom of Very Vanilla Cardstock & LHS of Cardstock.  I stamped the bird image in Soft Suede Ink.  Applied Basic Pearls to the top RH corner & eye.  This piece was adhered to the card using SU Dimensionals.
For the inside, I reversed the colours with the images, stamped the sentiment with Soft Suede & adhered to the inside of card.
A very easy card, but one that is quiet effective without being over the top.  I only hope they like it!
Supplies –
Stamp Set – Always, Well Scripted
Ink – Pink Pirouette, Soft Suede
Cardstock – Very Vanilla, Pink Pirouette
DSP – Elegant Soiree
Ribbon – Chantilly Lace
Accessories – Snail Glue, SU Dimonsionals. Basic Pearls
Contratulations Bronwyn & Allen!!!!!!!!!!!
?

Amber…

I am a little late in posng this card which was for my niece’s birthday last Wednesday.  I have kept it very easy with no layers.

I seem to be making a lot of no layer cards lately.
Base Card – Whisper White – 5 7/8″ x 4 1/4″ or 15cm x 10.5cm
I stamped the leaf image using Pear Pizzazz Ink randomly over the bottom part of the card.  Using Melon Mambo Ink and small flower image, I stamped off once, then stamped randomly onto the Whisper White Card Stock.  I repeated again, using Perfect Plum Ink.
Taking my Perfect Plum Marker, I drew a line around the top edge of the card, leaving a space to fit 3 Rhinestones.  I stamped the sentiment using Melon Mambo Ink.
I then adhered small Rhinestones to the centres of the flowers.

Again, a very basic card which took all of 5 minutes.

Supplies –
Stamp Set – Priceless, Well Scripted, Embrace Life
Ink – Melon Mambo, Perfect Plum, Pear Pizzazz
Cardstock – Whisper White
Accessories – Rhinestones, Perfect Plum Marker
Non-SU – Purple Rhinestones

Until next time, Enjoy!

Dani…

This week sees my neices 24th birthday!  So young!

Dannielle loves red & green, so I thought I would add just a touch of red & leave the remainder of the card black.  I did know that I just wanted to create a CAS card – Clean & Simple, my favourite!  What better way to do this type of card than to use “Pocket Silhouettes” – great stamp set!

Base Card – Whisper White – 5 7/8″ x  4 1/4″ or 15cm x 10.5cm

I stamped the images from Pocket Silhouettes using Basic Black Ink.  Using my Real Red Ink, I randomly stamped images over the Basic Black.

I then grabbed my Black Marker & drew a line around the edge of the card, leaving a space so that I could adhere 3 Rhinestones.  I stamped the sentiment in Basic Black Ink.

I coloured the Rhinestones with my Real Red Marker & adhered them to my card.  I applied a little Crystal Effects over the top of each so that the colour would set.

A very basic card which took all of 5 minutes – once I knew what I wanted to do.

Supplies –
Stamp Set – Pocket Silhouettes, Well Scripted
Ink – Basic Black, Real Red
Cardstock – Whisper White
Accessories – Basic Black Marker, Real Red Marker, Tombow Glue, Rhinestones

Check back tomorrow arvo when I will post the card I am making for Amber.

Until then, Enjoy!

Bugs…

It has been awhile since my last post but hopefully I am back to posting daily for you.

This card started out as a Buckle Card, but suddenly changed half way through.  I am quiet happy with the end result as it is a little different.  I also wanted to showcase that “Bugs & Kisses” is not only for boys but for the girls cards too.

Base CardChocloate Chip – 7″ x 5 3/4″ or 18cm x 15cm

Cut, Score at 3″ or 7.5cm 
Outside –
Layer 1 – Pretty in Pink – 5 3/8″ x 2 7/8″ or 14.5cm x 7cm
Layer 2 – Whisper White – 5 1/4″ x 2 3/4″ or 14cm x 6.5cm
Using Chocolate Chip & Pretty in Pink inks, randomly stamp images onto Whisper White Cardstock
Adhere Whisper White to Pretty in Pink Cardstock & then to base card
Inside LHS
Layer 1 – Pretty in Pink – 5/38″ x 2 7/8″ or 14.5cm x 7cm
Layer 2 – Whisper White – 5 1/4″ x 2 3/4″ or 14cm x 6.5cm
Using Chocolate Chip & Pretty in Pink inks, randomly stamp images onto Whisper White Cardstock
Adhere Whisper White to Pretty in Pink Cardstock & then to base card
For the inside, I stamped the images in opposite colours to the front of the card
Inside RHS –

Layer 1 – Pretty in Pink – 3 7/8″ x 5 3/4″ or 10cm x 14.5cm

Layer 2 – Whisper White – 3 3/4″ x 5 5/8″ or 9.5cm x 14.cm
Using Chocolate Chip ink, stamp images down the RHS of Whisper White Cardstock

Adhere Whisper White to Pretty in Pink Cardstock & then to base card

Band –
Layer 1 – Chocolate Chip – 8 1/4″ x 1″ or 21cm x 2.5cm
Layer 2 – Pretty in Pink – 8 1/4″ x 7/8″ or 21cm x 2cm
Layer 3 – Whisper White – 8 1/4″ x 3/4″ or 21cm x 1.5cm

Stamp random images onto Whisper White Cardstock using Chocolate Chip & Pretty in Pink Inks
Adhere to Pretty in Pink & then onto Chocolate Chip Cardstock
Place around middle of card & score where band will fold
Adhere ends together & place at front – this will be covered by the sentiment
Stamp sentiment onto Whisper White Cardstock using Chocoate Chip Ink
Punch sentiment using the Extra Large Oval Punch
Ink edges with Pretty in Pink Ink
Adhere to centre of band

Supplies –
Stamp Set – Bugs & Kisses, Well Scripted
Inks – Chocolate Chip, Pretty in Pink
Cardstock – Whisper White, Pretty in Pink, Chocolate Chip
Punches – Extra Large Oval
Accessories – Multipurpose Liquid Glue

Until next time, Enjoy!