Daisy Lane meets November Stamp ‘n Hop Blog Hop

G’Day Friends,

Welcome to the Stamp ‘N Hop Blog Hop for November!

We are a group of SU! Demos from all over the world sharing our love of Stampin’ Up! You are free to join us if you like, but we do ask that you be a current SU! Demo & that you use current SU! products.

This month we get to CASE (Copy & Share Everything or Copy & Share Selectively) each other.  I couldn’t decide so I went with another Demo with the same name lol.

You may have arrived from Karen’s blog where she shared her lovely creation.  If you are starting from my blog, all you have to do is click on any of the photos below to visit & comment on all the other lovely creations.

So as I mentioned I decided to case card from Vickie Littlewood who is a SU! Demo from the UK.  This is not the card I decided to go with but loved that this card on her blog as it was a Fun Fold & it actually used one of my favourite Paper’s from the last current catalogue.  You can see Vickie’s original card by clicking HERE.  To top it all off Vicki actually had mesurements for her card.  How good was that?

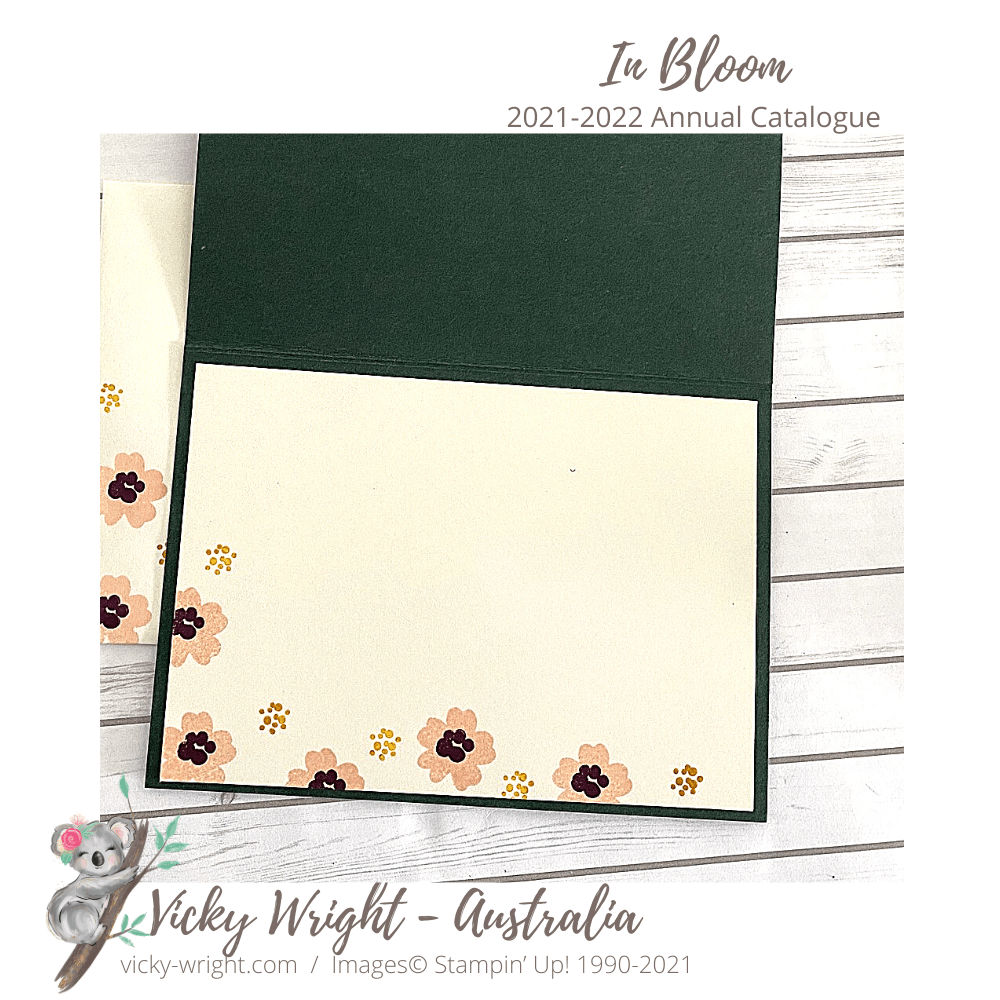
I grabbed the pack of 2021-2023 In Colour 6 x 6 DSP Pack & went for Pale Papaya.  Not sure why but I did want to use the Daisy Lane Stamp Set.

Now the hard part, what colours to team up with Pale Papaya.  After much toing & froing, out popped Merry Merlot, So Saffron Old Olive & a touch of Coastal Cabana in the Artistry Sequins.

I stamped the long stem onto a piece of Basic White in Old Olive Ink prior to stamping the medium daisy above the stem in So Saffron Ink, as well onto a scrap Basic White prior to punching the 2nd daisy with the Medium Daisy Punch.  This daisy was then adhered to the stamped daisy with a Mini Stampin’ Dimensionals off setting the petals.

The sentiment was stamped in Merry Merlot Ink, adhered to a piece of Mery Merlot & then adhered to the Card Front with the fold on the right hand side.  You should be able to close the DSP flap over the top of the Merry Merlot flap.

I wasn’t too sure about the colour combination but once I added the touch of Coasta Cabana, the card sort of popped!  What do you think?

Want to create my project at home?  All the supplies are available in my Online Stampin’ Up! Store.  Add all the items to your Shopping Cart by clicking on the photo below or just pick & chose what you would like to add to your Shopping Cart.

Thanks again for visiting my blog today. Be sure to click on the link below to visit all the projects today.  You will be taken to the all the entries once you have clicked on the blue button.

Please feel free to contact me if you have any questions.

Happy Stamping!

You are invited to the Inlinkz link party!

Click here to enter


November Starter Kit Special

Simply Stamping Class – 14 November

Stamp & Card Club – Subscription closes 10 November

1 2 3 Stamp – 21 November


Timeless Tropical

G’Day Friends,

To create my card I am sharing with you today is one that was created from a Sketch Layout that we had over in our Customer FB Group a little time ago.  It is a fairly easy layout but one that can have lots of different outcomes.

I started with a piece of DSP from the Pansy Petals DSP.  Yes, I am still playing with it and loving the opposite sides.

Deciding on the Timeless Tropical Stamp Set, of course I had to go for bright & tropical colours – Granny Apple Green for the fronds, Coastal Cabana for the flower & Early Espresso for the trunks & the sentiment.

While wanting to keep a clean look to the project, I decided to randomly adhered our Clear Rhinetsones to the centre of the flower & around the Basic White panel.

I think they finished the card off perfectly, don’t you?

To download a free tutorial, click on the link below.

Want to create my project at home?  All the supplies are available in my Online Stampin’ Up! Store.  Add all the items to your Shopping Cart by clicking on the photo below or just pick & chose what you would like to add to your Shopping Cart.

976.  Thank You – Timelss Tropical

Please feel free to contact me if you have any questions.

Happy Stamping!

November Starter Kit Special

Simply Stamping Class – 7 November

Stamp & Card Club – Subscription closes 10 November

1 2 3 Stamp – 21 November

In Bloom

G’Day Friends,

Thank you so much for dropping in today.  I hope you have had a lovely week!

I had a piece of DSP left over after creating my Dad’s birthday card.  I wanted to see if I could create something for the females with the same piece of DSP I had used on his card.  This lovely piece is from the Pansey Petals DSP.  Isn’t it just gorgeous?

I grabbed the In Bloom Stamp Set off the shelf, only because I haven’t used it for so long.  Then went to the Colour Coach to select a couple of colours.  Now, I will admit this colour combination is way out of my comfort zone but it is growing on me.

The Very Vanilla panel was stamped in Petal Pink, Crushed Curry, Rich Razzleberry & Sahara Sand.  Now are they colours you would normaly choose, but hey that is what my Colour Coach told me, so to stamp we must lol.

The panel was then adhere to a piece of Petal Pink before being placed onto the card front with Stampin’ Dimensionals.   The sentiment was stamped onto Very Vanilla in Rich Razzleberry, die cut with a shape from the Pierced Blooms Dies before being adhered to th ecentre of the stamped panel with Stampin’ Dimensionals.

The flower was die cut with Petal Pink Cardstock with the Pierced Bloom Dies.  The leaf was die cut from Soft Succulent with the same Dies.  I then decided to add a small piece of the Soft Succulent Open Weave Ribbon under the flower for more interest.

Both this Stamp Set  & Dies are fatastic as they have lots of lovely stamps to create great backgrounds while the Dies have lots of little dies to create lots of extra flowers & leaves.

Shop for the items I’ve used on my card by clicking on the photo below.  You are able to add all the items or just pick & chose the items to your Shopping Cart.

Please feel free to contact me if you have any questions.

Happy Stamping!

Simply Stamping Class – 7 November

Stamp & Card Club – Subscription closes 10 November

1 2 3 Stamp – 21 November

Many Messages

G’Day Friends,

You may notice over the next few days a repeat of a couple of previous posts.  My blog has been updated meaning that I have lost the last few posts.

My card I am sharing with you today is one that I created for a Take 5 Challenge over in our World Card Making Group where we had to create a project with Soft Succulent Card Base, Smokey Slate Cardstock, Blending Brush, Die Cut or Stencil & the lovely Soft Succulent Open Weave Ribbon.

I created my card with the Plenty of Patterns Decorative Masks where I blended Soft Succulent Ink over a piece of Basic White Cardstock with Soft Succulent Ink & a Blending Brush.

This piece of cardstock was layered onto Smokey Slate prior to a piece of the lovely Soft Succulent Open Weave Ribbon adhered across the front & then layered onto the Soft Succulent Base Card.

The sentiment is from the Many Messages Stamp Set, stamped onto Basic White, die cut with a die from the Messages Dies & adhere to the right side of the Card Front with Stampin’ Dimensionals.

To comple the card Soft Succulent In Colour Jewels were randomly adhered to the front.

Please feel free to contact me if you have any questions.

Happy Stamping!

Simply Stamping Class – 7 November

Stamp & Card Club – Subscription closes 10 November

1 2 3 Stamp – 21 November

Kylie’s Demonstrator Training Program Blog Hop – October 2021

G’Day Friends,

Thank you so much for joining me today as I am joining Kylie & Bruno’s  Stampin’ Up!® Demonstrator Monthly Team Blog Hop!  This is my first time hopping so I’m sure you will find lots of ideas & inspiration.

We are a group of Stampin’ Up!® Demonstrators from around the world that are taking part in training that is helping us to build a successful Stampin’ Up!® business and to reach goals we have set ourselves.  Your support is really appreciated.

You may be starting here – Vicky Wright – or have come from another blog – either way you can find the Blog Roll at the bottom of this post so that you can see every blog post and idea today.

I’ve taken the colours of Mint Macaron & Pale Papaya from the colours in the papers.  Aren’t they just so pretty together?  I finished it off with a couple of shinny & glittery Genial Gems.

Once again, thank you so much for popping by today!

Remember – By placing an order with me or joining my team this month, you will receive one of these lovely cards as my way of thanking you!  Of course, I have a matching PDF Tutorial along with 3 other projects waiting to be emailed to you, all created with the products used on my card today!

Please feel free to contact me if you have any questions.

Create with me!

Blog Roll –