Circles, Circles…

…and more circles.

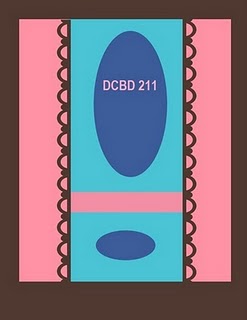
When I saw this challenge, I knew that I wanted to create a male card by using Circle Circus.  Then to top it off, I found some DSP that would match perfectly with the stamp set & sketch.  I will admit I am very happy with the way it turned out.  Got to love it when that happens!

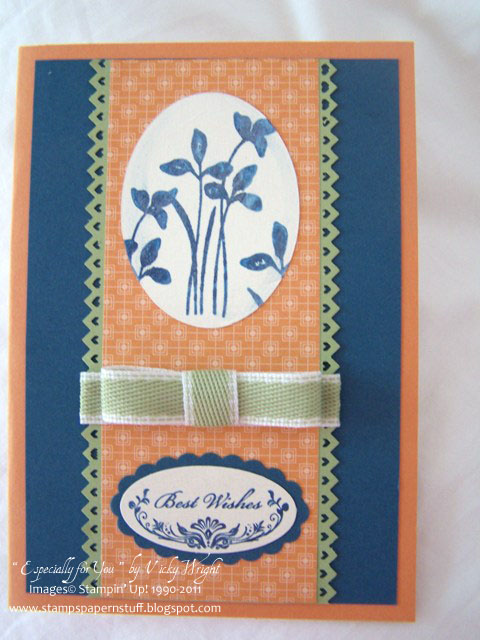
Base Card – Baja Breeze Cardstock – Cut, score & fold
Layer 1 – Very Vanilla Cardstock – 5 5/8″ x 3 7/8″ or 14cm x 10cm
Layer 2 – DSP – 2 1/2″ x 3 7/8″ or 6,5cm x 10cm

Stamp sentiment bottom RHS of Very Vanilla Cardstock in Soft Suede Ink.  With my Bigshot, Embossing Folder – Perfect Polka Dots & the bottom half of Very Vanilla Cardstock, I run the Cardstock through the Bigshot.  I then asdhered the DSP to the top half of Very Vanilla and adhered to the base card.

Again with the Bigshot, I cut an oval in Soft Suede Cardstock using the Ovals Dies.  I also cut a smaller one in Very Vanilla.  I grabbed my stamp set, Soft Suede and Baja Breeze Inks and the Very Vanilla Oval and proceeded to stamp.  I adhered this oval to the Soft Suede Oval & then adhered to the card base.
All in all a very easy card, but none the less a very nice one!

Supplies –
Stamp Set – Circle Circus, Sincere Salutations
Inks – Baja Breeze, Soft Suede
Cardstock – Very Vanilla, Baja Breeze, Soft Suede
DSP – Elegant Soiree – Love this DSP
Bigshot Dies – Ovals
Embossing Folder – Perfect Polka Dots
Accessories – Snail Adhesive, Multipurpose Liquid Glue, Bigshot

Until next time, Enjoy!
 

Best Wishes…

I wanted to use a particular stamp set this morning, so I went searching for a sketch challenge & come across this one from Diva Coffee Break & thought “Why not”.  This is what I come up.

Base Card – Peach Parfait Cardstock – Cut, score & fold
Layer 1 – Not Quiet Navy Cardstock – 5 1/2″ x 3 3/4″ or 14cm x 9.5cm
Layer 2 – Pear Pizzazz Cardstock – 5 1/2″ x 2 1/2″ or 14cm x 6.5cm
Layer 3 – DSP – 5 1/2″ x 2 1/8″ or 5.5cm

Attach Layer 1 to card base
Using my Border Punch, I punched both sides of Pear Pizzazz & attached to card base.  Armed with my Bigshot, Oval Dies & Very Vanilla Cardstock, I cut out an oval and randomly rubbed Shimmer Paint over it.
Once the Shimmer Paint was about dried, I stamped a flower image onto the oval using Not Quiet Navy Ink.  I ran my finger around the edges of the oval to give it a bit more of a look.  By doing this I was able to pick up some of the Not Quiet Navy ink which had not completely dried.  Using Shimmer Paint, I was able to do this as it keeps your inks wet a little longer.  I adhered this to the top of the DSP.  I  adhered ribbon and tied a bow tie. 
I again randomly applied Shimmer Paint to a piece of Very Vanilla Cardstock, allowed to dry & then stamped a sentiment using Not Quiet Navy.  I punched the sentiment using my Large Oval.  I punched a piece of Not Quiet Navy Cardstock with the Scallop Oval & adhered it to the Very Vanilla Cardstock.  This was then adhered to the bottom of the DSP.
I adhered the DSP to the Pear Pizzazz.
Supplies –
Stamp Set – Just Believe
Inks – Not Quiet Navy
Cardstock – Very Vanilla, Pear Pizzazz, Peach Parfait, Not Quiet Navy
DSP – Peach Parfait
Punches – Large Oval, Scallop Oval
Bigshot Dies – Ovals
Accessories – Snail Adhesive, Shimmer Paint, Bigshot
Until next time, Enjoy!

Too Late…

…and thinking I had posted this card earlier for the challenge over at Stamping 411.  Proves I have not had a very good day & need to get to bed.

Today’s sketch uses a simple technique that we sometimes forget about — Tearing! Tearing your cardstock or DSP adds great interest and texture and is a fast, easy and very inexpensive way to dress up a card or project!

Measurements –
1.Layer One — Cardbase cut at 5.5 x 8.5″, scored and folded
2.Layer Two — Cardstock cut at 4 x 5.25″
3.Layer Three — Cardstock of DSP cut at 4″ wide and torn at approximately 4″
4.Layer Four — DSP cut at 2.5 x 3.5″
5.Layer Five — Cardstock cut at 2.25 x 3.25″

For this card I pulled out my DSP Woodand Park, but wanting to use a pattern that I hadn’t used previously.  That is the best thing about the DSP from SU®, it is double-sided.  I love tearing, but am always very hesitant on tearing DSP, especially the ones you love so much, although once I start, there is no holding me back.
 
I stamped my image using Chocolate Chip Ink onto Watercolour Paper, grabbed my Aqua Painter & Garden Green Ink, & proceeded to colour the image.  I then stamped a flower image directly onto Watercolour Paper using Chocolate Chip Ink.  Cut it out & again coloured the image with Garden Green Ink & Aqua Painter.  I adhered it to the card using SU Dimensionals.  I used Chunky Sprinkles for the centre of the flower.

Supplies –
Stamp Set – Growing Green
Inks – Chocolate Chip, Garden Green
Cardstock – Chocolate chip, Watercolour Paper, Wild Wasabi
DSP – Woodland Park
Accessories – Snail Adhesive, Multipurpose Liquid Glue, Aqua Painter, Chunky Glitter
Until next time, Enjoy!

Dragonflies…

What I thought would be an easy sketch ended up challenging me.  The sketch is from Cards & Things & by rights should have been a great sketch.  Well try telling that to my inactive creative side of the brain.  I think we had a bit of a sleepy day!

Anyhow, after some deliberation & toing & froing, I decided on a card for the girls.  I haven’t made that many lately & they always come in handy for the unexpected birhday.

Instead of placing circle on cirle, I placed the Very Vanilla Circle off-centre to the Pumpkin Pie Circle, giving it a little bit of a different look.  I am quiet happy with the look.  I flipped the card somewhat and come up with the following card –

Supplies –
Stamp Set – Bugs & Kisses
Inks – Rose Red
Cardstock – Pumpkin Pie, Rose Red, Very Vanilla
DSP – Sweet & Sour Speciality
Bigshot Dies – Circles # 2
Accessories – Snail Adhesive, Basic Pearls
Until next time, Enjoy!

Fifth Ave…

I haven’t used Fifth Avenue Floral Stamp Set in such a long time.  It always makes such a lovely card when used.

The take on the card is from Sketch Frenzy Friday, so why not have some fun & have a go.

Base Card – Night of Navy Cardstock – cut, score & fold
Layer 1 – Whisper White Cardstock – 5 3/8″ x 2 1/2″ or 14cm x 6cm
Run Whisper White through Bigshot using Embossing Folder – Perfect Polka Dots
Adhere top half of base card
Stamp flower images directly onto Watercolour Paper using Baja Breeze Ink & cut out
Colour images using Aqua Painter, Baja Breeze & Pear Pazzazz Inks
Adhere to card where the bottom of Whisper White Cardstock ends
Using Two-Step Bird Extra Large Punch, punch 5 leaves in Garden Green Cardstock & adhere randomly to card

Supplies –
Stamp Set – Fifth Avenue Floral
Inks – Baja Breeze, Pear Pizzazz
Cardstock – Whisper White, Garden Green, Night of Navy
Punches – Two-Step Bird Extra Large
Embossing Folder – Perfect Polka Dots
Accessories – Snail Adhesive, Multipurpose Liquid Glue
Until next time, Enjoy!