SC 052/12…

Our challenge this week over at Sunny Challenges & Creations has been brought to us by Christine Blain, who just happens to be our Guest Designer for the month. 

With Father’s Day coming up in September for Australia, it is the perfect challenge to start creating your cards or project using this challenge.  I opted to go for a male’s birthday card & used a set that I really like, but must admit, haven’t used it for sometime.  In fact, I am really happy with the final result!

Measurements –
Base Card – Soft Suede – 8 1/4″ x 5 7/8″ or 21cm x 15cm
Layer 1 – Very Vanilla – 5 3/4″ x 4″ or 14.5cm x 10cm
Layer 2 – DSP – 5 5/8″ x 3 7/8″ or 14cm x 9.5cm
Layer 3 x 2 – So Saffron – 4″ x 1/2″ or 14.5cm x 1cm
Layer 4 – Not Quite Navy – 4″ x 2″ or 14.5cm x 5cm
Layer 5 – Very Vanilla – 4″ x 1 7/8″ or 14.5cm x 4.5cm

Supplies –
Stamp Set – Totally Tool, Happiest Birthday Wishes
Ink – Soft Suede
Cardstock – Not Quite Navy, Soft Suede, Very Vanilla, So Saffron, Basic Grey
DSP – Well Worn
Accessories – Snail Adhesive, Crystal Effects, Crop-a-Dile, Stampin’ Up! Wirte Markers – So Saffron, Cherry Cobbler, Not Quite Navy

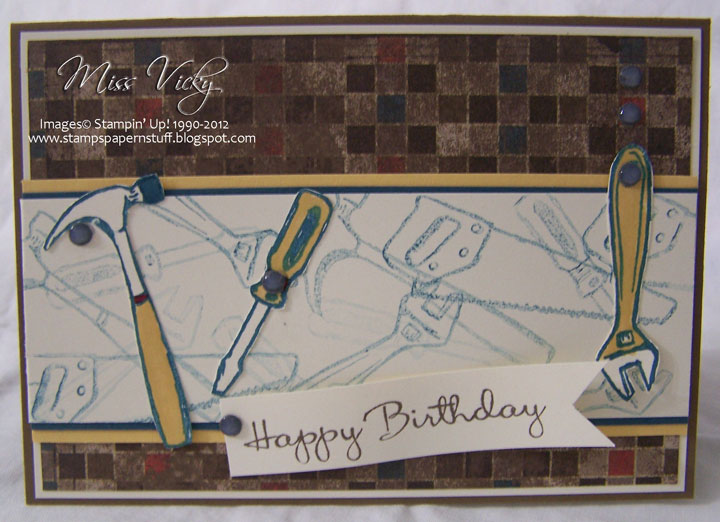
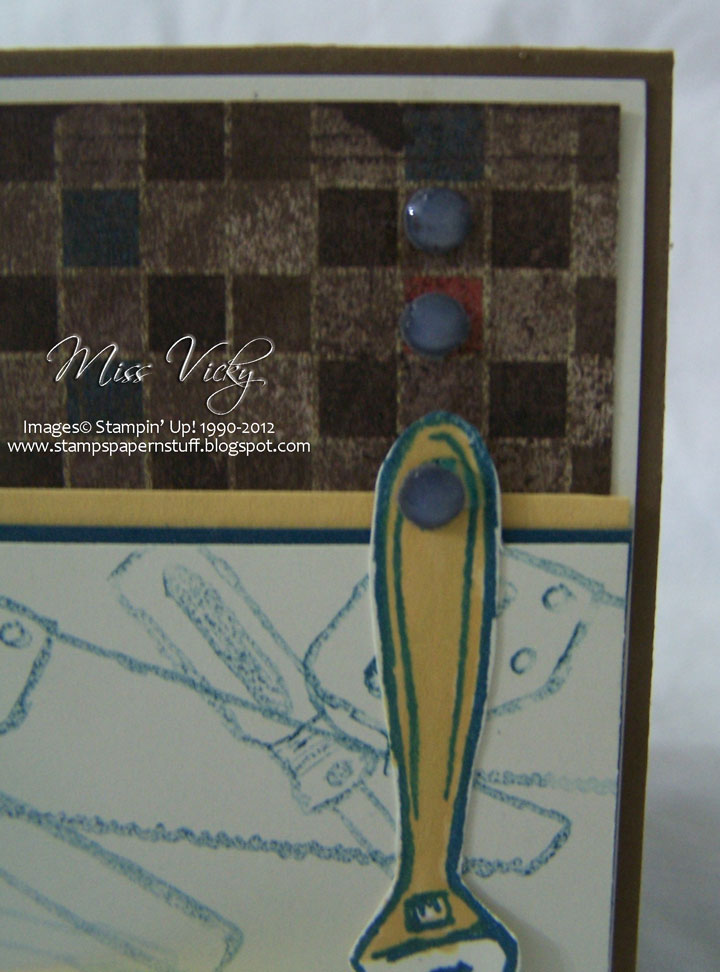
I inked my images with the Not Quite Navy Write Marker, stamped off once onto a scrap piece of paper & stamped onto the piece of Very Vanilla Cardstock.  I repeated this same step until I was happy with the look of the card.  I then stamped 3 images onto scrap Very Vanilla direct onto the card, cut the images out, coloured part of the images with Stampin’ Up! Write Markers – So Saffron, Not Quite Navy, Cherry Cobbler & set aside.

The piece of Very Vanilla was adhered to the piece of Not Quiet Navy, then So Saffron, to the piece of DSP, Very Vnailla & finally to the Base Card – Soft Suede all with Snail Adhesive.

I completely forgot to add my Silver Brads to the top left hand corner of the card, so I comprised a little.  I punched out 6 circles using my Crop-a-Dile, adhered 2 to the top LH corner with Tombow, 1 to the middle of the screwdriver, 1 to the handle of the spanner & 1 to the card where I wanted to place the hammer.

The tools were then adhered to the card – as per the photo with Tombow,with the spanner being my 3rd brad at the top LH corner.

The greeting was stamped in Soft Suede onto Very Vanilla, cut to size & adhered to the card prior to adhering the final Faux Brad it.

Don’t forget to pop over to Sunny Challenges & Creations to check out what Gwen, Kris & Christine have created.

We would love for you to join us!

Until next time, Happy Stampin’

FREE Pass…

Before I get onto sharing today’s card with you, I just want to let you know that I have a FREE pass to the next round of Stampin’ Fun & Friends which begins 20 September through to 4 October.

As the theme for this round is Autumn Artistry, all you have to do is leave a comment saying why you like Autumn.
Now, I know here in OZ we are only a few days off Spring, but there is something I remember about an autumn when living in Canberra many years ago.  That is all those beatuiful leaves falling off the many trees in & around the parks & gardens onto the ground & myself & my girlfriend diving into them, playing & hiding.  I had never seen anything like it.  The memory is still very strong in my mind!
I will be using random.org to draw the winner.  Closing date is 9 September.

??

On with the card –
With Father’s Day coming up here in OZ, we created a card last Friday which could be used for this occasion.  In fact, the card suits all occasions.  I found the instructions on the very talented Connie Babbert’s site.  I did change the measurememnts to suit my card & to make it smaller.
Base Card – More Mustard – 5 7/8″ x 4 1/4″ or 15cm x 10.5cm
Layer 1 – Pear Pizzazz – 5 3/4″ x 3 1/2″ or 14.5cm x 9cm
Layer 2 – DSP – 5 3/4″ x 3/4″ or 14.5cm x 2cm
Layer 3 – DSP – 5 7/8″ x 1″ or 15cm x 2.5cm
?
Inside Card…

?After scoring my Base Card at 4 1/2″ or 11.5cm, I adhered the wider piece of DSP down the RHS of the card – as per inside photo.

??
I adhered the narrower piece of DSP down the LHS of Pear Pizzazz Cardstock, stamped the image using Pear Pizzazz Ink at the top of the card & adhered to the Base Card using Snail Adhesive.  I wanted the tie to look like it was hanging off a hook.
After making my Tie using DSP, I attached it to the top of the card with Snail Adhesive.  I inked my sentiment in Basic Black Ink & stamped at an angle to the tie direct onto the Pear Pizzazz piece.
For my inside, I stamped the images around the edge of Whisper White Cardstock using Pear Pizzazz & adhered to the Base Card.
All in all, a really fast & very easy 5 minute card!
Supplies –
Stamp Set – Totally Tool, Short & Sweet, Cheers to You
Ink – Pear Pizzazz, Basic Black
Cardstock – Whisper White, Pear Pizzazz, More Mustard
DSP – In Colours
Accessories – Snail Adhesive
Until next time, Enjoy!

Male Card…

Using Stampin’ Up!® Designer Series Papers makes it so easy to co-ordinate all your cardstock to go with the papers.  This time I’ve created a male card using DSP – Blueberry Crisp®, but SU have taken the guess work out of matching the cardstock – it is all done for you!
Male cards are sometimes hard to make, but I’ve found that if you keep them very simple, the work is done for you.
 

Supplies –
Stamp Set – Totally Tool, Cheers to You
Inks – Pacific Point
Cardstock – Very Vanilla, Sahara Sand, Pacific Point, Not Quite Navy
DSP – Blueberry Crisp
Punches – 1″ Circle, 1 1/4″ Circle
Accessories – Grosgrain Ribbon – Night of Navy, Snail Glue
Until next time, Enjoy!

Manly Monday…

I’ve wanted to make a male card using “Totally Tool” with the background embossed to make it look like a board.  After checking out the sketch SSC149 this is what I have come up with.

My Card –
Supplies –
Stamp Set – Totally Tool, Best Yet
Ink – Basic Gray, Old Olive
Cardstock – Very Vanilla, Basic Gray, Old Olive
Punches – 1 3/4″ Circle, 1 1/4″ Circle, 1/16″ Handheld
Embossing Folder – SU Perfect Polka Dots
Accessories – Brads, Big Shot, Grosgrain Ribbon – Old Olive, Snail Adhesive, Sponge
Non-SU – Alfoil
To ensure the end result was a little stronger, I run 2 layers of Alfoil through the Embossing Folder.  This gave me a little more strength to work with.
 I’ve stamped the screwdriver onto Very Vanilla Cardstock &
punched a hole through the top of screwdriver, attached a silver brad so that it looks like it is hanging from the wall.
I then sponged a little of Basic Gray & Old Olive around so that it seems like there is a little oil, etc on the board.
To carry the theme through, I punched a hole through the “o” in “You” for a silver brad
Until next time, Enjoy! 

Tool Time…

Morning All,
I’ve finally managed to come up wwith a couple of male cards.  I always convince myself that they are really hard to do, but once I get started, I’m ok!

Again, this is a very easy card to do – my type of card and again I have updated one of my older cards I have copies of

Supplies
Cardstock – Pacific Point, Baja Breeze, Close to Cocoa, Very Vanilla
Stamp Set – Totally Tools, Short  & Sweet
Ink – Pacific Point, Basic Black
DSP – Urban Garden,
Accessories – Snail Adhesive, Dimensionals, Mat Pack
Punches – Photo Corners

Enjoy

Vicky