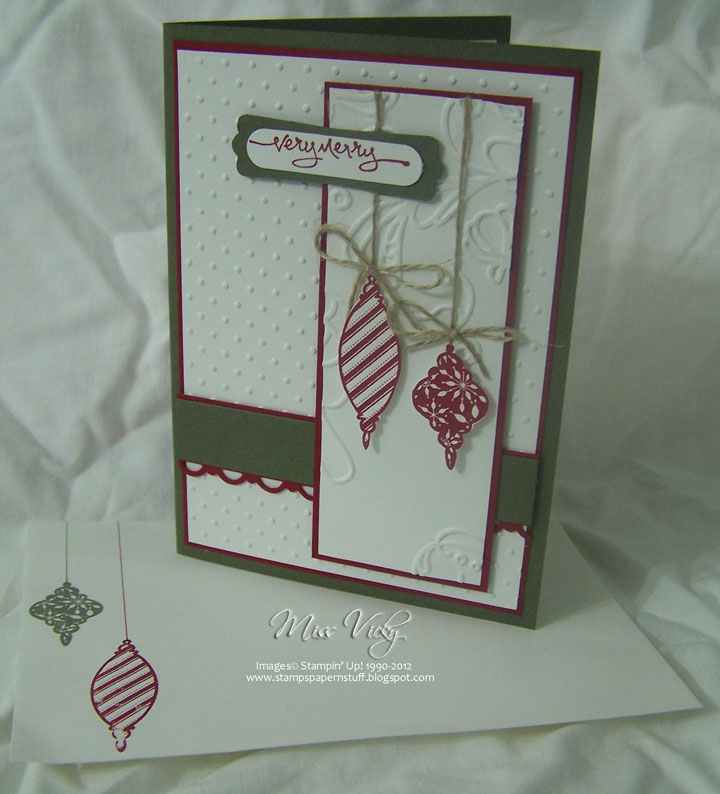
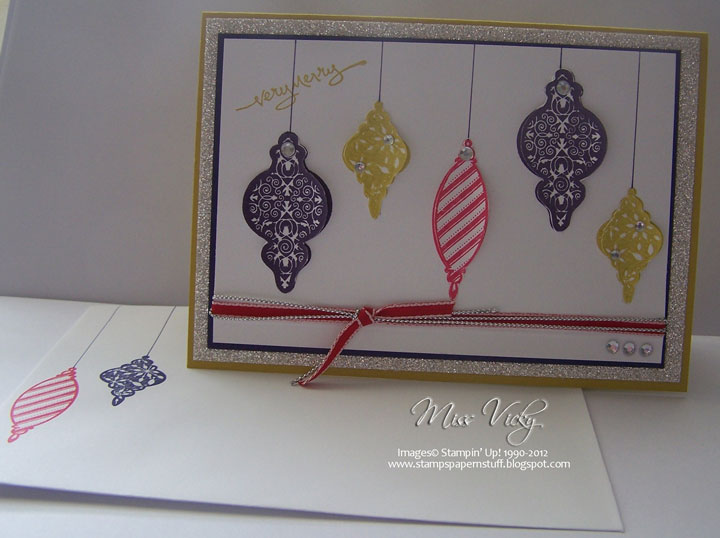
Today’s card is one we created a couple of weeks ago in my Volunteer “Crafty Creations” class at the Caloundra Community Centre.
Measurements – Base Card – Summer Starfruit – 8 1/4″ x 5 7/8″ or 21cm x 15cm Layer 1 – Sliver Glitter Paper – 5 3/4″ x 4″ or 14.5cm x 10cm Layer 2 – Concord Crush – 5 1/4″ x 3 5/8″ or 13.5cm x 9cm Layer 3 – Whisper White – 5 1/8″ x 3 1/2″ or 13cm x 8.5cm
Supplies – Stamp Set – Tree Trimmings, Short & Sweet (Both Retired) Ink – Concord Crush (Retired), Summer Starfruit, Real Red Cardstock – Whisper White, Summer Starfruit, Concord Crush, Silver Glitter Paper Ribbon – 1/8″ Taffeta – Real Red Accessories – Rhinestones, Snail Adhesive, Sticky Strip, Stampin’ Marker – Concord Crush (Retired), Non- SU! – Silver Cord
The images were stamped onto the large piece of Whisper White Cardstock, ensuring that I staggered them when stamping. I used Concord Crush, Real Red & Summer Starfruit Inks. I also stamped the same images onto a scrap piece of Whisper White Cardstock, cut out & set aside.
A piece of Real Red Ribbon & the Silver Cord was tied along the bottom prior to adhering this piece to the piece of Concord Crush Cardstock with Snail Adhesive.
The whole piece was then adhered to the piece of Silver Glimmer Paper with Sticky Strip. I find this holds it a little better, priro to adhering to the Base Card – Summer Starfruit.
Lastly, I drew lines using Concord Crush Marker so that the images looked like they were hanging down. The cut out images that had been set aside were adhered to the top of the matching images with a little of Snail Adhesive down the middle, the sides turned up a little & Rhinestones added randomly to the images, as well as 3 along the bottom of the card.
I stamped the sentiment direct onto the Whisper White Cardstock with Summer Starfruit Ink.
Although this little stamp set has been retired, I still love it. We used it in our volunteer class last Friday. During this class I get to play with all my favourite retired stamp sets & products. The layout is not my idea, as I sort of cased the card from the very talented Juliette Chapman Thanks Juliette!
Measurements – Base Card – Riding Hood Red – 11 5/8″ x 4 1/8″ or 19.5cm x 10.5cm Layer 1 – Early Expresso – 5 5/8″ x 4″ or 14.5cm x 10cm Layer 2 – Riding Hood Red – 4″ x 1 1/2″ or 10cm x 5cm Layer 3 – Very Vanilla – 4″ x 1″ or 10cm x 1.5cm Layer 4 – Riding Hood Red – 3″ x 2 3/4″ or 7.5cm x 7cm Layer 5 – Very Vanilla – 2 7/8″ x 2 5/8″ or 7cm x 6.5cm
Supplies – Stamp Set – Tree Trimmings (Retired), Short & Sweet (Retired) Ink – Garden Green, Riding Hood Red Cardstock – Riding Hood Red, Very Vanilla, Early Expresso Ribbon – 1 1/4″ Striped Grosgrain – Riding Hood Red (Retired) Embossing Folder – Perfect Polka Dots Punches – Scallop Trim Border Accessories – Big Shot, SU! Markers – Early Expresso, Snail Glue, Stampin’ Dimensionals, Tombow Multipurpose Glue
I run the piece of Early Expresso Cardstock through my Big Shot using the Perfect Polka Dots Embossing Folder prior to adhering it to the Base Card – Riding Hood Red with Tombow Multipurpose Glue.
I punched along the one edge of both pieces of the Very Vanilla & Riding Hood Red Cardstocks with the Scallop Trim Border Punch, adhered the Very Vanilla piece to the top of the Riding Hood Red piece with Snail Adhesive, tied a knot in a piece of Ribbon, adhered to the top of the Very Vanilla with Snail Adhesive, tucked ends under & then adhered to the Base Card with Snail Adhesive.
The images were stamped with Garden Green & Riding Hood Red Inks direct onto the small piece of Very Vanilla, lines drawn using my Early Expresso Stampin’ Up! Marker, adhered to the matching piece of Riding Hood Red Cardstock & then to the Base Card with Stampin’ Dimensionals.
Since the photo was taken, I have added a couple of small pearls to the images.
Today is Sunday & the start of the new challenge for the week over at Sunny Challenges & Creations. We hope you will join us this week.
It was my turn to bring you the challenge & along with the sketch we have to use a Christmas Theme. Seeing as though Christmas is just around the corner, this is the perfect time to make a start on your cards.
Measurements – Base Card – Always Artichoke – 8 1/4″ x 4 1/8″ or 21cm x 10.5cm Layer 1 – Cherry Cobbler – 4 7/8″ x 5 5/8″ or 14cm x 10cm Layer 2 – Whisper White – 4 3/4″ x 5 1/2″ or 13.5cm x 9.5cm Layer 3 – Cherry Cobbler – 1 1/2″ x 4 3/4″ or 3cm x 9.5cm Layer 4 – Always Artichoke – 1 1/4″ x 4 3/4″ x 2cm x 9.5cm Layer 5 – Cherry Cobbler – 5″ x 2″ or 5cm x 13cm Layer 6 – Whisper White – 4 7/8″ x 1 7/8″ or 4.5cm x 12.5cm
Supplies – Stamp Set – Tree Trimings, Short & Sweet Ink – Cherry Cobbler Cardstock – Cherry Cobbler, Always Artichoke, Whisper White Punches – Word Window, Modern Label, Scallop Trim Border Embossing Folders – Perfect Polka Dots, Elegant Lines Accessories – Linen Thread, Stampin’ Dimensionals, Snail Adhesive
I embossed the large piece of Whisper White with the Perfect Polka Dots prior to adhering to the piece of Cherry Cobbler & then to the Base Card – Always Artichoke.
The smaller piece of Cherry Cobbler was punched along one long side with the Scallop Trim Border Punch, adhered to the embossed Whisper White with Snail Adhesive & the piece of Always Artichoke adhered to the top of the punched piece.
I embossed the longer piece of Whisper White Cardstock using Elegant Lines Embossing Folder (I must confess that this is not a folder I have used that much, but when I do, I can’t understand why), adhered 2 pieces of Linen Thread to the back prior to adhering to the long piece of Cherry Cobbler & finally to the Base Card with Stampin’ Dimensionals.
I stamped 2 of the images from Tree Trimmings with Cherry Cobbler onto a scrap of Whisper White, cut them out & adhered to the card with Stampin’ Dimensionals. I tied 2 bows from the Linen Thread & adhered them to the tops of the images.
The sentiment was stamped onto a scrap of Whisper White Cardstock, punched with the Word Window Punch, & adhered to a piece of Always Artichoke which had been punch with the Modern Label Punch. The whole lot was then adhered to the card with Snail Adhesive & Stampin’ Dimensionals.
I’m not usually one for the tradional Christmas Colours, but I picked colours that I don’t usually play with. I also opted to go for Whisper White rather than Very Vanilla & I think it gives the whole card a very modern, yet old look about it. I also think the Linen Thread helps the feel of the card too!
I created this card sometime ago for the class I have at the Caloundra Community Centee on a Friday. The ladies like to create their own Christmas Cards, so towards the end of the year, I try to bring in colours that could be used for Christmas or any occasion.
I have put this card in such a safe spot that I cannot find it, so please bear with me while I try & think of the measurements. Fingers crossed they are not wrong!
Measurements –
Base Card – Melon Mambo – 11 5/8″ x 4 1/4″ or 29.5cm x 10.5cm – Scored at 2 7/8″ & 5 3/4″ or 7.3cm & 14.6cm
Layer 1 – Front – Whisper White – 2 3/4″ x 4″ or 7cm x 10.cm
Laye 2 – Back – Whisper White – 5 3/4″ x 4″ or 14.5cm x 10cm
I punched an oval in the middle of the smaller piece of Whisper White using my Large Oval Punch, prior to running it through the Bigshot using Embossing Folder – Perfect Polka Dots.
I stamped my greeting onto a scrap of Whisper White with Melon Mambo Ink & punched using my Extra Large Oval Punch. This was adhered behind the embossed Whisper White & a Pretty in Pink frame created to adhered over the top. I created the frame by punching first with my Oval Punch & then my Scallop Oval Punch.
I adhered a piece of Ribbon across the bottom of the Whisper White, tucked the edges behind & adhered to the front of the card with Multipurpose Glue.
I stamped my images onto the piece of Whisper White Cardstock using Melon Mambo & Pretty in PInk Inks and ahered to the Melon Mambo Cardstock.
Supplies –
Stamp Set – Short & Sweet, Tree Trimmings
Ink – Pretty in Pink, Melon Mambo
Cardstock – Pretty in Pink, Melon Mambo, Whisper White
Punches – Scallop Oval, Extra Large Oval, Large Oval
I created this card sometime ago & have never gotten around to posting it. I did get the idea from the very talented Holly Krautkremer a long time ago. I didn’t save the card but stored it in my head for all this time. I don’t even know if Holly created it for this Christmas or for last Christmas. I am not even sure if it is exact copy, but I think it is close enough. I only hope I have done it justice Holly!
Measurements –
Base Card – Rich Razzleberry – 8 1/4″ x 5 7/8″ or 21cm x 15cm – scored & folde in half landscape Layer 1 – Old Olive – 5 3/4″ x 4″ or 14,5cm x 10cm Layer 2 – Rich Razzleberry – 3″ x 3 3/8″ or 7.5cm x 8.5cm Layer 3 – Whisper White – 2 7/8″ x 3 1/4″ or 7cm x 8cm
I run the piece of Old Olive through the Bigshot using the Petals a Plenty Embossing Folder. I adhered a piece of Satin Ribbon off-centre across the card & tied a double bow tie to the RHS.
I stamped the piece of Whisper White Cardstock with the small snow flake from Short & Sweet Stamp Set using both Rich Razzleberry & Old Olive Inks. I stamped 3 images onto scraps of Whisper White Cardstock, 2 in Old Olive & 1 in Rich Razzleberry. I cut these images & adhered over the top of Rich RazzleberryRibbon using SU Dimensionals. The ribbon had been adhered to the Whisper White Cardstock. I applied 3 Basic Pearls to the top of the images.
I adhered the Whisper White piece to the piece of Rich Razzleberry Cardstock & then adhered to the Old Olive using SU Dimensionals. I adhered 3 Basic Pearls to the card.
A very quick, but very elegant Xmas card.
Supplies –
Stamp Set – Short & Sweet, Tree Trimmings
Ink – Rich Razzleberry, Old Olive
Cardstock – Old Olive, Rich Razzleberry, Whisper White
Another Xmas card you ask???? Well, it is getting close to that time of the year & me being me, I like to have my cards in the mail the first week in December. ???????????
Inside…
?
The layout for this card has been around the blog world for some time, so I have to say it is not my idea, but a combination of many cards & layouts I’ve seen over time. I love both stamp sets I’ve used on this card, so very versatile without being over the top.
Again, I’ve created a non-traditional card. Gotta love non-tradition…..
?
Base Card – Early Expresso – 8 1/4″ x 4 1/4″ or 21cm x 10.5cm – Scored & folded in half longways
Layer 1 – Blushing Bride – 5 3/4 x 4″ or 14.5cm x 10cm
Layer 2 – Whisper White – 5 5/8″ x 3 7/8″ or 14cm x 9.5cm
Layer 3 – DSP – 5 1/2″ x 3 3/4″ or 13.5cm x 9cm
Layer 4 – Early Exresso – 3 1/4″ x 2 1/4″ or 8cm x 5.5cm
Layer 5 – Whisper White – 3 1/8″ x 2 1/8″ or 7.5cm x 5cm
I cut my DSP into 3 pieces, being careful that I didn’t mix the sections so that I knew which order they would be adhered to the card. I actually didn’t want them all to be the same size, but the 1st & 2nd are…..
These pieces were adhered to Whisper White leaving a small border of WhisperWhite around each piece, then to Blushing Bride using Snail Ahesive.
?
Envelope…
?I stamped 3 images onto the smaller piece of Whisper White using Old Olive & Blushing Bride Inks. I drew the lines at the top of the images with my SU Markers – Old Olive & Blushing Bride. I adhered this piece to the top of the DSP with Snail Adhesive.
I stamped my greeting onto Whisper White scrap piece with Early Expresso Ink, punched it out with my Small Oval Punch & adhered to a piece of Early Expresso which had been punched using Large Oval Punch.
I punched a hole in either side of the ovals, run ribbon through them & across the card, tucked my ends under & adhered the whole piece to the Base Card – Early Expresso.
To pop the card a little, I applied Basic Rhinestones to the images & to the ribbon at the greeting.
Supplies –
Stamp Set – Short & Sweet, Tree Trimmings
Ink – Early Expresso, Blushing Bride, Old Olive
Cardstock – Whisper White, Early Expresso, Blushing Bride
DSP – Letters to Santa
Punches – Small Oval, Large Oval
Ribbon – 1/8″ Taffeta – Early Expresso
Accessories – Snail Adhesive, Basic Rhinestones, SU Markers
This is the card we made today at Crafty Creations. All the ladies loved it & of course, the best part – even though we all had the same basic kit, everyone’s card turned out so very different!
Base Card – Old Olive – 8 1/2″ x 5 7/8″ or 22cm x 15cm
Front –
Layer 1 – Blushing Bride – 5 3/4″ x 2 1/8″ or 14.5cm x 5.5cm
Layer 2 – DSP – 5 5/8″ x 2 3/4″ or 14cm x 5cm
Layer 3 – Old Olive – 3 1/2″ x 2″ or 8.5cm x 5cm
Layer 4 – Whisper White – 3 3/8″ x 1 7/8″ or 8cm x 4.5cm
LHS –
Layer 1 – Whisper White – 5 3/4″ x 2 1/8″ or 14.5cm x 5.5cm
RHS –
Layer 1 – Early Expresso – 5 3/4″ x 4″ or 14.5cm x 10cm
Layer 2 – DSP – 5 5/8″ x 3 7/8″ or 14cm x 9.5cm
Score along long edge of card at 2 1/4″ & 4 1/4″. Fold at score lines.
????????
Inside Card…
???????????????
Front –
Using Snail Adhesive, I adhered DSP to Blushing Bride Cardstock, then to the Base Card – Old Olive. I stamped random snowflake images onto Whisper White Cardstock using Early Expresso & Blushing Bride Inks. I stamped the image to be cut out onto a scrap of Whisper White Cardstock using Old Olive Ink. This was adhered to the piece of Whisper White Cardstock using SU Dimensionals. I drew a line from the top of the card to the image with my SU Marker – Old Olive.
I adhered this piece to the Old Olive piece & then to the front of the card, ensuring that adhesive was only applied to half the piece. I applied a Basic Pearl to the top of the trim.
Inside LHS –
I randomly stamped snowflake images onto a piece of Whisper White Cardstock using Blushing Bride & Early Expresso Inks. With the Early Expresso images, I stamped off once prior to stamping onto the Whisper White, as I didn’t want this colour to be too dark. I then stamped a trim onto the Whisper White using Blushing Bride & drew a line from the top of the card to the top of the trim with my SU Marker – Old Olive.
I adhered this piece to the Base Card – Old Olive, as per photo.
Inside RHS –
I adhered the DSP to Early Expresso Cardstock & then to the Base Card – Old Olive.
Supplies –
Stamp Set – Tree Trimmings, Short & Sweet
Ink – Blushing Bride, Old Olive, Early Expresso
Cardstock – Old Olive, Blushing Bride, Early Expresso, Whisper White
DSP – Letters to Santa
Accessories – SU Markers – Old Olive, Snail Adhesive, SU Dimensionals, Basic Pearl
I did these couple of cards a little time ago, but hadn’t gotten round to posting. They are both the same with a couple of little differences, plus I used a colour that to me has gone a little by the wayside with all the new colours SU have!
Card 1 – Base Card – Chocolate Chip – 9 1/4″ x 4 1/4″ or 23.5cm x 10.5cm – scored & folded at 3 1/2″ or 9cm Layer 1 – Bashful Blue – 5 5/8″ x 4″ or 14cm x 10cm Layer 2 – Whisper White – 5 1/2″ x 3 7/8″ or 13.5cm x 9.5cm Layer 3 – Bashful Blue – 3 3/8″ x 4″ or 8.5cm x 9cm Layer 4 – Chocolate Chip – 2 3/4″ x 2″ or 7cm x 5cm Layer 4 – Whisper White – 2 5/8″ x 1 7/8″ or 6.5cm x 4.5cm ?
Card 1 – Inside…
? I stamped my image direct onto piece of Whisper White Cardstock using Chocolate Chip Ink, adhered this piece to the Chocolate Chip Cardstock & set aside.
With Embossing Folder – Elegant Lines, I run the piece of Bashful Blue through the Bigshot, tied a knot in the middle of the ribbon before adhering to the LHS of the embossed piece. This was adhered to the front of the card.
I then adhered the stamped piece to the top of the card, ensuring I placed adhesive on ONLY half of the piece to be adhered to the card. Basic Rhinestones were applied to the image.
Inside – I stamped the image direct onto Whisper White using Chocolate Chip Ink, adhered to Bashful Blue & then to the Base Card – Chocolate Chip.
Card 2 – Base Card – Chocolate Chip – 9 1/4″ x 4 1/4″ or 23.5cm x 10.5cm – scored & folded at 3 1/2″ or 9cm
Layer 1 – Bashful Blue – 5 5/8″ x 4″ or 14cm x 10cm Layer 2 – Whisper White – 5 1/2″ x 3 7/8″ or 13.5cm x 9.5cm Layer 3 – Bashful Blue – 3 3/8″ x 4″ or 8.5cm x 9cm Layer 4 – Chocolate Chip – 3″ x 2 1/2″ or 7.5cm x 6.5cm Layer 4 – Whisper White – 2 7/8″ x 2 3/8″ or 7cmx 6cm
Inside –
I used a Technique– “Bubble Background”. I had watched this great video from Frenchie quiet some time ago & had always remembered it. While creating this card, I thought it would be the perfect opportunity to put this technique to the test. It creates a very soft suttle background. One, which I was aimng for, as I still wanted to be able to write over the top for my message. ????
?
Once my background had been created onto Whisper White, I stamped 2 images using Bashful Blue & Chocolate Chip Inks. I then randomly stamped the Snowflake images around the outside of the card using Bashful Blue Ink.
Front –
Using Bashful Blue Ink, I randomly stamped the piece of Bashful Blue Cardstock, tied a knot in the piece of ribbon, adhered to the LHS & adhered to the base card – Chocolate Chip Cardstock.
I stamped the images onto Whisper White using Chocolate Chip & Bashful Blue Inks & adhered to the piece of Chocolate Chip Cardstock. This piece was adhered to the front of the card, ensuring adhesive was applied to ONLY half of the piece to be adhered to the card.
All in all 2 very quick Christmas Cards. These would be great for a Stamp-a-Stack & could be applied for any occasion.
…as a gift card turning into a Christmas Card but with a small difference….
I had scraps of coloured cardstock sitting on my desk after completing a couple of other projects & instead of putting it all away, I thought I would attempt to make a small gift card. Once I finished it & as I have to create a “Master Plan” for tomorrow’s class, I took it one step further & created a Christmas Card.
I used Retired DSP on this card, but it can be quickly turned into a completely different card using the DSP – Letters From Santa which is the current Xmas Paper or any DSP for that matter!
Base Card – Cherry Cobbler – 5 7/8″ x 4 1/4″ or 15cm x 10.5cm Layer 1 – DSP – 5 3/4″ x 4″ or 14cm x 10cm Layer 2 – Cherry Cobler – 5″ x 3 5/8″ or 12.5cm x 9.5cm – Scored in half Layer 3 – Old Olive – 4 7/8″ x 3 1/2″ or 12cm x 9cm Layer 4 – Very Vanilla – 4 3/4″ x 3 3/8″ or 11.5cm x 8.5cm
Using my SU Marker – Chocolate Chip, I drew squiggley lines around the edge of the Very Vanilla Cardstock. I stamped my 2 images using Cherry Cobbler & Old Olive Inks direct onto Very Vanilla Cardstock. I drew 2 lines from the images to the border around the card using my SU Markers – Chocolate Chip.
This piece was adhered to Olid Olive Cardstock & then to the Cherry Cobbler Cardstock. Using 2-Way Glue, I randomly applied this to the stamped images & applied Dazzling Diamonds – cannot be seen very well in the photo. This was my original gift card.
I adhered a piece of Very Vanilla Grosgrain Ribbon to the lower half of the DSP, tied a knot & then adhered to the Base Card – Cherry Cobbler. The Gift Card was then adhered to the LHS of the Base Card – as per photo.
I stamped the sentiment using Chocolate Chip Ink onto Very Vanilla, punched using my Oval Punch & adhered to a piece of Cherry Cobbler Cardstock which had been punched using the Scallop Oval Punch. I adhered this to the Base Card.
Supplies –
Stamp Set – Tree Trimmings, Short & Sweet
Ink – Chocolate Chip, Old Olive, Cherry Cobbler
Cardstock – Very Vanilla, Cherry Cobbler, Old Olive
DSP – Jolly Holiday – Retired
Punches – Scallop Oval, Large Oval
Ribbon – 5/8″ Grosgrain – Very Vanilla
Accessories – Tombow, Dazzling Diamonds, SU Markers, 2-Way Glue