For Mum…

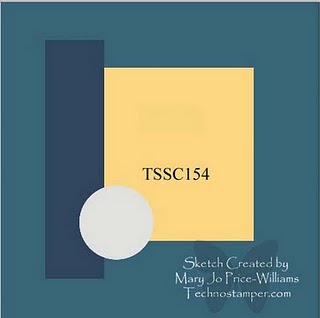
Today’s card is a CASE from the Summer Mini, although I have changed a couple of things.  I’ve loved the look of this card from the first time I opened the mini.

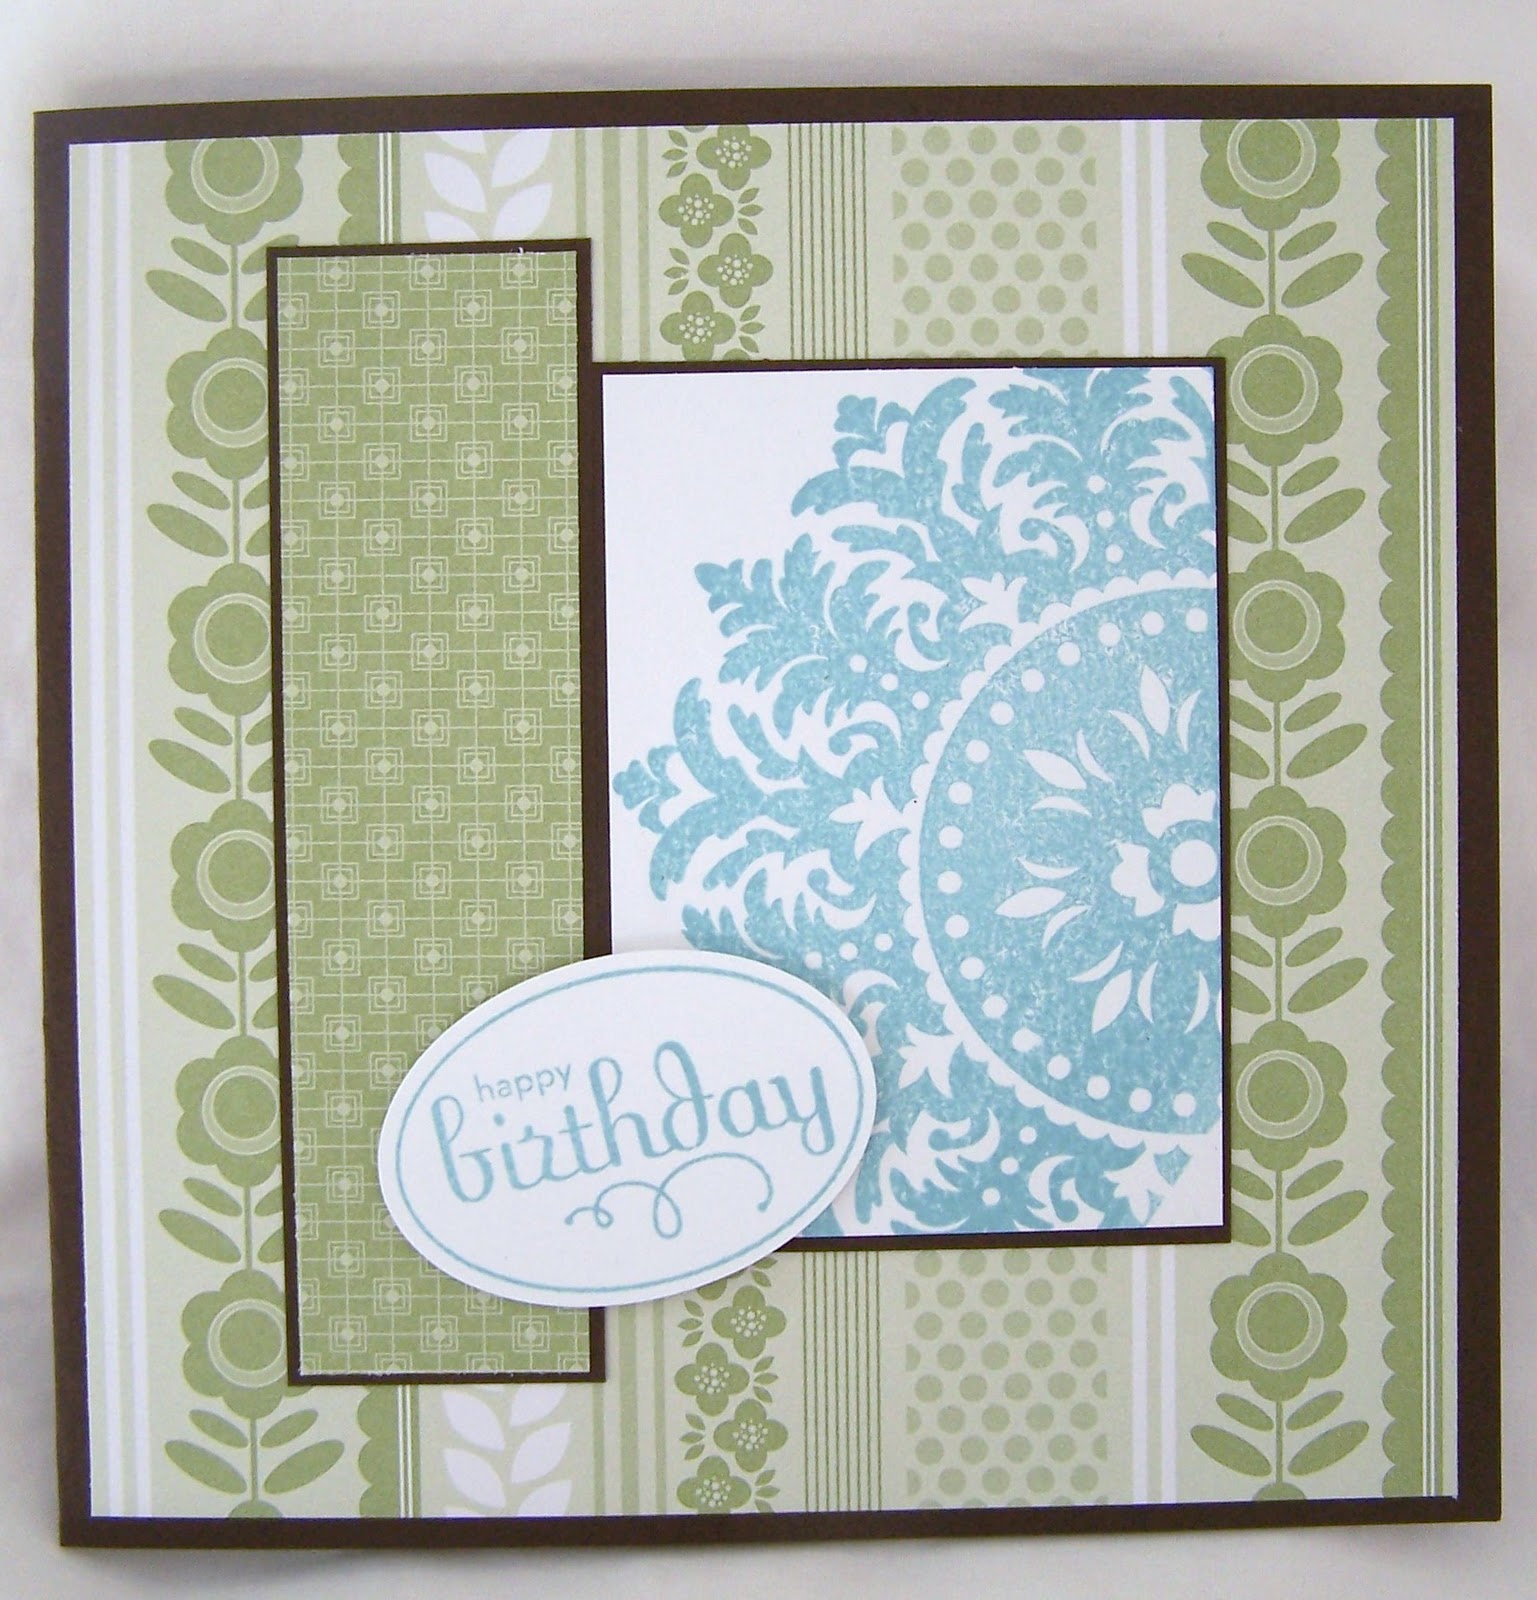
Cut base card using Riding Hood Red Cardstock
Cut So Saffron Cardstock – 5″ x 3 1/2″ or 12.5cm x 9cm
Run this piece through your Bigshot using Embossing Folder Square Lattice
Adhere to base card
Cut Pear Pizzazz Cardstock – 4 1/2″ x 2″ or 11.5cm x 5cm
Cut Whisper White Cardstock – 4 3/8″ x 1 7/8″ or 11cm x 4.5cm
Using Pear Pizzazz Ink, stamp image twice onto the Whisper White Cardstock
Colour buds using your Watercolour Pencils
Using a scrap piece of Whisper White Cardstock, stamp images again & cut out

Adhere 2 cut out images over the stamped images using SU Dimensionals
Adhere Whisper White to Pear Pizzazz & then to base card down the RHS
Stamp 3 flower images onto scrap Whisper White Cardstock using Riding Hood Red Cardstock & cut out
Apply flowers to card using SU  Dimensionals
Adhere Basic Pearls to middle of flowers
With a scrap piece of Whisper White Cardstock & Pear Pizzazz Ink, stamp sentiment
Using Oval Punch Extra Large, punch sentiment & adhere to card
The sentiment I’ve used for this card makes for a great greeting birthday/general card for your mum or a Mother’s Day card.
 Supplies –
Stamp Set – Blessed Mother, Well Scripted
Inks – Pear Pizzazz, Riding Hood Red
Cardstock – Whisper White, Riding Hood Red, So Saffron
Punches – Oval Extra Large
Embossing Folder – Square Latice
Accessories – Snail Adhesive, Multipurpose Liquid Glue, SU Dimensionals
Until next time, Enjoy!

Pocket Card…

The card today is one I made about 6 weeks ago & have been meaning to post, but things have gotten in the way.  I was really happy with the way it turned out.  I used a couple of Techniques on this card – Sponging, Stampin’ Pastels & Shimmer Paint.

Inside –
Stamp image using Early Expresso Ink
Sponge Early Expresso around the edges
Punch out tab using Designer Label Large & DSP Blushing Bride
Score, fold in half & apply halfway at top card – as per picture
Stamp sentiment using Early Expresso Ink directly onto card

Card –
Score & fold in half Early Expresso Cardstock
Using 1 1/4″ Punch, punch 1/2 circle at the halfway mark
Cut smaller piece of DSP – Blushing Bride, punch 1/2 circle at top
Adhere Grosgrain Ribbon – Early Expresso near bottom Adhere to Early Expresso card base
Cut smaller piece of Early Expresso Cardstock for the main picture
Cut piece of Very Vanilla Cardstock
Randomly apply Shimmer Paint – White to the Very Vanilla, allow to dry
Punch moon using 1 1/4″ punch & Post-It Note, adhere lightly to where you would like your moon to be
Using Stampin’ Pastels & Dauber, apply background – I used Certainly Celery, Pretty In Pink & Early Expresso
Stamp image over top of background using Early Expresso Ink
Using a small scrap of Very Vanilla, rub Stampin’ Pastels over the top of cardstock
Using Embosslit Dies – Beautiful Wings, cut out
Adhere Jewels – Basic Pearls to the middle of large butterfly & randomly adhere 3 images to the card
Insert Inside Card
Supplies –
Stamp Set – Just Believe, Well Scripted
Ink – Early Expresso
Cardstock – Very Vanilla, Early Expresso
DSP – Blushing Bride
Punches – Designer Label Large, 1 1/4″ Circle
Embosslit Dies – Beautiful Wings
Ribbon – 1/4″ Grosgrain -Early Expresso
Accessories – Snail Glue, Bigshot, Stampin’ Pastels, Jewels – Basic Pearls, Dauber
Non-SU – Post-It Notes
I hope you enjoyed today’s card share.  I know I thoroughly enjoyed creating it!
Until next time, Enjoy!

Birthday…

I’ve created today’s card using the Colour Challege over at stampinwithstacey Love these colours together – very clean & fresh. 

I have also combined my colours with Mary Jo’s sketch challenge.
For my card –
Cut your basic card using Early Expresso Cardstock – Square
Layer a piece of DSP Patterns – Pear Pizzazz over Early Expresso
Cut long piece of Early Expresso and adhere a piece of DSP – Pear Pizzazz on top of this.  I choose to have the opposite side to the base card
Adhere to base card
Cut anoher piece of Early Expresso Cardstock and a smaller piece of Whisper White Cardstock
Stamp image onto Whisper White, using Baja Breeze ink
Adhere Whisper White to Early Expresso
Using Baja Breeze Ink, stamp sentiment onto Whisper White & punch using Extra-Large Oval Punch
Adhere to Card using Stampin’ Dimensionals
This makes for a great male card.
Supplies –
Stamp Set – Mediallion, Well Scripted
Ink – Baja Breeze
Cardstock – Early Expresso, Whisper White
DSP – Pear Pizzazz
Punches – Extra-Large Oval
Accessories – Snail Adhesive, Stampin’ Dimensionals
Until next time, Enjoy!

Black & White…

The group I belong to has just postsed our weekly challenge.  Well to be truthful it was a couple of days ago & I’ve just gotten round to completing it.  I love doodling & always think it calls for a very “simple & clean” card.
Challenge 101

Week of December 27 – January 5 Doodling

This week we are creating a project that includes doodling. Doesn’t matter what kind or where. Grab your markers and doodle away.
Cut your base card using Whisper White Cardstock
Cut piece of Basic Black Cardstock & another piece in Whisper White
Stamp image onto Whisper White using Basic Black ink & colour in with your Watercolour Pencils
Adhere 3 Basic Jewels to the top LHS of the card

Adhere Whisper White to Basic Black & adhere to card base

With your Stampin’ Write Journaler – Basic Black, doodle around the edges of the card
Inking your sentiment in Basic Black, stamp directly onto card
 
Supplies –
Stamp Set – Every Moment, Well Scripted
Ink – Basic Black
Cardstock – Whisper White, Basic Black
Accessories – Snail Glue, Watercolour Pencils, Basic Jewels,
Stampin’ Write Journal – Basic Black
Why not have a go yourself?
Until next time, Enjoy!

Birthday…

Challenge # 1 –
I come across a Colour Challenge over at http://stampinwithstacey.blogspot.com/ which ask for the colours Real Red, Old Olive, Chocolate Chip & Certainly Celery to be used. 

Challenge # 2 –
Putting my thinking cap on, I then needed a layout, which brings me to the Sketch Challenge at http://technostamper.blogspot.com/  Mary Jo always has great challenges.
Seeing Masry Jo’s sketch, I knew I wanted to create a male’s card & the first stamp set which sprung to mind was “Circle Circus“.  An oldie, but a goodie.
Challenge # 3 –
Not to be outdone, my Yahoo Group is celebrating 100 challenges.  The theme being “CELEBRATING“.  The mind is full of options.
To complete my card, I embossed the Chocolate Chip Cardstock using the Bigshot & Perfect Polka Dots
For the middle of the card, I used the Technique – Faux Tiles.  To see how this technique is done, please look under Techniques on the RHS of the bar.
I then stamped my images over the top of the technique.  I adhered this piece to Real Red.  Adhering Grosgrain 5/8″ Ribbon – Certainly Celery across the middle, I attached the whole lot to Old Olive Cardstock.
I stamped the greeting from the stamp set Well Scripted, punched it out using the Extra Large Oval punch & wiped the edge through Chocolate Chip ink.  I then adhered this to the middle of the rribbon using SU Dimensionals.
Supplies –
Stamp Set – Circle Circus, Well Scripted
Ink – Real Red, Chocolate Chip, Certainly Celery, Old Olive
Cardstock – Whisper White, Real Red, Old Olive, Chocolate Chip
Punches – Extra-Large Oval
Embossing Folder – Perfect Polka Dots
Accessories – Mutlipurpose Liquid Glue, Grosgrain 5/8″ Ribbon – Certainly Celery, Bigshot, Dimensionals
Until next time, Enjoy!