Christmas …..

… is over for another year!  I hope you all had a great day & enjoyed the company of your family & friends. 

Over the next couple of days, I hope to post Christmas Cards which for some reason or other, I didn’t manage to post.  There may not be instructions or measurements as I no longer have the cards, but I would still like to share them with you.

Today’s card is one we created way back in October.  I’ve used retired Stamps – the beauty of being able to reuse my favourite stamps in this class!

Supplies –
Stamp Set – Short & Sweet, Dasher, Medallion
Ink – Crumb Crake, Early Expresso
Cardstock – Cherry Cobbler, Very Vanilla
Embossing Folder – Vintage Wallpaper
Ribbon – 1/2″ Seam Binding – Very Vanilla
Accessories – Snail Adhesive, Tombow Multipurpose Glue, Mini Glue Dots, Pearls,

Until next time, Happy Stampin’

SC012/11…

This card has been created for the challenge over at Sunny Challenges & Creations  It is not too late to link your creation.  You have until Saturday arvo, so why not have some fun & have a go!  You could be our “Ray of Sunshine”

For the inspiration of this card, I actually saw a dress in a shop window yesterday using these colours.  Amazing where your inspiration comes from.

The measurements for my card will make it easier for you.  Along with the sketch, don’t forget to use flowers on your card.

Base Card – Crumb Cake – 8 1/4″ x 5 7/8″ or 21cm x 15cm – score @ 4 1/8″ or 10.47cm & fold in half
Layer 1 – Cherry Cobbler – 5 3/4″ x 4″ or 14.5cm x 10cm
Layer 2 – Very Vanilla – 5 5/8″ x 4 1/8″ or 14xm x 10.5cm
Layer 3 – Crumb Cake – 4″ x 1 1/4″ or 10cm x 3cm
Layer 4 – Very Vanilla – 4″ x 1 1/4″ or 10cm x 3cm

I stamped my background mage onto Very Vanilla using Crumb Cake Ink – I didn’t stamp off.  I stamped over the stop with another image using Cherry Cobbler Ink.

I cut this stamped piece at 1″ & 1 1/4″ which gave me 2 x 1″ pieces & 1 x 1 1/4″.  I adhered these pieces onto the piece of Cherry Cobbler & then to the Base Card – Crumb Cake, ensuring the larger piece went into the middle & smaller pieces either side.

With my Eyelet Border Punch, I punched the longer side of the piece of Crumb Cake Cardstock, stamped my sentiment with Cherry Cobbler Ink onto Very Vanilla piece & run it through the Bigshot using the Embossing Folder – Perfect Polka Dots.

Using a sponge, Cherry Cobbler Ink & a piece of White Taffeta Ribbon, I sponged the ribbon until it was the colour I wanted, let dry, adhered to the Embossed Very Vanilla Cardstock, tucked ends under, adhered to the punched piece of Crumb Cake & finally to the Base Card.

I punched 3 flowers with one of the punches from the Itty Bitty Set, adhered them to the Very Vanilla Embossed Cardstock & adhered a Basic Pearl on each.

Lastly, I adhered butterflies to the top of the card after they had been cut from the Bigshot & Embosslit Die.  I applied Basic Pearls to the butterflies & to the flowers.

Supplies –
Stamp Set – Medallion, Just Believe
Ink – Cherry Cobbler, Crumb Cake
Cardstock – Crumb Cake, Very Vanilla, Cherry Cobbler
Punches – Eyelet Border, Itty Bitty Set
Ribbon – 1/8″ Taffeta – White
Embossing Folders – Perfect Polka Dots
Embosslit Dies – Beautiful Wings
Accessories – Snail Adhesive, Sponge, Basic Pearls
Until next time, Enjoy!

Crimping…

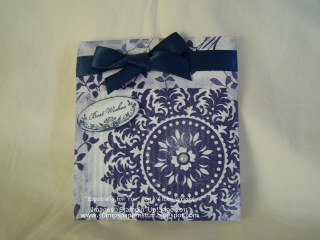
I created this card a couple of weeks ago but didn’t get round to posting it.  I remember seeing this card ages ago & it has always stuck in my mind.  It has been CASEd from another SU Demonstrator, whose names slips my mind as her details were not on the card.  Once I find out, I will give her the much credit she deserves as it is a beautiful creation.  I changed mine using the colours of Concord Crush & Not Quiet Navy.
It is such a long long time since I last used my Crimper.  A technique long past revisiting.
After sealing my envelope, I cut it about 1 1/2″ or 4cm from top – shorter side.  Ink your image using Concord Crush Ink & stamp image onto bottom part of envelope.  Stamp 2nd image again using Concrush Crush Ink & randomly stamp around the edges of your card – top & bottom.  For the top, I also stamped off a couple of times, just to give it another look.

I sponged around the edges of both top & bottom using my SU Sponge & Concord Crush Ink.  Are you sick of Concord Crush yet?????  I wrapped Satin Ribbon – Not Quiet Navy around the top part of the envelope & tied a bow off centre at the front.

These instructions sound very familiar that I could have sworn that I had posted this, but after searching my blog high & low, no result!  So on with the story….

Placing the bottom half of the card into the Crimper sideways, I proceeded to put it through the Crimper.

I stamped my greeting onto a piece of Whisper White Cardstock in Not Quiet Navy – yep, I’ve changed colours……  Punched the greeting out using my Large Oval Punch, sponged around the edges with Not Quiet Navy, adhered to card with a SU Dimensional & placed a small Pearl in the center of the greeting, as well as a larger Pearl to the centre of the Medallion Stamp.

For the inside, I cut a piece of Concord Crush Cardstock – 4 1/2″ x 4″ or 11.5cm x 10cm.  I cut another piece using Whisper White Cardstock – 4 3/8″ x 3 7/8″ or 11cm x 9.5cm.  I stamped my image using Not Quiet Navy Ink, sponged the edges in the same colour & adhered to the Concord Crush Cardstock.  I placed a couple of small Pearls to the centre of the flowers.

All in all a really lovely creative card using a techinque which has been around for yonks, but not seen that much now.  It is still one of my favourites & probably always will be.  Note to selfstart using Crimper more often!

Supplies –
Stamp Set – Medallion, Just Believe, Oval All
Cardstock – Whisper White, Concord Crush
Ink – Not Quiet Navy, Concord Crush
Punches – Large Oval
Ribbon – Satin – Not Quiet Navy
Accessories – Crimper, SU Envelope, Snail Adhesive, Basic Pearls, SU Sponge, SU Dimensionals

Until next time, Enjoy!

Medallion…

As I have to make a couple of male birthday cards this month & not having any cards in my stash – haha – this is the prefect sketch to complete a couple of cards.

Gotta love how all the measurements are done for you –

Layer 1  – Cardbase cut at 5.5 x 8.5″, scored & folded
Layer 2 – 4 x 5.25″
Layer 3 – 4 x 1.75″

I’ve used Baja Breeze for my card base, scored & folded
Cut smaller piece of Early Expresso Cardstock
Cut DSP – Pear Pizzazz
Cut Very Vanilla Cardstock
Stamp image directly onto Very Vanilla using Early Expresso Ink
Using your Early Expresso SU Marker, colour in sentiment & stamp directly onto Very Vanilla
Adhere both pieces to the Early Expresso Cardstock
Adhere Ribbon – Pear Pizzazz across the join, tuck ends under & tie knot
Adhere Early Expresso Cardstock to base card – Baja Breeze

This is a great sketch for that 5 minute card.

Supplies –
Stamp Set – Mediallion, A Word for You
Inks – Early Expresso, Pear Pizzazz
Cardstock – Very Vanilla, Baja Breeze, Early Expresso
DSP – Pear Pizzazz
Ribbon – 1/2″ Stitched-Poly Pear Pizzazz
Accessories – Multipurpose Liquid Glue, Snail Glue, SU Markers
Until next time, Enjoy!

Birthday…

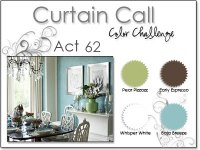
I’ve created today’s card using the Colour Challege over at stampinwithstacey Love these colours together – very clean & fresh. 

I have also combined my colours with Mary Jo’s sketch challenge.
For my card –
Cut your basic card using Early Expresso Cardstock – Square
Layer a piece of DSP Patterns – Pear Pizzazz over Early Expresso
Cut long piece of Early Expresso and adhere a piece of DSP – Pear Pizzazz on top of this.  I choose to have the opposite side to the base card
Adhere to base card
Cut anoher piece of Early Expresso Cardstock and a smaller piece of Whisper White Cardstock
Stamp image onto Whisper White, using Baja Breeze ink
Adhere Whisper White to Early Expresso
Using Baja Breeze Ink, stamp sentiment onto Whisper White & punch using Extra-Large Oval Punch
Adhere to Card using Stampin’ Dimensionals
This makes for a great male card.
Supplies –
Stamp Set – Mediallion, Well Scripted
Ink – Baja Breeze
Cardstock – Early Expresso, Whisper White
DSP – Pear Pizzazz
Punches – Extra-Large Oval
Accessories – Snail Adhesive, Stampin’ Dimensionals
Until next time, Enjoy!