Just Believe….

…is such a great stamp set & I find myself going to it constantly that I sometimes have to stop & grab another.

It is so long since I created a card for a challenge that I thought I would try the challenge over at Stampin’ Up! Only.  This site is where you have to use SU! products only on your creations.  This week the challenge is to use a Technique that you use infrequently.  I don’t do nearly enough techniques on my cards, so this is the perfect opportunity to try!

Knowing what I had to create on my card, I then went in search of a sketch.  What better place to start than Mary Jo’s.  This is the first of her sketches for the year.

For my card I choose the Technique – Faux Silk

Measurements –
Base Card – Calyspo Coral – 11 5/8″ x 4 1/8″ or 30cm x 10.5cm – Scored & Folded in the middle
Layer 1 – Whisper White – 5 5/8″ x 4″ or 14.5cm x 10cm
Layer 2 – DSP – 5 1/2″ x 3 7/8″ or 14cm x 9.5cm
Layer 3 x 2 – Calyspo Coral – 3 1/2″ x 2″ or 9cm x 5cm
Layer 4 x 2 – Whisper White – 3 3/8″ x 1 7/8″ or 8.5cm x 4.5cm
Layer 5 – Calyspo Coral – 5 3/4″ x 3/4″ or 14.5cm x 2cm
Layer 6 – Whisper White – 5 5/8″ x 5/8″ or 14cm x 1.5cm

I adhered the DSP to the piece of Whisper White Cardstock & then to the Base Card – Calyspo Coral using Snail Adhesive.

Envelope & Inside…
After stamping my image onto Tissue Paper using Pear Pizzazz Ink, let dry & scrunched the tissue,  adhered it to a piece of Whisper White Cardstock using Anywhere Glue.  I adhered this piece to the 2 pieces of Calyspo Coral Cardstock before adhering to the Base Card.

??

I stamped my sentiment onto the piece of Whisper White Cardstock using Pear Pizzazz Ink and adhered to the long piece of Calyspo Coral prior to adhering to the card. 

I punched 3 flowers in Calyspo Coral Cardstock using the Boho Punch & adhered to the card.  Pearls were applied to the centre as well as to some of the images.

I tied a bow & adhered to the card.

Supplies –
Stamp Set – Just Believe, A Word for You
Ink – Pear Pizzazz
Cardstock – Calyspo Coral, Pear Pizzazz, Whisper White
DSP – In Colours
Punches – Boho
Ribbon – 3/8″ Ruffled – Lucky Limeade
Accessories – Anywhere Glue, Snail Adhesive, Pearls
Non-SU – Tissue Paper
Until next time Enjoy!

Winner…

Opened my email mid-morning to find an email from Holly over at Rubber Redneck STAMPede to say I had been chosen as her winner of Challenge TRRSS6!  What an honour!  Thank you so very much Holly!  I have added your Badge to the side of my blog.

This is the layout which may also be seen in here

Thank you again Holly!

TRRSS6…

I’m trying to slowly get back into my scrapbooking, BUT I will be the first to admit it is taking a bit to try & think along these lines.  To ease back into it slowly, I am only doing basic pages, although they sometimes turn out to be the best pages.

This page is for the challenge over at Holly’s blog – “Rubber Redneck STAMpede“.  I have been wanting to do one of her challenges for quiet sometime now, but just never seem to find the time.  I decided that I would have a break from doing my niece’s weding invitations & attempt the challenge.  After looking at the sketch for a couple of hours, I thought I would do a scrapbook page instead of a card. 

This page is of my little Maltese – “Belle“.  She is not 12 months yet, but has such a lovely little nature & personality.  Loves life, chewing on all my scrap paper, even sneaking bits from the bin in my office & hiding it all under my bed, cuddles, walks & play!  Not necessarily in that order!

Not wanting to use any doggie theme for the page, I tried to pick up the brown in her face & ears.  To add a little bit of embellishments, while sticking to the sketch, I thought the Embosslits Die – Beautiful Wings would suit the page.

Supplies –
Stamp Set – Nil
Ink – Nil
Cardstock – Textured – Blushing Bride, Early Expresso,
Whisper White, So Saffron, Wild Wasabi
DSP – Just Add Cake
Punches – Eyelet Edge, Decorative Label
Ribbon – 1/4″ Grosgrain – Early Expresso
Embosslits Die – Beautiful Wings
Accessories – Multipurpose Glue, Snail Adhesive,
SU Marker – Early Expresso, Basic Rhinestones
Until next time, Enjoy!

SC 019/11…

This week for the new challenge over at Sunny Challenges & Creations I decided to go another way.  Mind you, this wasn’t until I had all my stuff to create my card sitting on the desk.  After desicovering that the DSP – Beau Chhateau goes with the Stamp Set Elements of Style & wanting to use both, I then did a complete switch & scrapped a page for my album.

The page is from Dannille’s mum’s wedding recently held in October where both her & Amber were bridesmaids.  The photos are so beautiful that it just seemed a shame not to do something with them.  This one is of Dannielle & her fiancé, Chris.

Once I had decided to go with the colours Chris was wearing, I again grabbed the DSP – Beau Chateau & the matching stamp set Elements of Style to complete my page.

I cut 1″ off 2 sides of the DSP so that it measured 11″ x 11″ square & adhered it to Soft Suede Cardstock. 

?

Rhinestones & Stamped Image…

?

After printing the photo, I left a small white margin right around the photo.  Usually I like to have a matching cardstock border but this way I can bring the white of Dannii’s dress into the layout without having to use Whisper White Cardstock

Prior to adhering the Night of Navy Cardstock to the DSP, I adhered a piece of Seam Binding Ribbon across the centre & then  a piece of Taffeta Ribbon over the top.

I layered 3 different size Flowers together, placed a Brad in the centre of each & adhered them to the LHS of the photo with SU Dimensionals.
?

Rhinestones & Flowers…

?

To finish the page, I adhered Rhinestones to the top & bottom LHS of the page.  The Rhinestones go well with Dannielle’s jewellery.

I am really happy with this page, as it is not too fussy or over the top, just like the beautiful dress she is wearing, while catching the colours in Chris’ clothes.

Supplies –
Stamp Set – Elements of Style
Ink – Night of Navy
Cardstock – Soft Suede – Textured, Night of Navy
Ribbon – Seam Binding – Baja Breeze, Taffeta – Night of Navy
Accessories – Snail Adhesive, Rhinestones, Flowers Brads – Night of Navy
Don’t forget to head over to Sunny Challenges & Creations & check out what both Kris & Gwen have created.  Better still, sit down during the week & create something yourself using the sketch provided, but with no Sentiment or Greeting.  You could be the next Ray of Sunshine.
Until next time, Enjoy!


Sc 018/11…

A new challenge begins today over at Sunny Challenges & Creations so be sure to head over there & check it out.  Along with the sketch, Kris included the stamp set – Upsy Daisy.
I suddenly realised it has been some time since this set last touched ink, so it is a great challenge to dust it off & re-ink.  I will be the first to admit, this is not one of the first sets I go for, but may have to re-look at this in the future.

Getting my card craeted this week was a challenge in itself.  After creating a card & about to email it off to Kris for posting, suddenly realised I had used the wrong stamp set!  Can you believe it?????  Then after completing my 2nd card, I dropped a ink pad fair smack bang in the middle of the card, so back to the drawing board again.  Serves me right for not closing my ink pads once I finish using them!!!!!  That is in amongst loosing the Embossing Folder I was going to use, plus having to cut my butterflies a number of times.

Measurements –
Base Card – Chocolate Chip – 5 7/8″ x 4 1/8″ or 15cm x 10.5cm – once scored & folded in half
Layer 1 – So Saffron – 5 3/4″ x ” or 14.5cm x 10cm
Layer 2 – Chocolate Chip – 3 1/2″ x 3″ or 9cm x 7.5cm
Layer 3 – So Saffron – 3 3/8″ x 2 7/8″ or 8.5cm x 7cm
Layer 4 – Whisper White – 3 1/4″ x 2 3/4″ or 8cm x 6.5cm
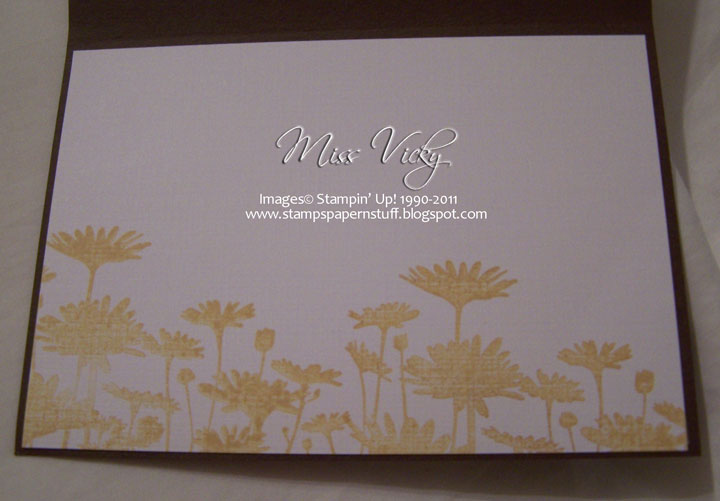
Inside…

I stamped my image direct onto Whisper White Cardstock using So Saffron Ink, then again with Chocolate Chip Ink, after first stamping off.  With my Bone Folder, I scored the piece diagonally across the card, turned 90 degrees & scored again.

I inked the Whisper White Cardstock with Versamark, poured Clear Embossing Powder over the top, tapped excess off & heat set with my Heat Tool.  This piece was adhered to So Saffron Cardstock & then to Chocolate Chip Cardstock using Snail Adhesive.

Using my Bone Folder & Ruler, the larger piece of So Saffron Cardstock was again scored diagonally, tuned 90 degress & scored again.  I adhered the embossed piece to the So Saffron piece, ensuring I had the opposite side of the scored card showing. 

I adhered a piece of ribbon across the bottom, stamped my sentiment in Chocolate Chip Ink onto Whisper White Cardstock, punched it with my Large Oval Punch & adhered to a piece of Chocolate Chip Cardstock which had been punched with my Scallop Oval Punch.  I adhered this to the centre with a SU Dimensional.  The whole lot was adhered to the Base Card – Chocolate Chip with Snail Adhesive.

I cut my butterflies with my Bigshot, adhered 2 smaller ones together & then onto the card.  I adhered a small Rhinestone to the centre of the butterfly.

Supplies –
Stamp Set – Upsy Daisy
Ink – Chocolate Chip, So Saffron, Versamark
Cardstock – Chocolate Chip, So Saffron, Whisper White
Punches – Scallop Oval, Large Oval
Embosslits Dies – Beautiful Wings
Ribbon – 1/2″ Scallop Dots – Chocolate Chip
Accessories – SU Dimensionals, Rhinestones, Snail Adhesive, Bigshot,
Bone Folder, Embossing Powder – Clear, Heat Tool

Now it is your turn, head over to Sunny Challenges & Creations & see what Kris & Gwen have created.  We would love for you to join us this week.
Until next time, Enjoy!
Vicky