This is the lovely sentiment from Stampin’ Up!’s “A Word for you“. It is also the sentiment I stamped onto this great little card.
Today’s share is the card we created in Crafty’s Creations Class this arvo. Of course, everyone’s was very different, but that the great thing about all having the same kit & each creating their card by adding their personal touch.
I would never usually combine Basic Black & Regal Rose together but I wanted a bit of a dramatic effect & think it has worked. Of course, the strip of Pearls along the top & the touch of Certainly Celery adds dimenion & colour to the card.
For such an easy challenge over at Sunny Challenges, I had a hard time creating sometime that I truely liked. I started about 4 times, blank, walked around, blank, cleaned, blank, BUT then went & did some “retail therapy’ which I don’t usually do & YES, it did the trick! Thank you Retail Therapy – you are my new best friend!
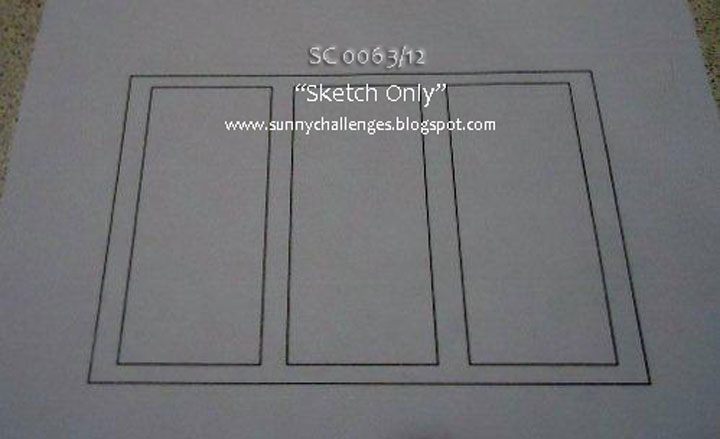
Our challenge this week is the sketch only! Because the layout was so open, I decided to try a technique……
Measurements – Base Card – Whisper White – 5 3/4″ x 4 1/8″ or 11cm x 14.5cm Layer 1 – Not Quite Navy – 4 7/8″ x 3 3/4″ or 12.5cm x 10cm Layer 2 – Whisper White – 5″ x 4 3/4″ or 13cm x 9.5cm
Supplies – Stamp Set – French Foliage, A Word for You Ink – Versamark, Tempting Turquoise, Certainly Celery, Not Quite Navy, Crumb Cake Cardstock – Whisper White, Not Quite Navy Accessories – Snail Glue, Heat Tool, Embossing Powders – White & Clear, Sponge
Technique – Emboss Resist – Tutorial may be found here
To select my ink colours, I wanted to go with something that was different, soft, but with one colour which would be vibrant. Once I had decided on the ink colours, the next big step was the Cardstock colour to bring the ink colours out even more. With technique in hand, I sort of selected random colours until I was happy with the look behind the technique.
Inside Card…
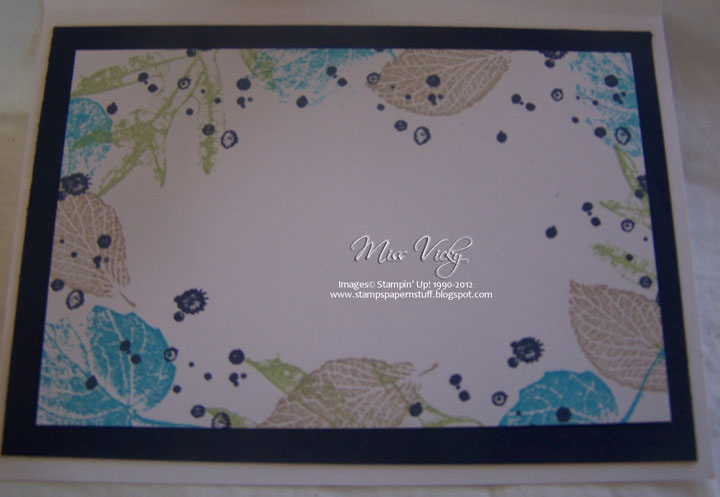
Once I had applied the Emboss Resist Technique to my card, I proceeded to sponge the colours of Tempting Turquoise, Crumb Cake & Certainly Celery Inks around the images with a Sponge. I did this until I was happy with the result.
I then decided that it wasn’t shinny enough & didn’t really show the technique to it’s full potential, so I decided to dab the Versamark Ink over the entire piece, poured Clear Embossing Powder over the top & heat set with my Heat Tool.
I proceeded to cut the stamped piece of cardstock into 3 equal pieces & adhered to the piece of Not Quite Navy Cardstock with Snail Adhesive.
I wanted to apply a greeting to the card, but didn’t want to stamp or place any pieces over the top of the stamped images, so instead to stamp the greeting on the right hand side of the card in Not Quite Navy Ink. I then adhered the Not Quite Navy piece to the Base Card – Whisper White.
Can you see the shine…
I’m really happy with the final outcome, as it is something I had pictured in my mind. It is a very clean card, but I like this sort of card.
With the greeting I used, I can now use it for any occasion I choose…….
Why not pop on over to Sunny Challenges & check out what Gwen & Kris have both created. We would love for you to join us this week.
Happy Mother’s Day to all the mums of the world! Hope you all have a great day & get spoilt rotten!
Our new weekly challenge over at Sunny Challenges & Creations starts today. This week we have only the sketch to go by. Gwen has been very easy on us!
I started out with a completely different card in mind, had it all made up in my head & then blow me down if I couldn’t find the stamp set. I then convenienced myself that I didn’t even have the set I wanted to use! The final result turned into a very quick 5 minute card, but these are good to do.
In fact, this card is going in the mail today!
Measurements – Base Card – Chocolate Chip – 8 1/4″ x 5 7/8″ or 21cm x 15cm – Scored in the middle & folded in half Layer 1 – DSP – 5 1/2″ x 3 7/8″ or 14cm x 10cm Layer 2 – Chocolate Chip – 2 1/2″ x 2″ or 6.5cm x 5.5cm Layer 3 – DSP – 2 3/8″ x 1 7/8″ or 6cm x 5cm Layer 4 – Chocolate Chip – 4 1/2″ x 1 7/8″ or 11.5cm x 5cm Layer 5 – Whisper White – 4 3/8″ x 1 3/4″ or 11cm x 4.5cm
Supplies – Stamp Set – Forever Young, A Word for You Ink – Chocolate Chip, Pool Party Cardstock – Chocolate Chip, Pool Party, Whisper White DSP – In Colours DSP Punches – Modern Label Accessories – Snail Adhesive
I adhered the smaller piece of DSP to the small piece of Chocolate Chip Cardstock prior to adhering to the large piece of DSP & then to the Base Card – Chocolate Chip.
I stamped my greeting onto a scrap piece of Whisper White Cardstock in Chocolate Chip Ink, punched using the Modern Label Punch &adhered to the DSP with Snail Adhesive. My image was stamped direct onto Whisper White Cardstock with Pool Party Ink & adhered to the long piece of Chocolate Chip Cardstock & then to the Base Card.
As I said a very easy 5 minute card!
I hope you can join us this week over at Sunny Challenges & Creations as we would love to see what you come up with using the sketch.
What some inspiration???? Then why not pop over & see what Gwen, Kris & Tanya have created as well as our very talented Weekly Guest Designers. They are fantastic!!!!!!
The challenge this week over at Sunny Challenges & Creations is all about colour & boy is it bright. Along with the sketch we had to use the colours of Tempting Turquoise, Melon Mambo, Soft Suede & a Neutral, ie Very Vanilla or Whisper White.
I had a hard time both with the colours & the sketch, until I was about to stamp my image & it dawned on me to rotate it. Problem solved. It come together really quickly then.
Measurements – Base Card – Soft Suede Cardstock – 8 1/4″ x 4 1/8″ or 21cm x10.5cm Layer 1 – Whisper White Cardstock – 4″ x 5 3/4″ or 10cm x 14.5cm Layer 2 – Tempting Turquoise Cardstock – 4 1/2″ x 4″ or 10cm x 11.5cm Layer 3 – Melon Mambo Cardstock – 3 1/2″ x 4″ 10cm x 9cm Layer 4 – Whisper White Cardstock – 3″ x 4″ or 10cm x 7.5cm
Inside Card…
Supplies – Stamp Set – Need for Speed, A Word for You Ink – Soft Suede, Melon Mambo Cardstock – Whisper White, Melon Mambo, Soft Suede, Tempting Turquoise Embossing Folder – Perfect Polka Dots Punches – Eyelet Edge Accessories – Bigshot, Tombow Multipurpose Glue, Snail Adhesive, Stampin’ Dimensionals, Dazzling Diamonds, SU! Marker – Tempting Turquoise, 2-Way Glue Pen
I punched the borders of both ends of Tempting Turquoise & Melon Mambo using the Eyelet Edge Border Punch & adhered the Melon Mambo to Tempting Turquoise with Snail Adhesive.
I stamped my image onto Whisper White Cardstock using Soft Suede Ink, stamped the car image to the same piece of Whisper White Cardstock and again onto a scrap piece of Whisper White Cardstock. This one I cut out & put aside.
Close Up…
I inked my sentiment using the Happy Birthday part with my SU! Marker – Tempting Turquoise & stamped direct onto the same piece of Whisper White Cardstock which I had stamped the car. The piece was then adhered to the Melon Mambo piece using Snail Ahesive, before running the whole lot through the Bigshot using Embossing Folder – Perfect Polka Dots, adhering to the large piece of Whisper White Cardstock with Tombow Multipurpose Glue & finally to the Base Card – Soft Suede with Snail Adhesive.
I applied a little of Dazzling Diamonds over the Soft Suede Ink with my 2-Way Glue Pen. Lastly the cut out car was adhered to the card with Stampin’ Dimensionals.
It is a set probably aimed at boys rather than girls, but who says girls can’t like cars. In fact, I know quiet a few girls who would love this card!
Don’t forget to hop on over to Sunny Challenges & Creations to check out what Kris & Gwen have created. We have a new Guest Designer for the month as well as our weekly Guest Designers.
Sunday brings the beginning of a new week & the start of the new challenge over at Sunny Challanges & Creations. It was my turn to create the sketch & issue the 2nd part of the challenge. This week, I opted for DSP – Designer Series Paper. How easy can that be???
Measurements – Base Card – Cherry Cobbler – 8 1/4″ x 4 1/8″ or 21cm x 15cm – Scored in middle & folded in half Layer 1 – DSP – 3″ x 4″ or 10.5cm x 7.5cm Layer 2 – Island Indigo – 1″ x 4″ or 1.5cm x 10.5cm Layer 3 – Basic Black – 4″ x 2″ or 10.5cm x 5cm Layer 4 – DSP – 3 7/8″ x 1 7/8″ or 10cm x 4.5cm Layer 5 – River Rock – 3 1/2″ x 2 1/2″ or 9cm x 6.5cm Layer 6 – DSP – 3 3/8″ x 2 3/8″ or 8.5cm x 6cm Layer 7 – Island Indigo – 4″ x 2 1/2″ or 10cm x 6.5cm Layer 8 – Very Vanilla – 3 7/8″ x 2 3/8″ or 9.5cm x 6cm
Using my Eyelet Border Punch, I punched along the side of a scrap piece of Basic Black Cardstock & adhered to the larger piece of DSP prior to adhering to the Base Card – Cherry Cobbler using Snail Adhesive.
Envelope & Inside Card…
I adhered both pieces of DSP to the corresponding Cardstock with Snail Adhesive – DSP Red to the Basic Black & Black DSP to River Rock. This piece was then adhered to the longer piece of DSP with Snail Adhesive & set aside.
I stamped my image onto Very Vanilla Cardstock with Staz-On Ink. I meant to do a little embossing, but completely forgot about it until I had assembled my card. Oh well, next time! I adhered the stamped piece to both pieces of DSP ensuring that it overlapped. I didn’t quiet adhere permanently but left a little so that I could tuck the ends of my ribbon under.
The whole section was then adhered to the Base Card. A bow was tied & adhered to the card with a Mini-Glue Dot.
The greeting was stamped in Staz-On Ink. Again, the embossing was forgotten.
Supplies –
Stamp Set – Forever Young, A Word for You
Ink – Staz-On Black
Cardstock – Very Vanilla, Island Indigo, Cherry Cobbler, Basic Black
DSP – Timeless Portrait
Punches – Eyelet Border
Ribbon – 3/8″ Ruffled – Island Indigo
Accessories – Mini-Glue Dots, Snail Adhesive
Don’t forget to pop over to Sunny Challenges & Creations to check out what both Libby & Kris have created along with our 2 Guest Designers for the week.
Once you have completed your card, scrapbook page, etc pop back & link to Mr Linky. We know you all have heaps of DSP, so this is the perfect challenge to cut into it & use some of it.
This is the card I created fo rthe new challenge over at Stamping 411. As soon as I saw this sketch, I knew what I wanted to use & how it should look when I finished. I wanted to try & create a shabby chic/vintage type card. I think I have succeeded in getting the results I had in my head.
As usual the operators have provided us with all the basic measurements – all the hard work has been done for us –
Measurements – Base: 8 1/2″ x 5 1/2″, scored and folded in half at 4 1/4″ – Very Vanilla Layer 2: 4 x 5 1/4″ – Soft Suede Layer 3: 4″ x 1 1/2″ – DSP Layer 4: 2 1/2″ x 2 1/4″ – DSP Layer 5: 2 3/8″ x 2 1/8″ – Very Vanilla
I Heat Embossed my image onto the piece of Soft Suede using Versamark & Clear Embossing Powder.
Envelope & Inside Card…
I adhered the DSP to a piece of Pink Pirouette so that I didn’t have the DSP straight onto the Soft Suede & to break the colours up a little. I think it looks pretty with the little bit of Pink Pirouette showing as a small edge. I then adhered this piece to the embossed piece using Snail Adhesive.
The Ribbon was adhered across the top part of the DSP & ends tucked under. The whole piece was then adhered to the Base Card – Very Vanilla using Snail Adhesive.
Stamping the image onto the small piece using Versamark & Soft Suede Inks, I Heat Embossed it. Using my Aqua Painter, I gently coloured the images with Pink Pirouette & Wild Wasabi Inks. I nearly left the leaves clear, but after looking at it for a little time, decided to go ahead & colour them. I like the little bit of green in the card! ?
Close Up of Clear Embossing & Flowers…
? I applied Pearls to the centres of some of the flowers & adhered both pieces to the card as per the sketch. I found a couple of small Butterflies that were in my packet of Pink Pirouette already cut out, so I used them on the card. The large Butterfly was adhered with Multipurpose Glue & 2 small Pearls applied to the centre. The Butterflies had been cut using the Beatuiful Wings Embosslits Dies.
I stamped my sentiment direct onto a piece of Very Vanilla using my SU Marker – Soft Suede, punched with the Modern Label Punch, dabbed a little Pink Pirouette around the edges, adhered to the card with Stampin’ Dimensionals & adhered the small butterfly to the sentiment. I applied 3 small Pearls to the punched piece – 1 in the centre of the Butterfly & 2 to replace the “o” in the words.
Lastly, I tied a bow & applied to the card with Mini Glue Dots.
When I saw this sketch, it is very similar to a scrapbook layout I have completed for a class I have this month, which I will post once the class is finished.
…is such a great stamp set & I find myself going to it constantly that I sometimes have to stop & grab another.
It is so long since I created a card for a challenge that I thought I would try the challenge over at Stampin’ Up! Only. This site is where you have to use SU! products only on your creations. This week the challenge is to use a Technique that you use infrequently. I don’t do nearly enough techniques on my cards, so this is the perfect opportunity to try!
Knowing what I had to create on my card, I then went in search of a sketch. What better place to start than Mary Jo’s. This is the first of her sketches for the year.
For my card I choose the Technique – Faux Silk!
Measurements – Base Card – Calyspo Coral – 11 5/8″ x 4 1/8″ or 30cm x 10.5cm – Scored & Folded in the middle Layer 1 – Whisper White – 5 5/8″ x 4″ or 14.5cm x 10cm Layer 2 – DSP – 5 1/2″ x 3 7/8″ or 14cm x 9.5cm Layer 3 x 2 – Calyspo Coral – 3 1/2″ x 2″ or 9cm x 5cm Layer 4 x 2 – Whisper White – 3 3/8″ x 1 7/8″ or 8.5cm x 4.5cm Layer 5 – Calyspo Coral – 5 3/4″ x 3/4″ or 14.5cm x 2cm Layer 6 – Whisper White – 5 5/8″ x 5/8″ or 14cm x 1.5cm
I adhered the DSP to the piece of Whisper White Cardstock & then to the Base Card – Calyspo Coral using Snail Adhesive.
Envelope & Inside…
After stamping my image onto Tissue Paper using Pear Pizzazz Ink, let dry & scrunched the tissue, adhered it to a piece of Whisper White Cardstock using Anywhere Glue. I adhered this piece to the 2 pieces of Calyspo Coral Cardstock before adhering to the Base Card.
??
I stamped my sentiment onto the piece of Whisper White Cardstock using Pear Pizzazz Ink and adhered to the long piece of Calyspo Coral prior to adhering to the card.
I punched 3 flowers in Calyspo Coral Cardstock using the Boho Punch & adhered to the card. Pearls were applied to the centre as well as to some of the images.
I tied a bow & adhered to the card.
Supplies –
Stamp Set – Just Believe, A Word for You
Ink – Pear Pizzazz
Cardstock – Calyspo Coral, Pear Pizzazz, Whisper White
Crikey, can you believe it!!!!! This is week 13 of our challenge – time does fly when you’re having fun.
This week, the challenge was brought to you by our own Gwen & boy, has she made it very easy for us – NO 2nd part of the challenge!!!!! Yep, you read right – NO 2nd part of the challenge!!!! In other words, you have a free hand on what you create as long as you stick basically to the sketch!!!!!!
Now, my mind went into overdrive & had so many ideas, but this is the one I ended up going with, as when I first saw the sketch, a kid’s birthday card popped into my head. This card can be used for boy/girl!!!!
To check out my 2nd card, pop back in later on in the week!
Base Card – Poppy Parade – 8 1/4″ x 5 7/8″ or 21cm x 15cm – Scored & folded in half landscape Layer 1 – Whisper White – 4″ x 5 3/4″ or 10cm x 14.5cm Layer 2 – DSP – 3 7/8″ x 5 5/8″ or 9.5cm x 14cm Layer 3 – Poppy Parade – 4″ x 2 3/8″ or 10cm x 6cm Layer 4 – DSP – 3 7/8″ x 2 1/4″ or 9.5cm x 5.5cm
I layered my DSP onto Whisper White Cardstock & then onto the Base Card – Poppy Parade, using Snail Adhesive. I layered the smaller piece of DSP onto the piece of Poppy Parade Cardstock, then onto the middle of the Base Card with Snail Adhesive.
I punched a piece of Whisper White Cardstock with my Scallop Circle Punch & layered a piece of Wild Wasabi Cardstock onto it. This piece had been punched with the 1 3/8″ Circle Punch. I punched a So Saffron circle from my 1 1/4″ Circle Punch & adhered to the top of Wild Wasabi circle. ?
With Envelope…
? With my Early Expresso Ink, I stamped the bottom of the cupcake, while the top was stamped using So Saffron Ink. I punched both pieces with my Cupcake Builder Punch, stamped over the So Saffron top with Early Expresso Ink – this put the “chips” onto the “icing” & adhered this piece to the top of the cupcake bottom with Snail Adhesive. I drew dots around the circle with my SU Marker – Early Expresso & adhered the whole cupcake to the So Saffron Circle with Su Dimensionals.
I stamped the greeting in Early Expresso Ink onto a scrap of Whisper White Cardstock, cut around it ensuring I allowed enough card at both ends of the greeting, one end to slide under the Scalloped Circle, while the other end, I snipped a “V” into it. I then used my scissors to shape the pennant & adhered the left hand end to the card with Snail Adhesive.
For something a little different, I decided to have another cupcake for the inside, but I wanted it to pop up when opened. For this, I cut a piece of Whisper White Cardstock 4″ x 5 3/4″ or 10cm x 14.5cm, measured the middle along the long side & marked with a pencil. To get the bit to stand, I measured 1/8″ or 3mm either side of the halfway mark. I then drew a line on both sides about 1 1/8″ or 2.5cm down, scored across the bottom to where both sides meet & cut along the lines to the score mark. ?
Inside – Pop Up Cupcake…
? I again stamped my images using Early Expresso & So Saffron Inks onto Whisper White Cardstock, punched using my Cupcake Builder Punch & adhered to the piece with Snail Adhesive. I punched the cherry from DSP with the same punch. I inked my wording with my SU Marker – Poppy Parade & stamped in the middle.
For the bottom half, I cut a strip of DSP, adhered to a piece of Early Expresso Cardstock, then to the Whisper White Cardstock, allowing a small edge of the White to show at the bottom.
All in all a very simple card but with a bit of a WOW, I think!!!!! I would relly like to know what you think?
Accessories – SU Dimensionals, Snail Adhesive, SU Markers – Early Expresso & Poppy Parade
Don’t forget to hop over to Sunny Challenges & Creations to check out what Gwen & Kris have created using the same sketch. While there, create your own card, link it to your blog or online group.forum with Mr Linky. Both Mr Linky & ourselves would really love to see your creation. Who knows, you could be our next “Ray of Sunshine“.
With the rain about today, I decided that I would sit & attempt a couple of challenges. This one is from Stamp-a-Holics which I have done before. It looked too easy not to attempt & upon seeing the sketch, though immediately of “Circle Circus”. I love this set & can’t seem to get enough of it. I’ve also used colours that are not me, but they just sort of jumped into my hands.
Now one of the conditions for this Sketch Challenge is – A card must be completed in 15 minutes or less. Yep, I had 68 seconds left. Boy, does the time fly when you are having fun.
Base Card – Whisper White – 5 7/8″ x 4 1/8″ or 15cm x 10.5cm – Score & Fold in half Layer 1 – Old Olive – 5 3/4″ x 4″ or 14.5cm x 10cm – Cut from bottom about 1″. This allows you to attach the Basic Black Scalloped Edge Layer 2 – Basic Gray – 4 1/2″ x 1 1/2″ or 11.5cm x 4cm
I punch an edge along a scrap piece of Basic Black Cardstock & layered it along the bottom half of Old Olive Cardstock. I adhered the other half of Old Olive across the top of the Basic Black.
I punched 3 Whisper White squares & stamped them randomly using different images & Olid Olive, Basic Gray & Basic Black Inks. These were adhered to the Basic Gray Cardstock, ensuring that they were placed evenly.This was then adhered to the Olive Olive Cardstock.
I stamped the sentiment directly onto Old Olive Cardstock using Basic Black Marker. I then drew a couple of scriggley lines under the sentiment using my Basic Black Marker.
I again stamped 2 images onto Whisper White Cardstock, one in Old Olive Ink & the other using Basic Gray Ink. I punched these images using 2 punches & adhered to the card.
The whole card was then adhered to the Base Card – Whisper White. I drew white dots in the middle of the scalloped edge to lift it a little using my Gel Pen.
Supplies – Stamp Set – Circle Circus, A Word for You Ink – Basic Gray, Old Olive, Basic Black Cardstock – Whisper White, Basic Gray, Basic Black, Old Olive Punches – 1 1/4″ Circle, 3/4″ Circle, Scallop Edge, 1 1/4″ Square Accessories – Snail Glue, Gel Pen, SU Markers
As I have to make a couple of male birthday cards this month & not having any cards in my stash – haha – this is the prefect sketch to complete a couple of cards.
Gotta love how all the measurements are done for you –
Layer 1 – Cardbase cut at 5.5 x 8.5″, scored & folded Layer 2 – 4 x 5.25″ Layer 3 – 4 x 1.75″
I’ve used Baja Breeze for my card base, scored & folded Cut smaller piece of Early Expresso Cardstock Cut DSP – Pear Pizzazz Cut Very Vanilla Cardstock Stamp image directly onto Very Vanilla using Early ExpressoInk Using your Early Expresso SU Marker, colour in sentiment & stamp directly onto Very Vanilla Adhere both pieces to the Early Expresso Cardstock Adhere Ribbon – Pear Pizzazz across the join, tuck ends under & tie knot Adhere Early Expresso Cardstock to base card – Baja Breeze
This is a great sketch for that 5 minute card.
Supplies –
Stamp Set – Mediallion, A Word for You
Inks – Early Expresso, Pear Pizzazz
Cardstock – Very Vanilla, Baja Breeze, Early Expresso
DSP – Pear Pizzazz
Ribbon – 1/2″ Stitched-Poly Pear Pizzazz
Accessories – Multipurpose Liquid Glue, Snail Glue, SU Markers