SC 004/11…

Wow!  My pre-order of new “stuff” arrived yesterday!  I am really speechless as to how lovely it all is.  I really can’t choose a favourite, only to say they all are.  Now as for the new book – wait until you lay your hands on that.  I promise, you won’t be able to put it down.  I know I am going to have to win Lotto, as I WANT  & MUST have everything NOW!  I couldn’t wait to use something & this challenge was crying out for some to be used on it.
It’s a really fun challenge this week over at Sunny Challenges & Creations… The challenge was set by Gwen which included not only a sketch, but we had to do some embossing & a Christmas Theme.  Well, this got me thinking & after receiving my pre-order goodies, I wanted to use the gorgeous new ribbon coming out September 1.  I also wanted to do something in non-traditional colours which is what I like for Christmas – a something a little different! 
So, my card is based around the ribbon & my non-traditional colours.
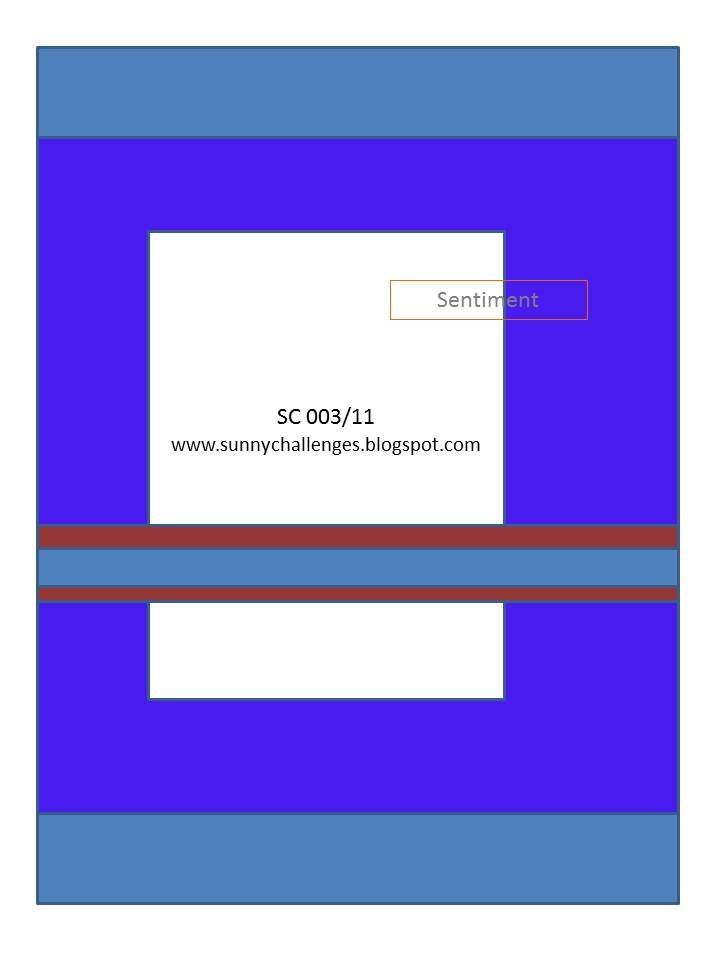
The challenge –
Go by the Sketch
Embossing
Christmas Theme
Base Card – Pink Pirouette – 4 7/8″ x 4 1/8″ or 15cm x 10.5cm – once folded & scored in half
Layer 1 – Early Expresso – 4 3/4″ x 4″ or 14.5cm x 10cm
Layer 2 (Top) – Whisper White – 2 3/4″ x 1 7/8″ x 2 or 9.5cm x 4.7cm x 2
Layer 3 (Bottom) – Whisper White – 1 3/4 ” x 3 7/8″ or 4.5cm x 9.5cm
Layer 4 – Early Expresso – Oval
Layer 5 – Pink Pirouette – Oval
Layer 6 – Ribbon
Inside –
Using Early Expresso Ink, I stamped off once, then stamped directly onto the Whisper White & then repeated again but not re-inking my image.  I wanted the faded images in the background.  This piece was adhered to the base card – Pink Pirouette.
I’ve been playing with my Shimmer Paint of late & experimenting all different ways of using it.  Amazing the results you can achieve!!!!
Oval –
I stamped my Dasher – so so so pleased he didn’t retire – image onto Pink Pirouette Cardstock using Versamark & heat embossed using Clear Embossing Powder.  I then grabbed my jar of Frost White Shimmer Paint – gotta love this stuff – a SU Dauber & spread the paint all over the piece of cardstock.  I wiped all the frosted paint off Dasher using a tissue.  This also shines your cardstock a little too.
I then used the same SU Dauber & Paint, except this time applying direct to the stamp itself.  I stamped this image directly over “Dasher“, used my tissue to wipe all the paint off my embossed image & around the piece of cardstock.
Layers –
I run this piece of Pink Pirouette Cardstock through the Bigshot using my Ovals Die.  It doesn’t matter that only part images appear on the completed oval – think it looks better this way.  I repeated again except using a piece of Early Expresso Cardstock & adhered the Pink Pirouette to the Early Expresso.  I adhered a couple of Basic Jewels to his antlers.
I run my 2 pieces of Whisper White Cardstock through the Bigshot using one of my favourite embossing folders – Petals a Plenty.  Oh what the hell, they are all my favourites!  While I still had my good ol’ Shimmer Paint & SU Dauber, I randomly spread Shimmer over the raised section of the embossing.  I wanted the flowers to stand out a little more!  I repeated the same for the bottom piece of Whisper White.
I adhered all these pieces of Whisper White to the Early Expresso Cardstock & run a piece of the new gorgeous Chocolate Chip Ribbon across where the top & bottom meet & tied a bow-tie.
For my greeting, I again stamped the tree image using my SU Dauber & Shimmer Paint onto a scrap piece of Whisper White, stamped the sentiment using Early Expresso Ink over the top, punched using the Word Window Punch & adhered to a piece of Pink Pirouette Cardstock which had been punched using the Modern Label Extra-Large Punch.  This was the adhered to the base card.
My oval was adhered to the base card using SU Dimensionals.  I didn’t want it to be lost in the embossing & shimmer paint.
I think I may have pulled off the look I was hoping for!
Supplies –
Stamp Set – Dasher, Short & Sweet, Lovely as a Tree
Ink – Early Expresso, Versamark
Cardstock – Pink Pirouette, Early Expresso, Whisper White
Punches – Word Window, Modern Label Extra-Large
Ribbon – 1/2″ Scallop Dots – Chocolate Chip
Embossing Folders – Petals a Plenty
Dies – Ovals
Accessories – Shimmer Paint – Frost, Basic Jewels, Embossing Powder – Clear, SU Daubers, SU Dimensionals, Snail Adhesive, Heat Tool, Embossing Buddy
To try the challenge out for yourself, why not head over to Sunny Challenges & Creations… & have a go!
While over there, see what Gwen & Kris have created!
Until next time, Enjoy!

More Mustard….

…is the colour I started out with, but somehow ended up working with the colours below.  These are not colours that I usually work with, but I think, just maybe, have pulled it off!
I also sat down to make the card for tomorrow’s class, along with a technique to go with it, but as usual I got a bit side tracked when I went looking for a layout. 
While looking, I come across this great sketch form Sketch Frenzy Friday, had the stamp set out on my desk which I was going to use for another challenge & started on this card.  It is so easy for me to become side tracked, especially when playing with colours, sketches & of course our wonderful stamps, etc.
Base Card – Basic Black – 5 7/8″ x 4 1/8″ or 15cm x 10.5cm when scored in half
Layer 1 – Tempting Turquoise – 5 3/4″ x 4″ or 14.5cm x 10cm
Layer 2 – Basic Black – 5 5/8″ x 3 7/8″ or 14cm x 9.5cm
Layer 3 – Tempting Turquoise – 4 5/8″ x 2 5/8″ or 11.5cm x 6.5cm
Layer 4 – Whisper White – 4 1/2″ x 2 1/2″ or 11cm x 6cm
Layer 5 – Basic Black – 7/8″ x 2 5/8″ or 2.2cm x 6.5cm
Layer 6 – Whisper White – 3/4″ x 2 1/2″ or 1.9cm x 6cm
Wow, I didn’t realise there were that many layers until I measured them all up!
Using my good ol’ faithful Embossing Folder – Square Lattice, I run it through the Bigshot, adhered to the Tempting Turquoise Cardstock & then to the Base Card – Basic Black.
 I stamped my image onto Whisper White using Tempting Turquoise Ink, stamped a couple of flowers onto the Whisper White using Basic Black Ink & adhered to Tempting Turquoise Cardstock.  I adhered this to the embossed piece of Basic Black using SU Dimensionals, as I didn’t want this piece to get lost in the embossing & the black.
I stamped my sentiment onto Whisper White Cardstock using Basic Black Ink, stamped another flower with Tempting Turquoise Ink beside the sentiment & adhered to the Tempting Turquoise piece.  This whole piece was adhered off centre to the middle piece.  Using the reverse ink colours gives it a little more of an interesting effect!
I adhered Basic Pearls to the centre of the Basic Black flowers, which I coloured a Basic Rhinestone with a permanent black marker & stuck it to the centre of the Tempting Turquoise flower.
For the inside, I reversed the inks again, while stamping onto Whisper White Cardstock, adhered to Tempting Turquoise & then to the base card.
Supplies –
Stamp Set – Short & Sweet, Baroque Motifs
Ink – Basic Black, Tempting Turquoise
Cardstock – Whisper White, Tempting Turquoise, Basic Black
Embossing Folder – Square Lattice
Accessories – SU Dimensionals, Basic Jewels, Basic Rhinestones, Bigshot, Snail Glue
 Until next time, Enjoy!

SC 003/11…

This is my 2nd card for the challenge over at Sunny Challenges & Creations Why not head over there & have a go, while at the same time, use that stamp set “Fox & Friends” which may not have seen ink for some time.
This is the great thing about the challenge or as someone described it “Double-Sword” where as you have a sketch to work by as well as a particular stamp set!
All my measurements may be found Here…
Using the Scallop Border Punch, I punched both pieces of Real Red Carstock & adhered them to both ends of the DSP.  I punched a random number of colour circles in Baja Breeze, Pear Pizzazz, Real Red & Pacific Point Cardstocks using the different size Circle Punches & adhered them randomly to Whisper White.  This piece was then embossed using the Square Lattice Embossing Folder & adhered to Pacific Point, then to the DSP & finally the base card.  Are you stick of this folder yet?  I’m sure not!
?
Inside Card…

?

I run a piece of Pear Pizzazz Ribbon across the card, followed by a piece of Real Red to the centre of the Pear Pizzazz.  I stamped the turtle image onto a scrap piece of Whisper White Cardstock & punched using my Circle Punch, adhered to a punched piece of Baja Breeze, then to the Scalloped Circle of Chocolate Chip & finally over the top of the ribbons.  I stamped another image using Pear Pizzaz, cut his shell out & applied to the brown image using SU Dimensionals
?
I inked small white dots around the Scalloped Chocolate Chip Circle using my White Gel Pen.
For my greeting/sentiment, I stamped it onto a piece of Whisper White Cardstock using Chocolate Chip Ink punched using the Word Window Punch, adhered to a piece of Baja Breeze which had been punched using the Modern Label Punch & adhered to the card.
I’ve just realised that I used a hell of a lot of punches, but I think doing it this way can sometimes bring a whole new look to a card.
??
Supplies –
Stamp Set – Fox & Friends, Short & Sweet
??Ink – Chocolate Chip, Pear Pizzazz
Cardstock – Pacific Point, Pear Pizzazz, Baja Breeze, Whisper White, Real Red
 DSP – Celebrations
Punches – Scallop Edge Border, Scallop Circle, 1/2″ Circle, 3/4″ Circle, 1 1/4″ Circle,
1 3/8″ Circle, 1 3/4″ Circle, Modern Label Extra-Large, Word Window
Embossing Folder – Square Lattice
Ribbon – 1/2″ Stitched-Poly – Pear Pizzazz, 1/4″ Grosgrain – Real Red
Accessories – SU Dimensionals, Snail Adhesive
Until next time, Enjoy!

SC 003/11…

Okey Dokey, this will be our third week for the challenge over at Sunny Challenges & Creations and it is going far better than we ever hoped!  If you haven’t seen the challenge, why not head over & see for yourself.

This week, I had to provide the sketch & stamp set to use.  I chose Fox & Friends!

Base Card – Pretty in Pink – 5 7/8″ x 4 1/4″ or 15cm x 10.5cm
Layer 1 – Rose Red – 4 1/4″ x 1″ or 10.5cm x 2.5cm
Layer 2 – DSP – 4″ x 4 1/4″ or 10cm x 10.5cm
Layer 3 – Rose Red – 3 1/2″ x 2 1/2″ or 9cm x 6.5cm
Layer 4 – Very Vanilla – 3 3/8″ x 2 3/8″ or 8.5cm x 6cm
Layer 5 – Rose Red – 1/2″ x 4 1/4″ or 1.5cm x 10.5cm
Layer 6 – Ribbon

I adhered Rose Red top & bottom to the DSP.  I stamped my images randomly & direct onto Very Vanilla Cardstock using Rose Red, Pretty in Pink & Soft Suede Inks.  I wanted to bring another colour into the card & browns always work well with pinks, although I didn’t want a strong brown, so Soft Suede Ink worked perfectly.

 I adhered Very Vanilla to Rose Red & then to the DSP.  I adhered my Ribbon to the small piece of Rose Red, tied a knot & adhered to the DSP.  This whole piece was then applied to the Base Card.

I stamped my sentiment using Soft Suede Ink, punched it out using the Modern Label Punch, swiped Pretty in Pink around the edges & adhered to the card using SU Dimensionals.
All in all a lovely card for a baby girl!
Supplies –
Stamp Set – Fox & Friends, Short & Sweet
Ink – Rose Red, Pretty in Pink, Soft Suede
Cardstock – Very Vanilla, Rose Red, Pretty in Pink
DSP – Sweet & Sour Speciality
Punches – Extra-Large Modern Label
Ribbon – 3/8″ Taffeta – Very Vanilla
Accessories – Snail Glue, SU Dimensionals
If you would like to play along, then head over there & submit your creation.  It is very easy, just follow Mr Linky instructions.
Until next time, Enjoy!

Thank You…

What started out with different size punches in my hand has turned into a Thank You Card for the lady who did the Puppy School which my new addition – 4 legged type – attended.  Belle began Puppy Scool wanting to be “Boss Lady”, but was soon put in her place by another little “Boss Lady”  This is her card from Belle.
Base Card – Early Expresso – 5 7/8″ x 4 1/8″ or 15cm x 10.5cm – Score & Fold in half
Layer 1 – Blushing Bride – 5 3/4″ x 4″ or 14.5cm x 10cm
Layer 2 – Whisper White – 5 5/8″ x 3 7/8″ or 14cm x 9.5cm
I punched different size circles using my punches & Early Expresso Cardstock & Blushing Bride Cardstock & randomly adhered the circles to Whisper White Cardstock.  I run the Whisper White through the Bigshot using an Embossing Folder.
This piece was adhered to Blushing Bride before being attached to the Base Card – Early Expresso.  I stamped “Thank You” onto a piece of Whisper White, punched out & inked the edges in Early Expresso Ink &adhered to the card. 
I run 2 pieces of Blushing Bride Cardstock through the Bigshot using Embosslit Dies.  The Butterflies were then attached to the top of the card, including over the edge of the sentiment.  I added Basic Rhinstones to the middle of the Butterflies.
All in all, a very simple little card but I am quite taken with the end result!
Supplies –
Stamp Set – Short & Sweet
Ink – Early Expresso
Cardstock – Whisper White, Early Expresso, Blushing Bride
Punches – Modern Label Extra-Large, 1/2″ Circle, 3/4″ Circle, 1/6″ Handheld Circle
Embossing Folder – Square Lattice
Embosslet Die – Beautiful Wings
Accessories – Multipurpose Glue, Basic Rhinestones
Until next time, Enjoy!