Christmas Card # 2….

Today is the 2nd card one of the groups in my class of 20 a couple of weeks ago did.  You can view the first card one of the groups completed.  They were all very easy cards, but this time we concentrated on the Big Shot & learning out to emboss.  I especially love that I can use some of my favourite retire stamps & retired DSP.

I originally found this on Google sometime ago.  I did go searching for it to give credit but now I can’t find it.  Please let me know if you recognise it as I would love to give you credit.  Thank you so much for the inspiration!

 
I have since sold this card so today there is no tutorial.
 
Until next time, Happy Stampin”
 
Vicky

Cracked Glass…

…was one of the techniques we did back in October.  I decided to do a Christmas Card along with a bit of a different spin on the Step Fold card.

It is another non-traditional Christmas card but the ladies loved it, especially the fold.  The 2nd card we created for this class can be seen in this post.


Until next time, Happy Stampin’

Christmas …..

… is over for another year!  I hope you all had a great day & enjoyed the company of your family & friends. 

Over the next couple of days, I hope to post Christmas Cards which for some reason or other, I didn’t manage to post.  There may not be instructions or measurements as I no longer have the cards, but I would still like to share them with you.

Today’s card is one we created way back in October.  I’ve used retired Stamps – the beauty of being able to reuse my favourite stamps in this class!

Supplies –
Stamp Set – Short & Sweet, Dasher, Medallion
Ink – Crumb Crake, Early Expresso
Cardstock – Cherry Cobbler, Very Vanilla
Embossing Folder – Vintage Wallpaper
Ribbon – 1/2″ Seam Binding – Very Vanilla
Accessories – Snail Adhesive, Tombow Multipurpose Glue, Mini Glue Dots, Pearls,

Until next time, Happy Stampin’

Dasher & Holly…..

… make for a lovely Christmas Card, be it Non-Traditional in colour!

Today’s card is the one we created in my Friday’s Volunteer Class.  A lot of the ladies had a particular stamp set & to get more use from it, I thought we oculd try & recreate one of the cards.  My version is similar to the card, although I have used Stampin’ Up! products.

Measurements –
Base Card – Basic Black – 5 7/8″ x 6 1/4″ or 16cm x 15cm – Scored at 2″ or 5.5cm on the 6 1/4″ side
Layer 1 – Champagne Glitter Paper – 5″ x 3 1/2″ or 13cm x 9cm
Layer 2 – Basic Black – 4 5/8″ x 3 1/8″ or 12.5cm x 8.5cm
Layer 3 – Whisper White – 4 1/2″ x 3″ or 12cm x 8cm
Layer 4 – Red Glitter Paper – 2 1/4″ x 5 7/8″ or 6cm x 15cm

Supplies –
Stamp Set – Dasher (Retired), Season of Joy (Retired)
Ink – Real Red, Tangerine Orange, Versamark
Cardstock – Basic Black, Red Glitter Paper, Champagne Glitter Paper, Whisper White, Old Olive
Accessories – Heat Tool, Embossing Buddy, Bone Folder, Embossing Powder – White & Clear, Sticky Strip, Snail Adhesive, Pearls, Smooch Spritz – Vanilla Shimmer, Stampin’ Write Marker – Old Olive, Pearls
Non-SU! – Ribbon, Button, Gold Paint, Tissue

I randomly sponged the piece of Whisper White Cardstock with a Tissue using Real Red, Tangerine Orange Inks plus a little of Shimmer Paint with a small amount of Gold Pint mixed together.  I went with the tissue as I wasn’t happy with the Sponge or Sponge Dauber.  I lightly wiped a clean tissue over the sponging to remove any excess ink that may have been sitting there.

Dasher was stamped direct onto the sponged background with Versamark Ink & embossed with White Embossing Powder.  I repeated the same for the images along the bottom.  I then sprayed the whole lot with Smooch Spritz to give it a bit of a shine.

For the Leaves, I drew them free-hand onto a scrap piece of Old Olive Cardstock, scored the middle of each leaf with my Bone Folder so that it looked like there was a vein up each Leaf, drew along each vein with an Old Olive Stampin’ Write Marker, dipped it into Versamark & embossed with Clear Embossing Powder.

The leaves were adhered to the top of the Ribbon with Mini Glue Dots, Button added to the top of the leaves with Mini Glue Dots & a row of Pearls adhered along the Ribbon, as well as the corner of the card & Dasher’s eye.

I adhered the piece of Red Glitter Paper to the right hand side of the Basic Black Base Card with Snail Adhesive.  The embellished piece of Cardstock was adhered to the piece of Basic Black Cardstock with Snail Adhesive, then to the piece of Champagne Glitter Paper with Sticky Strip prior to adhering the left hand half to the front of the Base Card.

As I’ve stated, the Basic Black is not a traditional Christmas colour, but am happy with the final result.  Hope the ladies enjoy creating it as much as I have.

Until next time, Happy Stampin’

Guest Designer….

Sometime ago I was asked to be a Guest Designer over at Christmas Cards All Year Round.  Thank you so much Tracey for asking!

This site has been going for some time now & I have followed it for quiet awhile, although I must admit, have not participated in their challenges for so long.  This site is a great way to complete those Christmas cards ready for posting come 1 December!

Anyhow, on with the challenge.

The challenge this month was to –

 
TWINKLE-TWINKLE Christmas Lights

Multi-colored or clear, embossed or bling, strings or singles, vintage or new, bright or dull, broken or whole …inspriation is limitless! Make it electric and fun.
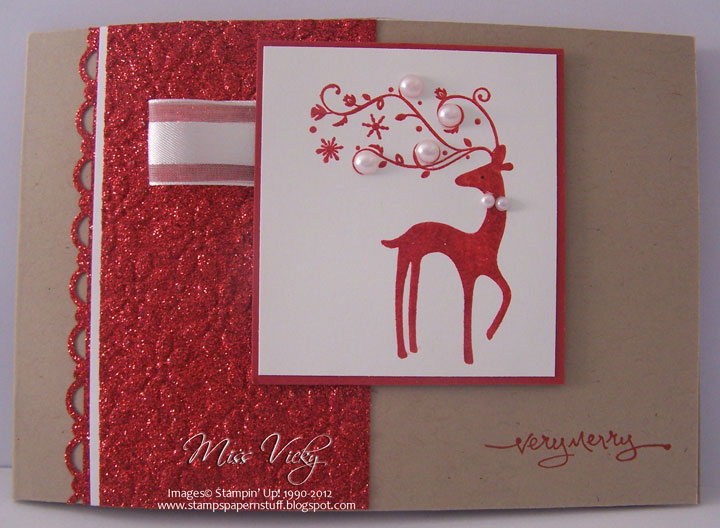
 
Measurements –
Base Card – Crumb Cake – 11 3/4″ x 4 1/8″ or 30cm x 10.5cm – scored in half & fold in the middle
Layer 1 – Glimmer Paper – 1/2″ x 4 1/8″ or 1cm x 10.5cm
Layer 2 – Whisper White – 1/2″ x 4 1/8″ or 1cm x 10.5cm
Layer 3 – Glimmer Paper – 2 1/4″ x 4 1/8″ or 5.5cm x 10.5cm
Layer 4 – Riding Hood Red – 2 1/2″ x 2 3/4″ or 6.5cm x 7cm
Layer 5 – Whisper White – 2 3/8″ x 2 5/8″ or 6cm x 6.5cm
 
Supplies –
Stamp Set – Dasher, Short & Sweet
Ink – Riding Hood Red, Versamark
Cardstock – Riding Hood Red, Whisper White, Crumb Cake, Glimmer Paper Red
Ribbon – 5/8″ Organza – White
Punches – Scallop Trim Border
Embossing Folder – Petals a Plenty
Accessories – Stampin’ Dimensionals, Snail Adhesive, Multipurpose Glue, Pearls, Black Journal Writer, Heat Tool, Embossing Powder – Clear
 
I punched the narrower piece of Glimmer Paper along one of the long sides using the Scallop Trim Border Punch.  I attached the piece of Whisper White Cardstock along the edge of the punched line with Snail Adhesive.
 
The larger piece of Glimmer Paper was run through the Bigshot using the Embossing Folder – Petals a Plenty and adhered it to the top of the Whisper White Cardstock so that a small piece of the White was showing.  This breaks up the red on red.  In hindsite, I should have added another smaller piece of White to the other side, but only thought of it when everything had been completed.
 
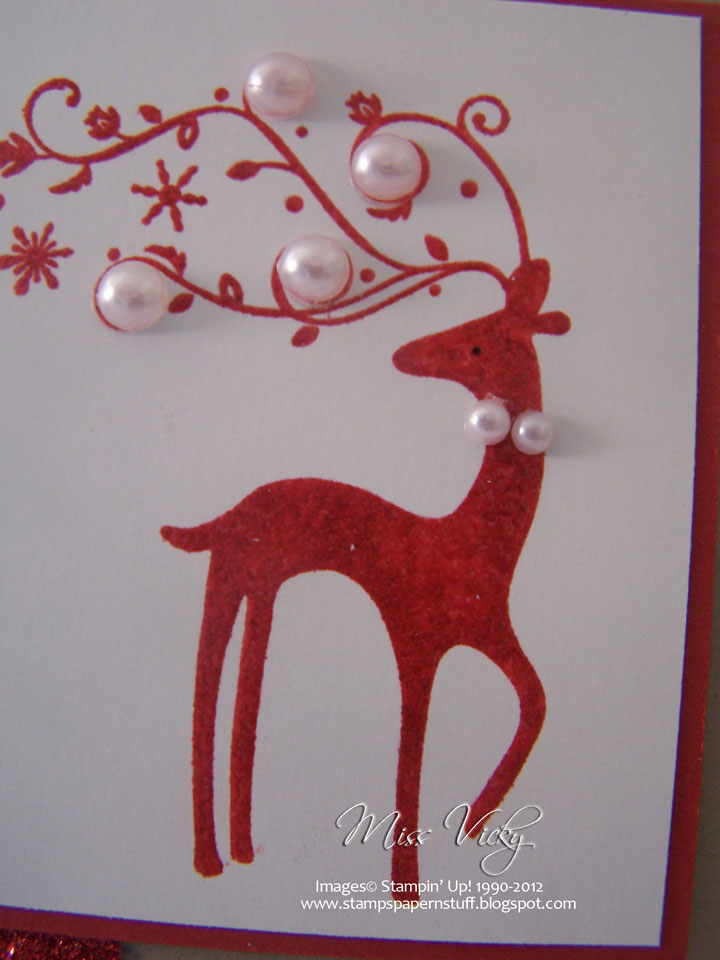
Dasher was stamped in Versamark & then Riding Hood Red Ink prior to being stamped onto the small piece of Whisper White Cardstock, heat set with the Heat Tool & then adhered to the piece of Riding Hood Red with Snail Adhesive.  I adhered a small piece of Ribbon to the side, applied Stampin’ Dimensionals & adhered to the Base Card.
 
Pearls were adhered to the antelers & around his neck for some bling.  His eye was marked using the Black Journal Marker.  The greeting was stamped in Riding Hood Ink.
 
 
Why not head over to Christmas Cards All Year Round & check out what the rest of the team have created, create your project & link back.
 
Until next time, Happy Stampin’


Dasher…

I did these couple of cards a little time ago, but hadn’t gotten round to posting.  They are both the same with a couple of little differences, plus I used a colour that to me has gone a little by the wayside with all the new colours SU have!

Card 1 –
Base Card – Chocolate Chip – 9 1/4″ x 4 1/4″ or 23.5cm x 10.5cm – scored & folded at 3 1/2″ or 9cm
Layer 1 – Bashful Blue – 5 5/8″ x 4″ or 14cm x 10cm
Layer 2 – Whisper White – 5 1/2″ x 3 7/8″ or 13.5cm x 9.5cm
Layer 3 – Bashful Blue – 3 3/8″ x 4″ or 8.5cm x 9cm
Layer 4 – Chocolate Chip – 2 3/4″ x 2″ or 7cm x 5cm
Layer 4 – Whisper White – 2 5/8″ x 1 7/8″ or 6.5cm x 4.5cm
?

Card 1 – Inside…

?
I stamped my image direct onto piece of Whisper White Cardstock using Chocolate Chip Ink, adhered this piece to the Chocolate Chip Cardstock & set aside.

With Embossing Folder – Elegant Lines, I run the piece of Bashful Blue through the Bigshot, tied a knot in the middle of the ribbon before adhering to the LHS of the embossed piece.  This was adhered to the front of the card.

I then adhered the stamped piece to the top of the card, ensuring I placed adhesive on ONLY half of the piece to be adhered to the card.  Basic Rhinestones were applied to the image.

Inside –
I stamped the image direct onto Whisper White using Chocolate Chip Ink, adhered to Bashful Blue & then to the Base Card – Chocolate Chip.

Card 2 –
Base Card – Chocolate Chip – 9 1/4″ x 4 1/4″ or 23.5cm x 10.5cm – scored & folded at 3 1/2″ or 9cm

Layer 1 – Bashful Blue – 5 5/8″ x 4″ or 14cm x 10cm
Layer 2 – Whisper White – 5 1/2″ x 3 7/8″ or 13.5cm x 9.5cm
Layer 3 – Bashful Blue – 3 3/8″ x 4″ or 8.5cm x 9cm
Layer 4 – Chocolate Chip – 3″ x 2 1/2″ or 7.5cm x 6.5cm
Layer 4 – Whisper White – 2 7/8″ x 2 3/8″ or 7cmx 6cm

Inside –

I used a Technique – “Bubble Background”.  I had watched this great video from Frenchie quiet some time ago & had always remembered it.  While creating this card, I thought it would be the perfect opportunity to put this technique to the test.  It creates a very soft suttle background.  One, which I was aimng for, as I still wanted to be able to write over the top for my message.  ????

?

Once my background had been created onto Whisper White, I stamped 2 images using Bashful Blue & Chocolate Chip Inks.  I then randomly stamped the Snowflake images around the outside of the card using Bashful Blue Ink.
Front –
Using Bashful Blue Ink, I randomly stamped the piece of Bashful Blue Cardstock, tied a knot in the piece of ribbon, adhered to the LHS & adhered to the base card – Chocolate Chip Cardstock.
I stamped the images onto Whisper White using Chocolate Chip & Bashful Blue Inks & adhered to the piece of Chocolate Chip Cardstock.  This piece was adhered to the front of the card, ensuring adhesive was applied to ONLY half of the piece to be adhered to the card. 
All in all 2 very quick Christmas Cards.  These would be great for a Stamp-a-Stack & could be applied for any occasion.
Supplies –
Stamp Set – Dasher, Trim Trimmings, Short & Sweet
Ink – Bashful Blue, Chocolate Chip
Cardstock – Whisper White, Bashful Blue, Chocolate Chip
Ribbon – 1/2″ Scallop Dots – Chocolate Chip, 5/8″ Grosgrain – Chocolate Chip (Retired)
Embossing Folder – Elegant Lines
Accessories – Re-Inker – Chocolate Chip, Snail Adhesive, Basic Rhinestones, Bigshot
Non-SU – Plastic Dish, Drinking Straw
Until next time, Enjoy!

SC 004/11…

Wow!  My pre-order of new “stuff” arrived yesterday!  I am really speechless as to how lovely it all is.  I really can’t choose a favourite, only to say they all are.  Now as for the new book – wait until you lay your hands on that.  I promise, you won’t be able to put it down.  I know I am going to have to win Lotto, as I WANT  & MUST have everything NOW!  I couldn’t wait to use something & this challenge was crying out for some to be used on it.
It’s a really fun challenge this week over at Sunny Challenges & Creations… The challenge was set by Gwen which included not only a sketch, but we had to do some embossing & a Christmas Theme.  Well, this got me thinking & after receiving my pre-order goodies, I wanted to use the gorgeous new ribbon coming out September 1.  I also wanted to do something in non-traditional colours which is what I like for Christmas – a something a little different! 
So, my card is based around the ribbon & my non-traditional colours.
The challenge –
Go by the Sketch
Embossing
Christmas Theme
Base Card – Pink Pirouette – 4 7/8″ x 4 1/8″ or 15cm x 10.5cm – once folded & scored in half
Layer 1 – Early Expresso – 4 3/4″ x 4″ or 14.5cm x 10cm
Layer 2 (Top) – Whisper White – 2 3/4″ x 1 7/8″ x 2 or 9.5cm x 4.7cm x 2
Layer 3 (Bottom) – Whisper White – 1 3/4 ” x 3 7/8″ or 4.5cm x 9.5cm
Layer 4 – Early Expresso – Oval
Layer 5 – Pink Pirouette – Oval
Layer 6 – Ribbon
Inside –
Using Early Expresso Ink, I stamped off once, then stamped directly onto the Whisper White & then repeated again but not re-inking my image.  I wanted the faded images in the background.  This piece was adhered to the base card – Pink Pirouette.
I’ve been playing with my Shimmer Paint of late & experimenting all different ways of using it.  Amazing the results you can achieve!!!!
Oval –
I stamped my Dasher – so so so pleased he didn’t retire – image onto Pink Pirouette Cardstock using Versamark & heat embossed using Clear Embossing Powder.  I then grabbed my jar of Frost White Shimmer Paint – gotta love this stuff – a SU Dauber & spread the paint all over the piece of cardstock.  I wiped all the frosted paint off Dasher using a tissue.  This also shines your cardstock a little too.
I then used the same SU Dauber & Paint, except this time applying direct to the stamp itself.  I stamped this image directly over “Dasher“, used my tissue to wipe all the paint off my embossed image & around the piece of cardstock.
Layers –
I run this piece of Pink Pirouette Cardstock through the Bigshot using my Ovals Die.  It doesn’t matter that only part images appear on the completed oval – think it looks better this way.  I repeated again except using a piece of Early Expresso Cardstock & adhered the Pink Pirouette to the Early Expresso.  I adhered a couple of Basic Jewels to his antlers.
I run my 2 pieces of Whisper White Cardstock through the Bigshot using one of my favourite embossing folders – Petals a Plenty.  Oh what the hell, they are all my favourites!  While I still had my good ol’ Shimmer Paint & SU Dauber, I randomly spread Shimmer over the raised section of the embossing.  I wanted the flowers to stand out a little more!  I repeated the same for the bottom piece of Whisper White.
I adhered all these pieces of Whisper White to the Early Expresso Cardstock & run a piece of the new gorgeous Chocolate Chip Ribbon across where the top & bottom meet & tied a bow-tie.
For my greeting, I again stamped the tree image using my SU Dauber & Shimmer Paint onto a scrap piece of Whisper White, stamped the sentiment using Early Expresso Ink over the top, punched using the Word Window Punch & adhered to a piece of Pink Pirouette Cardstock which had been punched using the Modern Label Extra-Large Punch.  This was the adhered to the base card.
My oval was adhered to the base card using SU Dimensionals.  I didn’t want it to be lost in the embossing & shimmer paint.
I think I may have pulled off the look I was hoping for!
Supplies –
Stamp Set – Dasher, Short & Sweet, Lovely as a Tree
Ink – Early Expresso, Versamark
Cardstock – Pink Pirouette, Early Expresso, Whisper White
Punches – Word Window, Modern Label Extra-Large
Ribbon – 1/2″ Scallop Dots – Chocolate Chip
Embossing Folders – Petals a Plenty
Dies – Ovals
Accessories – Shimmer Paint – Frost, Basic Jewels, Embossing Powder – Clear, SU Daubers, SU Dimensionals, Snail Adhesive, Heat Tool, Embossing Buddy
To try the challenge out for yourself, why not head over to Sunny Challenges & Creations… & have a go!
While over there, see what Gwen & Kris have created!
Until next time, Enjoy!

Christmas…

I’ve again created another Xmas Card using the sketch from http://dontwasteyourthursdays.blogspot.com/  This is a great way to get all your cards created in time to post.
My Card –
Supplies –
Stamp Set – Dasher
Ink – Early Expresso
Cardstock – Very Vanilla, Cherry Cobbler, Olive Green
DSP – Jolly Holiday
Bigshot Dies – Ovals
Accessories – Snail Adhesive
How easy is this card?  I’ve let the DSP & stamp do all the work for me, so that I don’t have to add any greetings!
Until next time, Enjoy!

Very Merry…

I’ve gone for a lot of non-traditional colours this year with my Christmas cards & kept them very Clean & Simple, but hey judge for yourself.
I’ve also used the stamp set “Dasher” in a lot of them, as he is such a cute little fella that it is hard not to be taken with him.
Supplies –
Stamp Set – Dasher, Short & Sweet
Ink – Basic Black
Cardstock – Very Vanilla, Basic Black
Punches – Large Oval, Scallop Oval
Embossing Folder – Perfect Polka Dots
Accessories – Snail Adhesive, Bigshot
Can they get any easier?
Until next time, Enjoy!

Dasher Too…

I love his little fella that I’ve made another card using this great versatile stamp.
This time I’ve used the Technique – 3D Stamping.  Give it a go!  You will be suprised at how it comes out – giving the effect of being embossed!

Close-Up
Supplies –
Samp Set – Dasher
Inks – Blushing Bride, Whisper White
Cardstock – Concord Crush, Crumb Cake, Blushing Bride
DSP – DSP Paper Pack
Punches – Corner Rounder
Accessories – Snail Glue, 1/2″ Stitched-Poly Ribbon – Blushing Bride
Until next time, Enjoy!