SC 049/12….

…. and non-traditional Christmas Colours.

Our challenge over at Sunny Challenges & Creations has been given to us by Gwen.  What a great challenge this week – the possibilities are endless.  We have to use Circles on our project this week.  Why not pop over & check out what Kris & Gwen have created & then join us.  We would really love for you to link your project with Mr Linky!

Measurements –
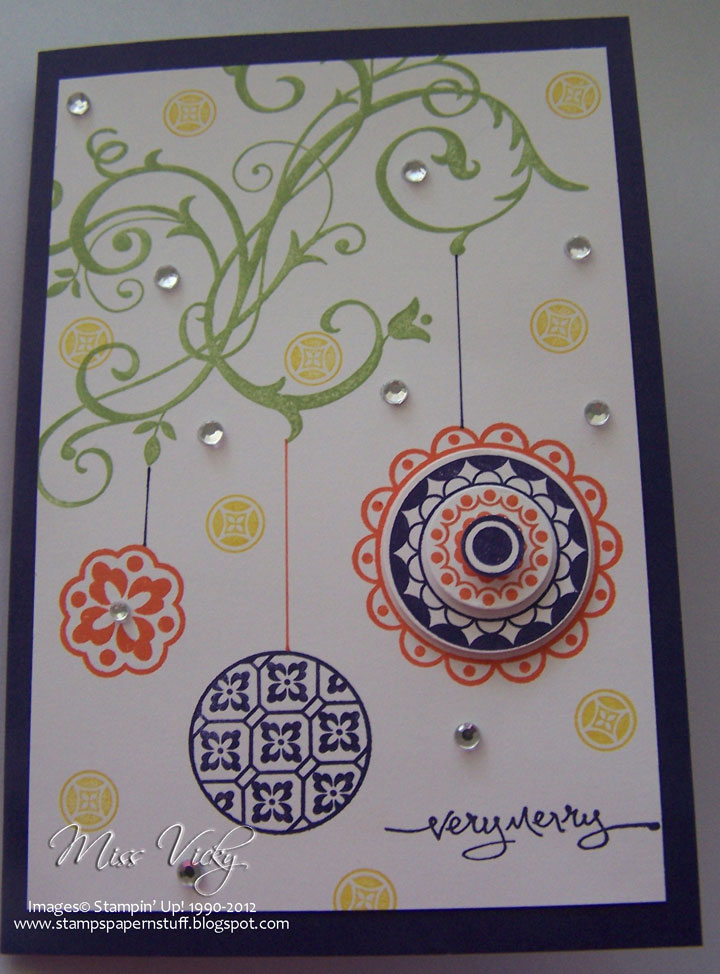
Base Card – Concord Crush – 8 1/4″ x 4 1/8″ or 21cm x 15cm – Scored in middle & folded in half
Layer 1 – Whisper White – 5 1/2″ x 3 3/4″ or 14cm x 9 1/2″

Supplies –
Stamp Set – Baroque Motifs, Circle Circus, Short & Sweet
Ink – Daffodil Delight, Tangerine Tango, Pear Pizzazz, Whisper White, Concord Crush
Cardstock – Whisper White, Concord Crush
Punches – Itty Bitty Shapes, 3/4″ Circle, 1 1/4″ Circle
Accessories – Rhinestones, Stampin’ Up! Markers – Tangerine Tango, Concord Crush, Snail Adhesive, Stampin’ Dimensionals

 I stamped the large image from Barquoe Motifs in Pear Pizzazz straight onto the piece of Whisper White Cardstock.

3 images from Circles Circus were stamped direct onto the piece of Whisper White Cardstock – 2 with Tangerine Tango & 1 in Concord Crush.  3 of the larger image was also stamped onto a piece of scrap Whisper White Cardstock – 2 in Concord Crush & the other in Tangerine Tango.

I punched one of the stamped Concord Crush images using the 1 1/4″ Circle Punch, while the 2nd image was punched with the small Circle Punch from the Itty Bitty Shapes set.  The Tangerine Tango image was punched using the 3/4″ Circle Punch.

The punched images were then adhered to the main image on the card & built using Stamping’ Dimensionals

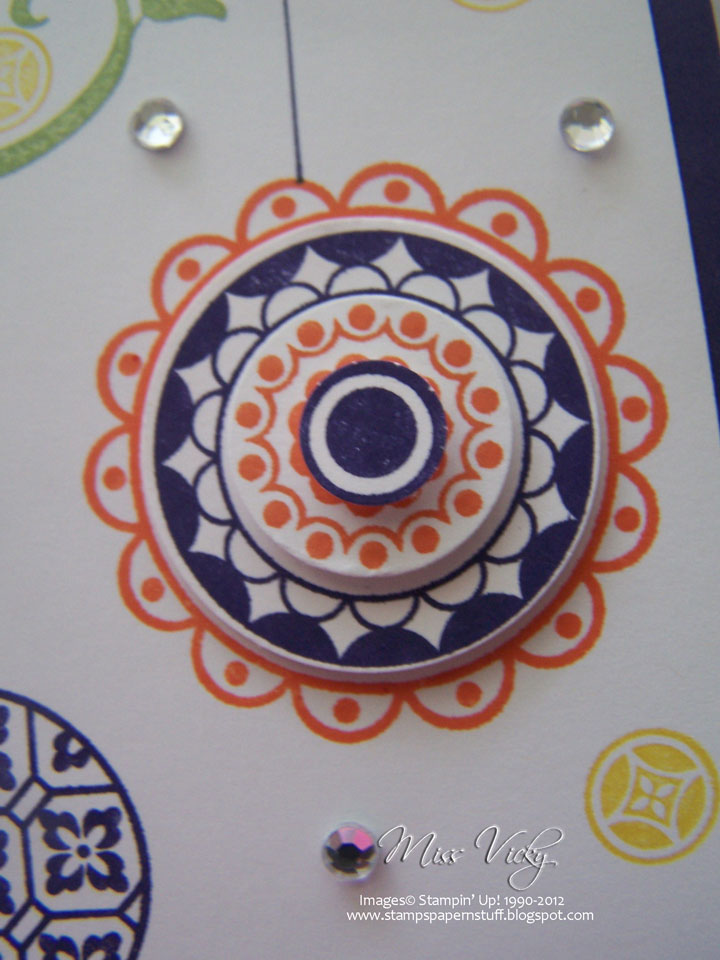
The lines were drawn with a Ruler & Stampin’ Up! Markers – Tangerine Tango & Concord Crush.

Prior to stamping the smallest image from the Circle Circus Stamp Set in Daffodil Delight ink, I stamped the sentiment in Concord Crush straight onto the Whisper White Card.

I had all intensions of just adding the Rhinestone to the middle of one of the images, but to add more depth to the card, I scattered the Rhinestones around the card.  I think it adds a little bit of a sparkle & finishes it off a little.

As always, this isn’t how I pictured my card to be, but I am quiet happy with the final result. What do you think?

Until next time, Have a great day!

Page 7…

Wow!  It seems such a long way to go before I hit 150 pages, but I am determined to get there.

With having an hour or so spare this morning & taking a small break between jobs, thought I would scrap these 2 photos of my nieces.

Tip –
When scrapping your photos, don’t forget there is nothing to say that you can’t use the same photo on the one page.  I haven’t done this on this page, but the photos are so similar that you would think they are. 

I thought about changing these photos to back & white, but decided to give myself a bit of a challenge & went with the colours in Dannielle’s dress to complete my page.

I tore down 2 sides of the Pumpkin Pie Cardstock & along the top of the DSP prior to adhering both pieces to the Basic Black Cardstock.  To match the embossed DSP, I decided to emboss all my flowers.  The larger ones were adhered to the page with Stampin’ Dimensionals, while the 3 smaller flowers were heat embossed direct onto the DSP.  Don’t be scared to try different things when scrappin’.  I oloured a couple of Rhinestones using a Black  & Orange Permanent Markers.  The smaller Rhinestones I used Clear Rhinestones.

The stamp set I used had the word “Cherish” in it, so I typed the dictionary meaning onto a scrap of Whisper White, printed it out & adhered to the page sideways.

The same word was stamped onto another scrap of Whisper White, heat embossed, punched & layered onto a punched pieced of Basic Black.  I adhered it over the top of the ribbon with Stampin’ Dimensionals.

Supplies –
Stamp Set – Baroque Motifs
Ink – Versamark, Pumpkin Pie, Basic Black
Cardstock – Textured Basic Black, Textured Punpkin Pie, Whisper White
DSP – Sweet & Sour Speciality (Retired)
Ribbon – 1/2″ Stitched Poly – Pear Pizzazz
Punches – Large Oval, Scallop Oval
Accessories – Rhinestones, Stampin’ Dimensionals, Snail Adhesive,
Heat Tool, Embossing Powder – Clear

Remember, Scrapbooking is meant to be FUN!!!!

Gift Card….

????????

This is the last of my Christmas Postings – Yah!!!!!!!!!!!
I took the idea from Sandi who has a great tutorial on how to create it…..  I matched mine to suit the Box Bag I created a couple of days ago. 
?
Inside – Card for Greeting & Gift Card behind…

?

Gift Card…
Supplies –
Stamp Set – Perfect Punch, Baroque Motifs
Ink – Old Olive, Chocolate Chip
Cardstock – Whisper White, Old Olive
DSP – Letters to Santa
Punches – Scallop Border, Scallop Circle
Accessories – Mini Glue Dots, White Gel Pen, Sticky Strip, Snail Adhesive
Until next time, Enjoy!

Baroque Motifs….

… turns into a Christmas Card.

The past couple of days, I have been madly creating 6 different cards for a group of lovely women from the Community Centre.  The class was one of their weekly get togethers.  Very tiring, but the reward in the end always wins in the end.  I used the sane stamp set for 5 of them & another for 2 of them.  Most of the cards are all non-traditional colours.

Over the next few days, I will post the cards we created, so I hope you enjoy them as much as I did creating them.

Baroque Mofits 1…
Baroque Mofits 2…
Supplies –
Stamp Set – Baroque Motifs
Ink – Rich Razzleberry, Old Olive
Cardstock – Rich Razzleberry, Crumb Cake, Old Olive
Embossing Folder – Stripes
Ribbon – Rich Razzleberry – Retired
Accessories – Basic Rhinestones, Snail Adhesive, Multipurpose Glue, Bigshot
Until tomrrow, Enjoy!

More Mustard….

…is the colour I started out with, but somehow ended up working with the colours below.  These are not colours that I usually work with, but I think, just maybe, have pulled it off!
I also sat down to make the card for tomorrow’s class, along with a technique to go with it, but as usual I got a bit side tracked when I went looking for a layout. 
While looking, I come across this great sketch form Sketch Frenzy Friday, had the stamp set out on my desk which I was going to use for another challenge & started on this card.  It is so easy for me to become side tracked, especially when playing with colours, sketches & of course our wonderful stamps, etc.
Base Card – Basic Black – 5 7/8″ x 4 1/8″ or 15cm x 10.5cm when scored in half
Layer 1 – Tempting Turquoise – 5 3/4″ x 4″ or 14.5cm x 10cm
Layer 2 – Basic Black – 5 5/8″ x 3 7/8″ or 14cm x 9.5cm
Layer 3 – Tempting Turquoise – 4 5/8″ x 2 5/8″ or 11.5cm x 6.5cm
Layer 4 – Whisper White – 4 1/2″ x 2 1/2″ or 11cm x 6cm
Layer 5 – Basic Black – 7/8″ x 2 5/8″ or 2.2cm x 6.5cm
Layer 6 – Whisper White – 3/4″ x 2 1/2″ or 1.9cm x 6cm
Wow, I didn’t realise there were that many layers until I measured them all up!
Using my good ol’ faithful Embossing Folder – Square Lattice, I run it through the Bigshot, adhered to the Tempting Turquoise Cardstock & then to the Base Card – Basic Black.
 I stamped my image onto Whisper White using Tempting Turquoise Ink, stamped a couple of flowers onto the Whisper White using Basic Black Ink & adhered to Tempting Turquoise Cardstock.  I adhered this to the embossed piece of Basic Black using SU Dimensionals, as I didn’t want this piece to get lost in the embossing & the black.
I stamped my sentiment onto Whisper White Cardstock using Basic Black Ink, stamped another flower with Tempting Turquoise Ink beside the sentiment & adhered to the Tempting Turquoise piece.  This whole piece was adhered off centre to the middle piece.  Using the reverse ink colours gives it a little more of an interesting effect!
I adhered Basic Pearls to the centre of the Basic Black flowers, which I coloured a Basic Rhinestone with a permanent black marker & stuck it to the centre of the Tempting Turquoise flower.
For the inside, I reversed the inks again, while stamping onto Whisper White Cardstock, adhered to Tempting Turquoise & then to the base card.
Supplies –
Stamp Set – Short & Sweet, Baroque Motifs
Ink – Basic Black, Tempting Turquoise
Cardstock – Whisper White, Tempting Turquoise, Basic Black
Embossing Folder – Square Lattice
Accessories – SU Dimensionals, Basic Jewels, Basic Rhinestones, Bigshot, Snail Glue
 Until next time, Enjoy!