SSC 207…

The challenge over at Stamping 411 is a great one this week.  I couldn’t believe how easy it looked!  Note, I said “look!”  These are the ones I always have trouble with, but decided to give it a whirl.
Measurements –
Base: 11 x 4 1/4″, scored and folded in half at 5 1/2″

Layer 2: 5 1/8 x 3 7/8″
Layer 3: 5″ x 3 3/4″

For the rest of the layer you could run a 1 inch strip of paper for layer 4, and maybe use a punch! Don’t be afraid to change up the shape or even the measurements a little. Use this sketch as a jumping off point. You can use a star or anything that fits in the space (So ~ just about anything!).

After adhering all my layers, I adhered the Ribbon 3/4 way across the DSP, chalked 2 of the flowers – one in purples, the 2nd in pinks.  I think they come up to a near perfect match with the DSP colours!  I stuck a Pearl in the middle of the flower & adhered to the card. 

How easy can it get!  A very CAS card in all – Clean & Simple – my favourite type!

Supplies – 
Stamp Set – Nil
Inks – Nil
Cardstock – Blushg Bride, Concord Crush
Ribbon – 1/2″ Stitched Ploy-Ribbon – Blushing Bride
Accessories – SU Flowers, Multipurpose Glue, Pearls, Stampin’ Pastels
Until next time, Enjoy! 

CS34352… Flowers & Butterflies…

Lately it seems so long between my posts, but this time I have had a valid reason.  I’ve just finished creating & assembling invitations for a lovely couple who lost everything in the recent Brisbane floods – you can read more http://www.sunshineinvitations.blogspot.com/ or http://www.dreamweddingrescue.com.au/  – yep, nothing to do with stamping, but that is my excuse & I am sticking to it!  PS  Photos of the invitations won’t be posted until next Tuesday when I know their guests have received their invitations, as I don’t want to spoil the surprise.

Now on with stampin!

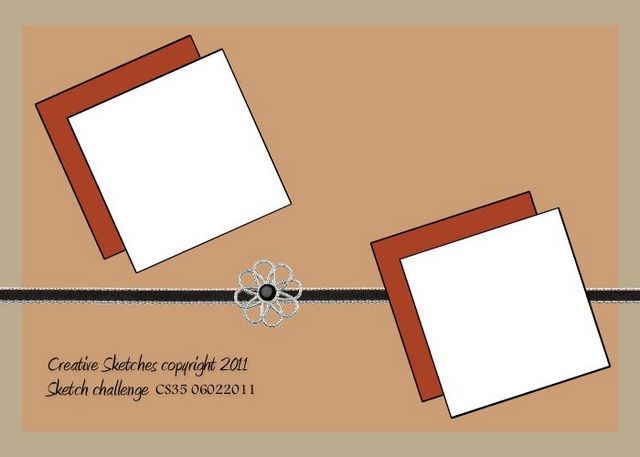
I decided to do a card from the sketch over at Creative Sketches I think I am cutting it a little fine, but hey I really had to think about this.  I knew what paper I wanted to use & that a male’s card would hopefully be the end result, but try as I might, it turned into a female’s card right before my eyes.

Base Card – Baja Breeze – 5 7/8″ x 4 1/4″ or 15cm x 10.5cm
Layer 1 – Soft Suede – 5 3/4″ x 4″ or 14.5cm x 10cm
Layer 2 – DSP – 5 5/8″ x 2 1/4″ or 14cm x 5.5cm
Layer 3 – DSP – 5 5/8″ x 1 1/2″ or 14cm x 4cm
I adhered the 2 pieces of DSP to the Soft Suede Cardstock.  I coloured my ribbon using Baja Breeze Ink & adhered across the join prior to adhering to the Base Card – Baja Breeze.  I then punched 2 squares from Soft Suede using my 1 1/4″ Square Punch.  I repeated the same using Very Vanilla Cardstock
With the 2 pieces of Vanilla Vanilla Cardstock, I put these through the Bigshot & the Elegant Lines Embossing Folder.  I must admit, I have had this folder for some time, but has never been out of its folder!  Things will change now!  I attached these squares to the Soft Suede ones, as per the sketch & adhered to the card.
Using my Bigshot, the Beautiful Wings Embosslits Dies  & Baja Breeze Cardstock, I cut the butterflies out & adhered to the squares.  I then applied Rhinestones to the centre.  For my flowers, I inked the blue using Baja Breeze Ink & SU Sponge.  I layered all 3 together & adhered to the card.  I applied another Rhinestone to the middle of the flower.
I then stamped the sentiment directly onto DSP using Basic Gray Ink.  This was punched using the Large Oval Punch & another from the Scallop Oval Punch but with Baja Breese Cardstock.  I adhered both together & then to the card.
Supplies –
Stamp Set – Afterthoughts
Ink – Baja Breeze, Basic Gray
Cardstock – Baja Breeze, Soft Suede, Very Vanilla
DSP – Elegant Soiree
Ribbon – 38″ Taffeta Ribbon – Whisper White
Punches – 1 1/4″ Square, Large Oval, Scallop Oval
Embossing Folders – Elegant Lines
Embosslits Dies – Beautiful Wings
Accessories – Multipurpose Glue, SU Sponges, Rhinestones
Until next time, Enjoy!

SAH 170…

With the rain about today, I decided that I would sit & attempt a couple of challenges.  This one is from Stamp-a-Holics which I have done before.  It looked too easy not to attempt & upon seeing the sketch, though immediately of “Circle Circus”.  I love this set & can’t seem to get enough of it.  I’ve also used colours that are not me, but they just sort of jumped into my hands.

Now one of the conditions for this Sketch Challenge is – A card must be completed in 15 minutes or less.  Yep, I had 68 seconds left.  Boy, does the time fly when you are having fun.

Base Card – Whisper White – 5 7/8″ x 4 1/8″ or 15cm x 10.5cm – Score & Fold in half
Layer 1 – Old Olive – 5 3/4″ x 4″ or 14.5cm x 10cm – Cut from bottom about 1″.  This allows you to attach the Basic Black Scalloped Edge
Layer 2 – Basic Gray – 4 1/2″ x 1 1/2″ or 11.5cm x 4cm

I punch an edge along a scrap piece of Basic Black Cardstock & layered it along the bottom half of Old Olive Cardstock.  I adhered the other half of Old Olive across the top of the Basic Black.

I punched 3 Whisper White squares & stamped them randomly using different images & Olid Olive, Basic Gray & Basic Black Inks.  These were adhered to the Basic Gray Cardstock, ensuring that they were placed evenly.This was then adhered to the Olive Olive Cardstock.

I stamped the sentiment directly onto Old Olive Cardstock using Basic Black Marker.  I then drew a couple of scriggley lines under the sentiment using my Basic Black Marker.

I again stamped 2 images onto Whisper White Cardstock, one in Old Olive Ink & the other using Basic Gray Ink.  I punched these images using 2 punches & adhered to the card.

The whole card was then adhered to the Base Card – Whisper White.  I drew white dots in the middle of the scalloped edge to lift it a little using my Gel Pen.

Supplies –
Stamp Set – Circle Circus, A Word for You
Ink – Basic Gray, Old Olive, Basic Black
Cardstock – Whisper White, Basic Gray, Basic Black, Old Olive
Punches – 1 1/4″ Circle, 3/4″ Circle, Scallop Edge, 1 1/4″ Square
Accessories – Snail Glue, Gel Pen, SU Markers

As I said 68 seconds left.  A great male’s card.

CCMC 149…

Yes, another posting & another challenge.  You may need your sunglasses for this one.  When I saw the challenge, I wanted to use the DSP – Sweet & Slumber, while at the same time using Basic Black Cardstock.
This challenge comes from Create with Connie & Mary  Why not hop over & have a go yourself!
Base Card – Basic Black – 5 7/8″ x 4 1/8″ or 15cm x 10.5cm – Score & Fold in half
Layer 1 – Daffodil Delight – 4 1/2″ x 3 1/2″ or 11.5cm x 6.5cm
Layer 2 – DSP – 4 3/8″ x 3 3/8″ or 11cm x 6cm
Layer 3 – Tangerine Tango – 3″ x 2 3/8″ or 9cm x 6.5cm
Layer 4 – Whisper White – 2 7/8″ x 2 1/4″ or 8.5cm x 6cm

I randomly spread Shimmering Paint – Frost White over the Whisper White Cardstock & allowed to dry.

Prior to adhering DSP to my Daffodil Delight Cardstock, I punched corners of both pieces using my Corner Edge Punch.  This was adhered to the Base Card, as per the sketch. 
Using Tangerine Tango & Daffodil Delight Inks & SU Sponges, I sponged over the top of the Shimmer Paint.  I stamped the butterfly image using Basic Black Ink.  This was adhered to Tangerine Tango & then to the card.
I cut a small piece of Daffodil Delight Cardstock & punched one side using my Scallop Edge Punch.  I then attached Basic Black Grosgrain Ribbon along the middle of this piece & tied a bow prior to adhering to the card.

Again, I have no sentiment.  I find this sometimes covers a lot of occasions.
Supplies –
Stamp Set – All a Flutter
Ink – Basic Black, Daffodil Delight, Tangerine Tango
Cardstock – Whisper White, Daffodil Delight, Basic Black, Tangerine Tango
DSP – Sweet & Sour Speciality
Punches – Scallop Edge, Corner Edge
Ribbon – Grosgrain 1/4″ – Basic Black
Accessories – Multipurpose Glue, Shimmer Paint – Frost White, SU Sponges

Until next time, Enjoy!

Special Card…

Today just happens to be Mother’s Day, so to all those mums out there – “Happy Mother’s Day!”. 

I’ve made this card for a special aunt & will post it this arvo, although I must admit it will be a day late, but you know the old saying “Better late, than never”

For my card, I’ve taken the sketch from Clean & Simple Stamping  It also qualifies for my group’s weekly challenge, I think!

Group’s Weekly Challenge # 119 –   Focusing on Embellishments.  We must have at least 3 emblishments on our project.

Base Card – Concord Crush – 5 7/8″ x 4 1/8″ or 15cm x 10.5cm – Score & fold
Layer 1 – Blushing Bride – 5 3/4″ x 4″ or 14.5cm x 10cm
Layer 2 – Concord Crush – 4 5/8″ x 3″ or 11cm x 7.5cm
Layer 3 – Blushing Bride – 4 1/2″ x 2 7/8″ or 10.5cm x 7cm
DSP – 1 3/4″ x 2 7/8″ or 4.5cm x 7cm

I stamped the Blushing Bride Cardstock randomly using Blushing Bride Ink & my flower image & adhered it to the base card.

I randomly rubbed Shimmer Paint over the Blushing Bride Cardstock & heat embossed Clear Embossing Powder for the flower outline.  I used Versamark & Basic Gray Ink for the flower outline.  I repeated the same process for the sentiment.  I then adhered the DSP to the bottom half of the card piece.

I added the Brad to the middle of the Ribbon prior to adhering this to the top of the DSP.  I adhered Blushing Bride Cardstock to Concord Crush & adhered the whole lot to the Base Card.

Wanting to make the card “pop” a little more, I added 3 small Basic Pearls to the top RHS, bottom LHS & bottom RHS of the card.  I also decided to add one to the middle of the brad.  I used Crystal Effects to adhere the pearls.
Supplies –
Stamp Set – Great Friend, Fifth Avenue Floral

Ink – Basic Gray, Versamark
Cardstock – Concord Crush, Blushing Bride

DSP – Lap of Luxury
Ribbon – 1/2″ Stitched-Poly – Concord Crush

Accessories – Crystal Effects, Snail Glue, Embossing Powder – Clear, Brad – Pretty in Pink, Shimmer Paint – Frost White

Until next time, Enjoy!