All the Best

Heya Stampers,

Today I am sharing with you a card we created in our “Cards @ Toogoom” class last week.  I wanted to try & see if I could use the Embossing Paste a different way.  Seaside-Shore---close-up

When I started, I wasn’t too sure how it was going to turn out but after some trial & error I think I  am finally happy with the outcome.  I love it when I can get multiple uses from my craft supplies.  I call this “Painting with Embossing Paste” – is that such a thing?

I have used a couple of retired In ColoursLost Lagoon & Mint Macaron but you could easily create the same card using current colours.

My sentiment is from the “Better Together” Stamp Set which I masked off the bottom part with Sticky Tape, inked the top with Calypso Coral Ink, removed the mask & then stamped directly onto Whisper White Card.

The “frame” has been created by die cutting 2 different circles using the Layering Circles Framelits & running through the Big Shot.

Why not have ago at “painting” with your Embossing Paste.  I would love to see what you come up with.

Until next time, Happy Stampin’

Signature---Vicky-Wright---

257. All the Best – Seaside Shore

Seaside-Shore

Daughter

Oh-So-Eclectic---close-up

Heya Stampers,

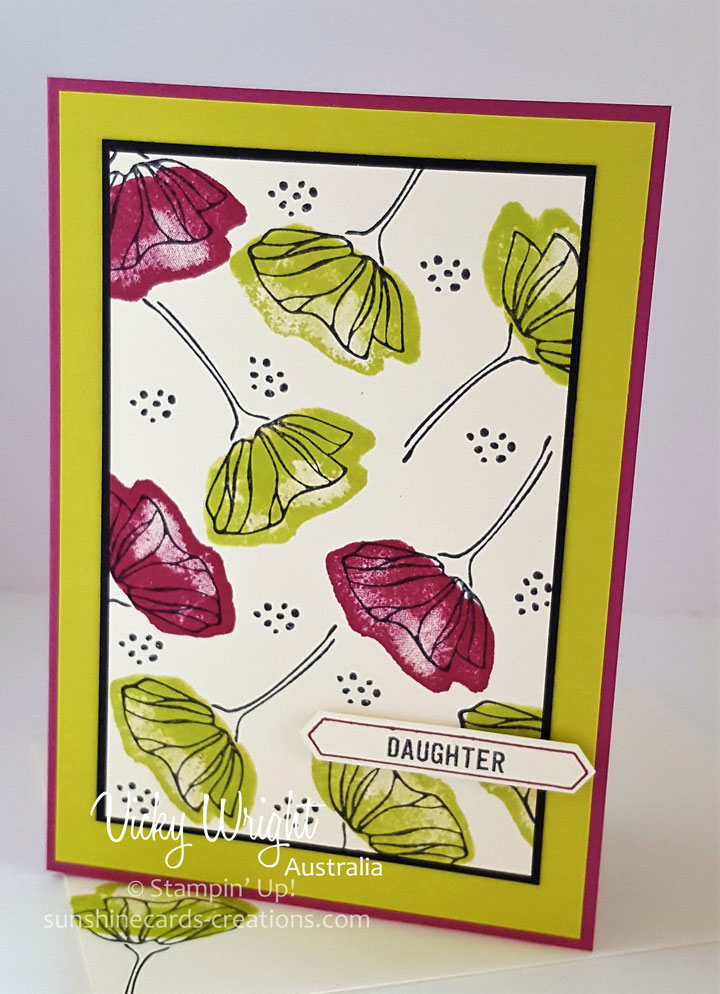
Today’s post is a very easy card using the “Oh So Eclectic” Stamp Set, which I actually cased from here.  I especially loved the colours, layout & how she stamped the flowers.  So easy but very striking with a WOW factor.  Thank you so much for your inspiration!

I actually didn’t change much at all as it was perfect the way it was, except I used Very Vanilla Card, changed out the greeting & I stamped a small image in amongst the flowersOh-So-Eclectic---inside from the same set.

The set is a 2-step stamping technique.  The beauty about this technique?  The images don’t have to be perfectly lined up with each other.

The flower outline was randomly stamped direct onto a piece of Very Vanilla using Memento Tuxedo Black Ink before stamping the matching solid image over the top using Berry Burst & Lemon Lime Twist Inks.  I then randomly stamped the small dotty image around the flowers in Memento Tuxedo Black Ink.

I stamped “Daughter” from the “Thoughtful Banners” Stamp Set onto scrap Very Vanilla.  The label outline was stamped using Berry Burst Ink before punching with the Classic Label Punch.

I layered the stamped card to a piece of Basic Black, then onto a piece of Lemon Lime Twist & finally to the Base Card – Berry Burst before popping on the sentiment with Mini Stampin’ Dimensionals.

Hope you enjoyed my card today.

Until next time, Happy Stampin!

Oh-So-Eclectic---300717

It’s Your Day…

… Make a Splash!

I’m  just loving this cute little stamp set “Message in a Bottle“.  So many ideas, so little #8---Maytime!  It is perfect for all occasions!  In fact, when I first saw this stamp set, I knew what I had to create with it.  It has taken me some time, but am happy with the result.

I wanted to show my “Cards @ Toogoom” class how much fun it is to play with the Watercolour Paper , Aqua Painters & water & I mean water as we really wet our paper.  It also doubled as my card for our challenge over on our FB Page.

I did start out sponging Rich Razzleberry, Pink Pirouette & Night of Navy but it wasn’t giving me the result I wanted so I switched over to Powder Pink, Fresh Fig & Tranquil Tide I then watched the magic happen as no 2 pieces will ever end up the same.

Splotches of water was then splashed over the dry Watercolour Paper to take some of the water away.  I splashed the Clear Wink of Stella over the top before die cutting with 20170626_120225blog-close-uthe Stitched Shapes Framelits  by running through the Big Shot.

I used Archival Basic Black Ink to stamp my mermaid onto Watercolour Paper.  She was coloured with Powder Pink (skin), Lemon Lime Twist (hair), Fresh Fig (cap & bra) & Tranquil Tide for the tail along with an Aqua Painter.  Between the colouring of different inks, I let them dry as I didn’t want the colours to run into each other.

The background was embossed with the Seaside TIEF by running a piece of the Thick Whisper White through the Big Shot & adhered to the Base Card – Powder Pink.

To download your free tutorial click on the link below.  It includes measurements (metric & imperial) & products used to create my card.

Until next time, Happy Stampin’

Signature---Vicky-Wright---

247. It’s Your Day, Make a Splash – Message in a Bottle

20170626_120219blog

Kylie’s International Blog Highlights

It is that time again where I am once again playing along with Kylie’s International Blog Highlights which is so much fun.  This month our theme is Gratitude inspired by Thailand!

What is Kylie’s International Highlights?   It is where Demonstrators from all around the world take part in a monthly Blog Highlight.  It’s a great way to get to know other Demonstrators & see projects using current Stampin’ Up!® product.  Each month Kylie has a different theme so we get to play with different product.

Vote for Me HereWhat is so different about this Blog Highlight?  YOU get to vote for your top 5 favourites.  The top ten will then get to take part in an international blog hop with Kylie & other talented successful demonstrators.

What do I do?  All you have to do is click on the “Vote for Me” photo at the side or head on over to Kylie’s Blog, click on the heart in the top right hand side of the picture.

Can I leave comments?  Sure you can.  Once you have voted, click on any picture & comment on those that you really love.  You know how bloggers love to read your comments.

My card was one I had started playing with a couple of weeks ago & has been sitting on my desk in bits & pieces for a couple of weeks now.  Instead of starting from scratch I challenged myself to use what I had started so I sat down & then bang, it hit me.  The Wood-Words---close-upflowers from the “Wood Words” Stamp Set were perfect as they remind me of Thailand.  The colours I didn’t have to change at all as I had gone with Berry Burst & Lemon Lime Twist Inks & Card & I think they are the perfect colours……

I do hope all the Demonstrators who have earned the Thailand Incentive Trip are enjoying themselves as it is such a lovely country.

There is a free tutorial on how I created my card by clicking on the link below.  It gives you all the product used plus the measurements (metric & imperial).

Don’t forget to head on over to Kylie’s Blog to check out all the lovely cards that have been created & to vote for your favourites.  I’m #17 (just in case you are looking).

Until next time, Happy Stampin’

Vicky

250. Hello Friend – Wood Words

Wood-Words---100717

Crafting Forever

Heya Stampers,

My card today is one we created last week in our class “Cards @ Toogoom“.  The ladies loved it & thought it was a perfect way to use up those bits of DSP hanging around, not 20170612_102411blog-insidedoing anything but sitting just in case…..

For me it was the perfect time to showcase the gorgeous “Crafting Forever” Stamp Set, Page 181 of the new Catalogue.  It has a couple of lovely images great for the male, female & kids.

I’ve used the “Playful Palette” DSP Stack (retired) but the perfect excuse to use most of the remaining pages.  You could easily change out the DSP, replace it with current DSP to achieve an entirely different look.

To highlight the DSP even further & for the colours to pop even more,  I allowed a small amount of Basic Black to show between each piece.

I didn’t colour the image as I thought the DSP was busy enough & didn’t want to take away from the DSP.  I did, however, “Paper Pieced” the vase with the same DSP.

To create your own card, just click on the link below to download the tutorial which includes all the product used & measurements (metric & imperial).  SU! Demonstrators are quiet welcome to use the tutorial for any of their classes.

Until next time, Happy Stampin’

Vicky

242. Crafting Forever

20170612_102356blog