Seaside Notions

G’Day Stampers,

Today I am sharing with you one of the cards we created sometime ago with the lovely Seaside Notion - InsideSeaside Notions Stamp Set.  I love this set & have to stop myself from using it all the time.  Do you find yourself going to use the same set all the time!

The background has been created with Inks & an Aqua Painter onto Shimmery White Cardstock.

I will say that I was more than happy with how it turned out considering I wasn’t sure what I was doing when I first started out but went along with an idea I had in my head!

If you click on the link below, you will be able to download a free tutorial to create your own card.

Shop with me to receive a FREE Tutorial Bundle

Showcase-Tutorial-Bundle

Until next time, Happy Stampin’


Vicky

609. Happy Birthday – Seaside Notions

Seaside Notion 1

It’s Your Day…

… Make a Splash!

I’m  just loving this cute little stamp set “Message in a Bottle“.  So many ideas, so little #8---Maytime!  It is perfect for all occasions!  In fact, when I first saw this stamp set, I knew what I had to create with it.  It has taken me some time, but am happy with the result.

I wanted to show my “Cards @ Toogoom” class how much fun it is to play with the Watercolour Paper , Aqua Painters & water & I mean water as we really wet our paper.  It also doubled as my card for our challenge over on our FB Page.

I did start out sponging Rich Razzleberry, Pink Pirouette & Night of Navy but it wasn’t giving me the result I wanted so I switched over to Powder Pink, Fresh Fig & Tranquil Tide I then watched the magic happen as no 2 pieces will ever end up the same.

Splotches of water was then splashed over the dry Watercolour Paper to take some of the water away.  I splashed the Clear Wink of Stella over the top before die cutting with 20170626_120225blog-close-uthe Stitched Shapes Framelits  by running through the Big Shot.

I used Archival Basic Black Ink to stamp my mermaid onto Watercolour Paper.  She was coloured with Powder Pink (skin), Lemon Lime Twist (hair), Fresh Fig (cap & bra) & Tranquil Tide for the tail along with an Aqua Painter.  Between the colouring of different inks, I let them dry as I didn’t want the colours to run into each other.

The background was embossed with the Seaside TIEF by running a piece of the Thick Whisper White through the Big Shot & adhered to the Base Card – Powder Pink.

To download your free tutorial click on the link below.  It includes measurements (metric & imperial) & products used to create my card.

Until next time, Happy Stampin’

Signature---Vicky-Wright---

247. It’s Your Day, Make a Splash – Message in a Bottle

20170626_120219blog

SSC 241…

This is the card I created fo rthe new challenge over at Stamping 411.  As soon as I saw this sketch, I knew what I wanted to use & how it should look when I finished.  I wanted to try & create a shabby chic/vintage type card.  I think I have succeeded in getting the results I had in my head.

As usual the operators have provided us with all the basic measurements – all the hard work has been done for us –

Measurements –
Base: 8 1/2″ x 5 1/2″, scored and folded in half at 4 1/4″ – Very Vanilla
Layer 2: 4 x 5 1/4″ – Soft Suede
Layer 3: 4″ x 1 1/2″  – DSP
Layer 4: 2 1/2″ x 2 1/4″ – DSP
Layer 5: 2 3/8″ x 2 1/8″ – Very Vanilla

I Heat Embossed my image onto the piece of Soft Suede using Versamark & Clear Embossing Powder.

Envelope & Inside Card…

I adhered the DSP to a piece of Pink Pirouette so that I didn’t have the DSP straight onto the Soft Suede & to break the colours up a little.  I think it looks pretty with the little bit of Pink Pirouette showing as a small edge.  I then adhered this piece to the embossed piece using Snail Adhesive.

The Ribbon was adhered across the top part of the DSP & ends tucked under.  The whole piece was then adhered to the Base Card – Very Vanilla using Snail Adhesive.

Stamping the image onto the small piece using Versamark & Soft Suede Inks, I Heat Embossed it.  Using my Aqua Painter, I gently coloured the images with Pink Pirouette & Wild Wasabi Inks.  I nearly left the leaves clear, but after looking at it for a little time, decided to go ahead & colour them.  I like the little bit of green in the card!
 ?

Close Up of Clear Embossing & Flowers…

?
I applied Pearls to the centres of some of the flowers & adhered both pieces to the card as per the sketch.  I found a couple of small Butterflies that were in my packet of Pink Pirouette already cut out, so I used them on the card.  The large Butterfly was adhered with Multipurpose Glue & 2 small Pearls applied to the centre.  The Butterflies had been cut using the Beatuiful Wings Embosslits Dies.

I stamped my sentiment direct onto a piece of Very Vanilla using my SU Marker – Soft Suede, punched with the Modern Label Punch, dabbed a little Pink Pirouette around the edges, adhered to the card with Stampin’ Dimensionals & adhered the small butterfly to the sentiment.  I applied 3 small Pearls to the punched piece – 1 in the centre of the Butterfly & 2 to replace the “o” in the words.

Lastly, I tied a bow & applied to the card with Mini Glue Dots.

When I saw this sketch, it is very similar to a scrapbook layout I have completed for  a class I have this month, which I will post once the class is finished.

Supplies –
Stamp Set – Elements of Style, A Word for You
Ink – Pink Pirouette, Soft Suede, Versamark, Wild Wasabi
Cardstock – Pink Pirouette, Very Vanilla, Soft Suede
DSP – Beau Chateau
Embosslits Dies – Beautiful Wings
Punches – Modern Label
Ribbon – 1/2″ Seam Binding  – Very Vanilla
Accessories – Aqua Painter, Snail Adhesive, Heat Tool,
Pearls, Stampin’ Dimensionals, SU Marker – Soft Suede
Until next time, Enjoy!

‘Tis the Season…

I wanted to create another card for the current challenge over at Sunny Challenges & Creations and with Christmas fast approaching, thought it best to try & start on my Christmas Cards.  In fact, I was going to use this set on my first card, but changed my mind as I went to select my stamp set!

It is not too late to link your creation with Mr Linky.  We would love to see what you create!

All measurements may be found in this posting.  All I’ve done is changed my colours around.  In fact, they are completely different!

I stamped my image onto Very Vanilla Cardstock using Chocolate Chip Ink.  Grabbing my Aqua Painter, I coloured the image using Olive Olive, Chocolate Chip & a touch of Riding Hood Red Inks.  The bird I left except for his little beak & feet.

I coloured some Basic Rhinestones with a permanent red marker & applied them over the berries.  Am not sure if I like the final result, but they are there to stay.

I adhered this piece to a piece of Riding Hood Red Cardstock, then to DSP, Very Vanilla Cardstock, DSP & finally to the Base Card – Chocolate Chip using Snail Adhesive.

Supplies –
Stamp Set – Beautiful Season
Ink – Old Olive, Chocolate Chip, Riding Hood Red
Cardstock – Chocolate Chip, Very Vanilla, Riding Hood Red
DSP – Letters to Santa
Accessories – Snail Adhesive, Basic Rhinestones, Aqua Painter
Non-SU – Permanent Marker – Red

Until next time, Enjoy!

SSC 217…

I am in the middle of doing Wedding Reception Stationery so shouldn’t really be doing any cards, let along attempt sketches, but while the paint is drying, the mouse will play.  Anyhow, I have to make the bride & groom a “Congratulations” Card, so this is a good excuse!
This card has been created for the challenge over at 
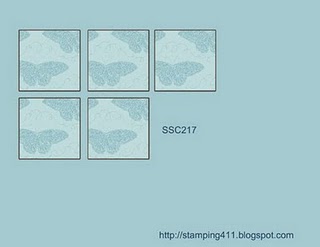
Stamping 411 I finally inked a stamp set which has been sitting on my shelf for a little time now.  After seeing it in ink, I now have a million ideas to use it, but alas as it is a Hotess Set, so will be retiring at the end of the month.
This week Stamping 411 not only have 2 sketches but they have a “Contest” so to speak.  The winner will receive a FREE Level 3 Hostess Set from the previous Idea Book & Catalogue – “Playful Pieces“. 
If I get the time, I will attempt to have a go at the other sketch too, as a few ideas popped into my head while making the card for #2 sketch
As always, measurements have been supplied for us –
Base: 11 x 4 1/4″, scored and folded in half at 5 1/2″ – Basic Black
Layer 2: 5 x 3 3/4″  – Riding Hood Red
Layer 3: 4 7/8″ x 3 5/8″  – DSP
Layer 4: 3 1/8″ x 4 1/8″ – Basic Black
Layer 5: 3×4″ – Very Vanilla
Layer 6: Ribbon or cardstock
Layer 7: ANY shape punch
I stamped my images direct onto Very Vanilla Cardstock using Basic Black Ink.  Thinking I would try something a little different & not do the 2-step stamping technique onto the image, I coloured the images using my Aqua Painter, Riding Hood Red & Crumb Cake Inks.  I think it come out ok.  I very roughly coloured the images, as I think the stamp set calls for that, not to keep your colouring within the lines, so to speak!
I put the card through the Bigshot using Embossing Folder – Perfect Polka Dots, layered it to Basic Black, then to DSP & then to Riding Hood Red Cardstock.  A piece of Ribbon was adhered across the bottom about 1/4 way up & a bow tied.
I stamped my sentiment using Basic Black Ink onto Very Vanilla, punched using Oval Punch & run it through the Bigshot, again using the same Embossing Folder.  The piece was then adhered to a piece of Crumb Cake Cardstock which had been punched using the Scallop Oval Punch.  I adhered to the card using SU Dimensionals.
The whole piece was then adhered to the Base Card – Basic Black.
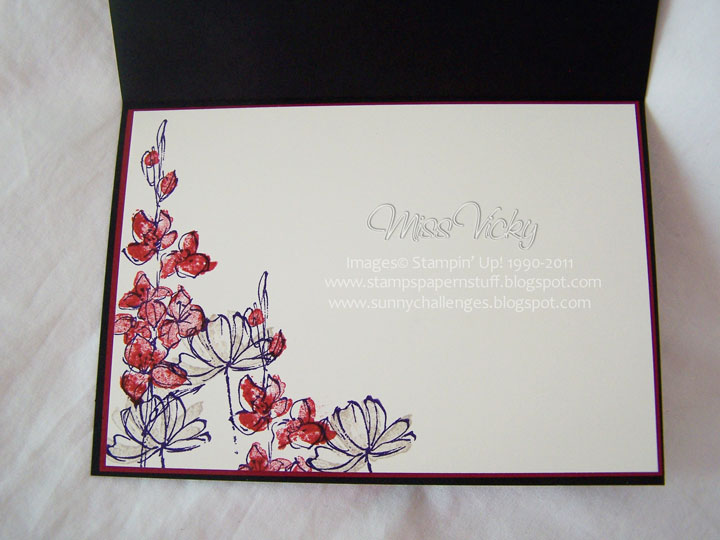
For my inside, I did the 2-Step Stamping Technique using Basic Black, Riding Hood Red & Crumb Cake Inks onto Very Vanilla, adhered to layer of Riding Hood Red Cardstock & then to the Base Card.
What looks like a hard sketch, is really a great one to do!
Supplies –
Stamp Set – Fast & Fabulous, Oval All
Inks – Basic Black, Riding Hood Red, Crumb Cake
Cardstock – Very Vanilla, Crumb Cake, Riding Hood Red, Blasic Black
DSP – Love Letter
Embossing Folder – Perfect Polka Dots
Punches – Oval, Scallop Oval
Ribbon – 1/8″ Taffeta – Basic Black
Accessories – SU Dimensionals, Bigshot, Snail Adhesive, Aqua Painter
Until next time, Enjoy!