Last Day…

… to order from the Retiring List

To celebrate the current Stampin’ Up! Catalogue, I thought I would share with you the box of cards I created again using Retiring Products.  The idea come about after creating my card for the current Sunny Challenges challenge, which still has one more week to run, so it is not too late to link your creation with Mr Linky.

If you remember I created a box of 3 x 3 Gift Cards using Nature Walk & the Regal Inks which are retiring, a couple of days ago, so this time I thought I do would a similar sort of thing using the retiring Subtles Colours.

I created 4 cards – 2 x Regal Rose & 2 x Pretty in Pink.  All cards have a different greeting/sentiment on them. The box has touches of Pretty in Pink.  The word “Cards” on the box was created in MDS & printed in Certainly Celery.

Regal Rose & Pretty in Pink?

 
Until next time, Happy Stampin!
 
Vicky

SC 082/13…

Our challenge over at Sunny Challenges is to create a project using the sketch as well as retiring Stampin’ Up! product.  To play along, all you have to do is check out that long Retiring List.

As the sketch is wide open, I thought I would try something a little different with my card this week.  In fact I enjoyed this fun technique that it is going to be included in our Technique Class next month.

I remember seeing a card which was using a tile technique on Pinterest, but as usual didn’t take much notice or didn’t save it, thinking I would not be using it, but it did stick in my mind.  Thank you so much for your inspiration.

After playing around for a little time, I eventually come up with something that I was happy with.

Not only did I do this for the challenge, but I also created a couple to post off to a couple of customers this month – different colours of course, but will show you them at a later stage.

Retiring Products I’ve used included –
Stamp Set – Nature Walk
Cardstock – Baja Breeze
Ink – Baja Breeze
SU! Write Markers – Baja Breeze, Certainly Celery

I am really going to miss the Stamp Set – Nature Walk, but no doubt SU! will have something better.

Baja Breeze
 
Bashful Blue
 
Don’t forget to pop on over to Sunny Challenges & check out what both Kris & Carole have created using the sketch & retiring products.
 
You have 2 weeks to create your project.  We love seeing your work & leaving comments, so be sure to link it back with Mr Linky.
 
Until next time, Happy Stampin’
 
Vicky

Something a Little Different…..

I’ve been doing a Handmade Market for the last couple of months.  In fact, I attended the first one that occured & had a great time, that I have decided to go back each month.  It is purely all handmade.  It is growing each time & the talent out there is staggering.

I don’t always sell a lot of the same thing, but what I do sell, I get a lot of feedback saying how lovely my cards, etc are.  It does make you feel good & always appreciate the comments.  I love speaking with people, finding out what they do, where they live, etc.

For those of you who do markets, you are probably aware that “What sells one day, won’t necessarily sell the next.”  “What is popular at one maket is not necessarily going to be popular at the next.”  So far, I have been very happy with the result as I have managed to cover my costs plus a little extra to purchase more supplies.

I thought I would show you some of the Post-It Notes & Gift Cards I created for my first market.  They have proven to be very popular.  I have kept away from the colours I would use to create, but instead decided to go with colours that I would not norally use.  I also like to match the colour with the pen.

Bashful Blue –?
 
Rich Razzleberry –
 
Gift Cards –
 
Until next time, Enjoy!

SC 067/12….

What a great challenge we were set this week over at Sunny Challenges & Creations.  All we have to do is create a Shaker Card – NO layout!!!!!  If you are like me, then I haven’t created one for so long that I can’t remember the last time I did one.

Measurements –
Base Card – Chocolate Chip – 8 1/4″ x 4 1/8″ or 21cm x 15cm
Layer 1 – Cherry Cobbler – 5 5/8″ x 3 7/8″ or 14.5cm x 10cm
Layer 2 – DSP – 5 1/2″ x 3 3/4″ or 14cm x 9.5cm
Layer 3 – Chocolate Chip – 3 1/4″ x 3 1/4″ or 8.5cm x 8.5cm
Layer 4 – Very Vanilla – 3 1/8″ x 3 1/8″ or 8cm x 8cm
Layer 5 – Window Sheet or Acetate – 3 1/8″ x 3 1/8″ or 8cm x 8cm

Supplies –
Stamp Set – Petite Pairs, Nature Walk
Ink – Chocolate Chip
Cardstock – Chocolate Chip, Cherry Cobbler, Very Vanilla
DSP – First Edition Speciality
Ribbon – 1/2″ Seam Binding – Cherry Cobbler, Crochet Trim – Victoria
Punches – 2 1/2″ Circle
Accessories – Snail Adhesive, Stampin’ Dimensionals, Sticky Strip, Glimmer Brad – Champagne, Glass Stampin’ Glitter – Gold (Retired), Stampin’ Markers – Marina Mist & Old Olive, Mini Glue Dots

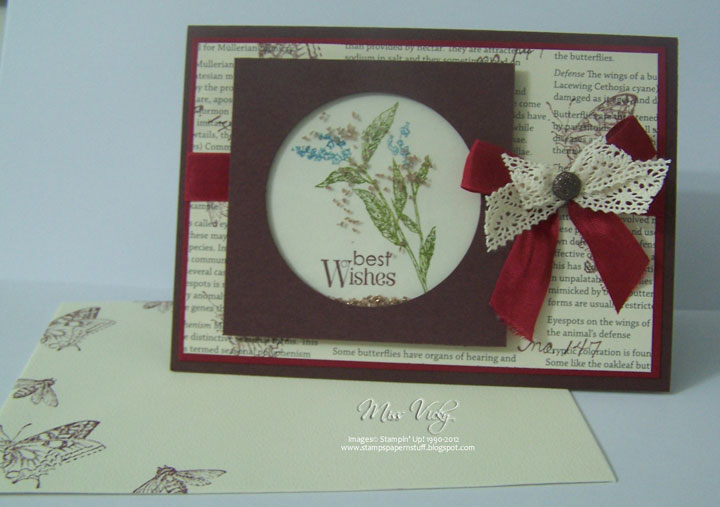
I randomly stamped images over the DSP with Chocolate Chip Ink, prior to adhering to the Cherry Cobbler Cardstock.  I ran a piece of Cherry Cobbler Ribbon across the middle, tucked ends under & adhered to the Base Card with Snail Adhesive.

For my window, I inked my image with Stampin’ Markers – Old Olive & Marina Mist, stamped direct onto Very Vanilla, inked my sentiment in Chocolate Chip Ink & stamped onto the same piece of Very Vanilla Cardstock.  I placed my images onto the Cardstock, so that they would be able to be seen once I had adhered the top piece of Chocolate Chip Cardstock.

As I didn’t have any Double Sided Mounting Tape, I made my own.  I applied Sticky Strip all around the outer edge of my stamped piece of Very Vanilla Cardstock, ensuring that all sides were covered.  I cut 2 pieces of thick Cardboard – from the Glitter Paper – & adhered to the tops of the Sticky Strip, ensuring that all areas were covered as I didn’t want any pieces of the glitter to escape, applied another layer of Sticky Strip, carefully poured Glitter onto my image – not too much as you don’t want it to take over – punched a circle into the middle of the Chocolate Chip Cardstock with the 2 1/2″ Circle Punch, adhered the Window Sheet to the wrong side & then finally to the top of the Sticky Strip.  I applied Stampin’ Dimensionals to the back of this piece & adhered to the card.

I tied a bow with the Cherry Cobbler Seam Binding, found 2 small pieces of Crochet Trim that happen to be in the same container as my Ribbon & decided to use them as well.  A Glimmer Brad was attached to the middle & finally adhered to the card with Mini Glue Dots.

We hope you will jon us this week for this fun challenge.  Head over to Sunny Challenges & Creations to chek out what both Kris & Vicki have created, create your project, post to your blog or on line group & then link back with Mr Linky.  We would love to see your creation!

Have a great week

SC 06012…

Our challenge this week was set by Gwen.  Along with the sketch we have to use Embossing on our cards, ie Heat Embossing or Dry Embossing using your Big Shot & Embossing Folders or any other Embossing that you may like to try.

I’ve been playing with colours the last couple of weeks & decided to go ahead with one of the combinations I found I really liked. 

Measurements –
Base Card – Whisper White – 8 1/4″ x 4 1/8″ or 22cm x 15cm
Layer 1 – Basic Gray – 5 3/4″ x 4″ or 14.5cm x 9.5cm
Layer 2 – Whisper White – 5 5/8″ x 3 7/8″ or 14cm x 9cm
Layer 3 – Not Quiet Navy – 1″ x 5 5/8″

Supplies –
Stamp Set – Perfect Punches, Nature Walk, French Foliage, Established Elegance
Ink – Baja Breeze, Marina Mist, Basic Gray, Not Quite Navy
Cardstock – Whisper White, Basic Gray, Not Quite Navy
Ribbon – 5/8″ White Organza
Punches – Scallop Trim Border, Scallop Oval
Embossing Folder – Vimtage Wallpaper
Accessories – Stampin’ Up! Dimensionals, Tombow Multipurpose Glue, Snail Adhesive, Big Shot

I randomly stamped my images onto the smaller piece of Whisper White Cardstock using Basic Gray, Baja Breeze, Marina Mist & Not Quite Navy Inks.  The whole piece was put through the Big Shot using Embossing Folder – Vintage Wallpaper.

I punched along both sides of the piece of Not Quite Navy Cardstock with the Scallop Trim Border Punch, adhered the ribbon along the middle, tucked the ends under & tied a knot.  This whole piece was then adhered to the piece of Basic Gray Cardstock & finally to the Base Card – Whisper White.

I stamped the wording onto a scrap piece of Whisper White Cardstock with Not Quite Navy Ink, punched with the Scallop Oval Punch & adhered to the card with Stampin’ Dimensionals.

Don’t forget to hop on over to Sunny Challenges & Creations to check out what the other girls have created.  This is the perfect time to dig out those Heat Tools or your Big Shot & join us this week for this fun challenge.

Until next time, Happy Stampin!