First Frost – Congratulations

G’Day Stampers,

I am sharing with you one of our cards created a couple of weeks ago in one of our classes.  The ladies loved the cards.  I will be honest & say this card was actually cased from the Annual Catalogue, Page 140.  The DSP is the lovely Frosted Floral Specialty & has First Frost 1 - Insideretired while the stamp set is First Frost!  We also teamed the set up with the matching Frosted Bouquet Dies.

The colours for the card have been picked up from the DSP.  I also managed to use up the last of the Tranquil Tide Cardstock which I was very proud of myself for doing.  Usually I have heaps of the retiring In Colours Cardstock left over but not this year!

By clicking on the link above the photo, you will be able to download a free tutorial to create your very own card.  It includes all the products plus the measurements – imperial & metric.

Until next time, Happy Stampin’

Signature---Vicky-Wright---

554. Congratulations – First Frost

First Frost

Work of Art

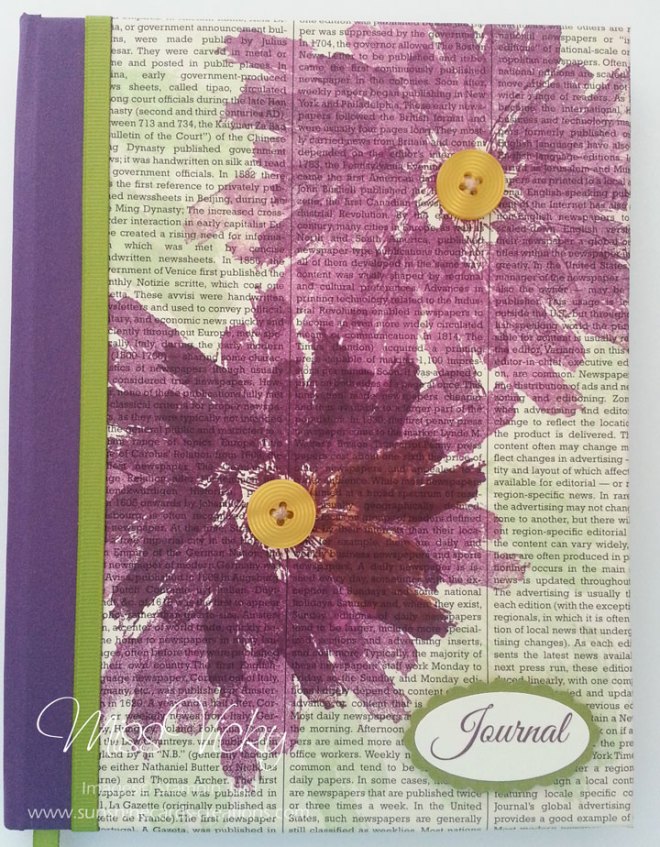
I found this great card on Pinterest sometime ago & it stuck in my head.  I loved the way the person had used the stamp to create her look.  Reminded me a bit of abstract art!

So many looks are able to be created using the fabulous “Work of Art” Stamp Set – gotta love it when you can achieve heaps with 1 set!

While using the same colours (I think), I’ve changed mine a little by using Buttons & Twine for the centre of the flowers.

So that I could stamp directly onto the now retired “First Edition Speciality” DSP, I temporary marked the front of my notebook prior to stamping.  I wasn’t too worried if the stamping would not all fit on the front, as it gives it a bit of a different look.

For the bottom flower, I stamped directly onto the DSP with Blackberry Bliss Ink, stamping in a circle.  I again repeated the same step, but this time stamping off prior to stamping direct onto the DSP.

For the top flower I stamped off once prior to stamping direct onto the DSP, again in a circle.  I repeated the same step, but this time stamping off twice prior to stamping direct onto the DSP.001-close-up-blog

With the little bits of green around the front, I used Old Olive Ink to match the Ribbon.

I then proceeded to cover my book with the DSP.  I covered the Spine with a piece of BlackBerry Bliss CS & adhered a piece of retired Old Olive Grosgrain Ribbon for the Bookmark, ensuring it was long enough once the book was open.

For the centres, I threaded a piece of Natural Linen Thread through 2 x Crushed Curry Buttons, tied at back & adhered with Glue Dots.  The same stamp as the flowers were used.

I printed the word “Journal” with MDS, punched with Oval Punch & adhered to a piece of Old Olive CS which had been punched with the Scallop Oval Punch.  This was then adhered to the book with Stampin’ Dimensionals.

To finish the cover, I lightly sprayed with Vanilla Shimmer Smooch Spritz.

I love the colours of Blackberry Bliss, Old Olive & a splash of Crushed Curry – they seem so very vibrant!

Until next time, Happy Stampin!

Vicky

001blog

Cracked Glass…

…was one of the techniques we did back in October.  I decided to do a Christmas Card along with a bit of a different spin on the Step Fold card.

It is another non-traditional Christmas card but the ladies loved it, especially the fold.  The 2nd card we created for this class can be seen in this post.


Until next time, Happy Stampin’

SC 067/12….

What a great challenge we were set this week over at Sunny Challenges & Creations.  All we have to do is create a Shaker Card – NO layout!!!!!  If you are like me, then I haven’t created one for so long that I can’t remember the last time I did one.

Measurements –
Base Card – Chocolate Chip – 8 1/4″ x 4 1/8″ or 21cm x 15cm
Layer 1 – Cherry Cobbler – 5 5/8″ x 3 7/8″ or 14.5cm x 10cm
Layer 2 – DSP – 5 1/2″ x 3 3/4″ or 14cm x 9.5cm
Layer 3 – Chocolate Chip – 3 1/4″ x 3 1/4″ or 8.5cm x 8.5cm
Layer 4 – Very Vanilla – 3 1/8″ x 3 1/8″ or 8cm x 8cm
Layer 5 – Window Sheet or Acetate – 3 1/8″ x 3 1/8″ or 8cm x 8cm

Supplies –
Stamp Set – Petite Pairs, Nature Walk
Ink – Chocolate Chip
Cardstock – Chocolate Chip, Cherry Cobbler, Very Vanilla
DSP – First Edition Speciality
Ribbon – 1/2″ Seam Binding – Cherry Cobbler, Crochet Trim – Victoria
Punches – 2 1/2″ Circle
Accessories – Snail Adhesive, Stampin’ Dimensionals, Sticky Strip, Glimmer Brad – Champagne, Glass Stampin’ Glitter – Gold (Retired), Stampin’ Markers – Marina Mist & Old Olive, Mini Glue Dots

I randomly stamped images over the DSP with Chocolate Chip Ink, prior to adhering to the Cherry Cobbler Cardstock.  I ran a piece of Cherry Cobbler Ribbon across the middle, tucked ends under & adhered to the Base Card with Snail Adhesive.

For my window, I inked my image with Stampin’ Markers – Old Olive & Marina Mist, stamped direct onto Very Vanilla, inked my sentiment in Chocolate Chip Ink & stamped onto the same piece of Very Vanilla Cardstock.  I placed my images onto the Cardstock, so that they would be able to be seen once I had adhered the top piece of Chocolate Chip Cardstock.

As I didn’t have any Double Sided Mounting Tape, I made my own.  I applied Sticky Strip all around the outer edge of my stamped piece of Very Vanilla Cardstock, ensuring that all sides were covered.  I cut 2 pieces of thick Cardboard – from the Glitter Paper – & adhered to the tops of the Sticky Strip, ensuring that all areas were covered as I didn’t want any pieces of the glitter to escape, applied another layer of Sticky Strip, carefully poured Glitter onto my image – not too much as you don’t want it to take over – punched a circle into the middle of the Chocolate Chip Cardstock with the 2 1/2″ Circle Punch, adhered the Window Sheet to the wrong side & then finally to the top of the Sticky Strip.  I applied Stampin’ Dimensionals to the back of this piece & adhered to the card.

I tied a bow with the Cherry Cobbler Seam Binding, found 2 small pieces of Crochet Trim that happen to be in the same container as my Ribbon & decided to use them as well.  A Glimmer Brad was attached to the middle & finally adhered to the card with Mini Glue Dots.

We hope you will jon us this week for this fun challenge.  Head over to Sunny Challenges & Creations to chek out what both Kris & Vicki have created, create your project, post to your blog or on line group & then link back with Mr Linky.  We would love to see your creation!

Have a great week

SC 059/12…

We have a great challenge beginning today over at Sunny Challenges & Creations.  Along with the sketch, we are to create an Easel Card.  I love making these, but don’t do them often enough.
Not sure on how to create this type of card, then click onto tis link & it will take you straight there – http://www.splitcoaststampers.com/resources/tutorials/easelcard/

I started out with the design in mind of a certain stamp set.  After grabbing all my supplies & colours which I thought would really suit the set, couldn’t find the set I wanted.  After searching for about 10m, suddenly realised I don’t have that stamp set.  Does this happen to anyone else????

Measurements –
Easel
Base – Crumb Cake – 8 1/4″ x 4 1/8″ or 22cm x 15cm – Score at 4 1/8″ & 2′

Card Front –
Layer 1 – Crumb Cake – 4 1/8″ x 5 7/8″ or 15cm x 10.5cm
Layer 2 – Raspberry Ripple – 3 7/8″ x 5 5/8″ or 14cm x 9.5cm
Layer 2 – DSP – 5 5/8″ x 2 1/2″ or 9.5cm x 6cm
Layer 3 – Perfect Plum – 5 5/8″ x 1″ or 9.5cm x 2.5cm

Inside –
Layer 1 – Very Vanilla – 4″ x 5 3/4″ or 14.5cm x 11cm
Laer 1 – Perfect Plum – 1″ x 4″ or 2.5cm x 14.cm
Layer 2 – DSP – 1″ x 4″ or 2.5cm x 14cm

Supplies –
Stamp Set – Field Flowers, Because I Care (Retired), French Foliage
Ink – Raspberry Ripple, Crumb Cake, Perfect Plum, Gumball Green
Cardstock – Crmb Cake, Perfect Plum, Raspberry Ripple, Very Vanilla
DSP – First Edition Speciality
Punches – Dotted Scallop Border, Word Label, Modern Label
Accessories – Snail Adhesive, Stampin’ Dimensionals

For the front panel of my card, I adhered the large piece of Raspberry Ripple onto the single piece of Crumb Cake Cardstock with Snail Adhesive.

I stamped my images randomly onto the piece of DSP using Gumball Green, Raspberry Ripple & Perfect Plum Inks.  I punched along the edge of the piece of Perfect Plum Cardstock with the Dotted Scallop Border Punch, adhere it to the bottom of the DSP, prior to adhering to the front of the card.

I stamped the small image onto a scrap of Very Vanilla Cardstock in Perfect Plum Ink, cut around & adhered it to the bottom left hand corner of the card with Stampin’ Dimensionals.  The large flower was completed the same way.

The whole piece was adhered to the Easel Base with Snail Adhesive.

For my Easel Base, I adhered the piece of Very Vanilla Cardstock to the bottom of the Crumb Cake with Snail Adhesive, then punched along the edge of the Perfect Plum with the Scallop Dotted Border Punch, adhered to the DSP & finally to the bottom of the Very Vanilla Cardstock.

With Perfect Plum, Raspberry Ripple & Gumball Green Inks, I stamped the images direct onto the DSP allowing some of the images to go onto the piece of Very Vanilla Cardstock.

My greeting was stamped onto a scrap of Very Vanilla Cardstock in Perfect Plum Ink, punched with the Word Label Punch & then to a piece of Raspberry Ripple Cardstock which had been punch with the Modern Label prior to adhering to the bottom of the card with Stampin’ Dimensionals.

We hope you will join us this week.  Don’t forget to pop on over to Sunny Challenges & Creations & check out what GwenKris and Christine have created.  These are fun cards to create!

 
Until next time, have a great week
 

SC 056/12…

Happy Father’s Day to all the Dads out there!  Hope you all have a great day & are spoilt rotten!
 
What a great little challenge Gwen set us this week.  Once I knew what I was going to use to creat my little card, it literally took about 5 minutes.  This size card is perfect for a little Thank You Note, slip inside or attach to a small gift bag.  The ideas are endless……  I also opted with a colour combination that I don’t think I have used for a really long time.

Measurements –
Base Card – So Saffron – 4″ x 8″ or 10cm x 10cm – Score in half & folded in middle
Layer 1 – Basic Black – 3 3/4″ x 3 3/4″ or 9.5cm x 9.5cm
Layer 2 – DSP – 3 5/8″ x 3 5/8″ or 9cm x 9cm

Supplies –
Stamp Set – Mixed Bunch
Ink – Basic Black, So Saffron
Cardstock – So Saffron, Very Vanilla, Basic Black
DSP – First Edition Speciality
Ribbon – 5/8″ Victoria Crochet Trim, 1/8″ Basic Black Taffeta
Punches – Blossom, 3/4″ Circle, 1 3/4″ Circle, 1 3/8″ Circle
Accessories – Snail Adhesive, Stampin’ Up! Dimensionals, Rhinestone

 I adhered the piece of DSP to the piece of Basic Black Cardstock before running first a piece of Crochet Trim across the bottom part of the card.  Once this Crochet Trim had been adhered to the layers, I then decided to run a piece of Taffeta Ribbon on top of that, tied a bow & adhered the whole piece to the Base Card – So Saffron using Snail Adhesive.

I stamped my image twice onto a scrap piece of Very Vanilla Cardstock, once in Basic Black which I punched out with the matching Blossom Punch.  The 2nd image was stamped in So Saffron, where I punched the middle out with the 3/4″ Circle Punch.  This small piece was attached to the centre of the larger image with a Stampin’ Dimensional.

A large circle was punched in Basic Black from the 1 1 3/4″ Circle Punch & the smaller using the 1 3/8″ Circle Punch.  These were layered on top of each other & then to the card with Snail Adhesive.  The punched images were layered on top of the circles with Stampin’ Dimensionals.

For my black Rhinestone, I coloured a Clear Rhinestone with a permanent Black Marker & popped it in the middle of the So Saffron image.

Don’t forget to pop on over to Sunny Challenges & Creations to check out what Kris, Gwen, Christine & Leah have created.  Create your card and add to Mr Linky.  I would really love to see what you can come up with using the challenge.

Have a great week

Challenge Card….

Today’s card is for the challenge over at Stampin’ Fun & Friends.  Click on the link to register for this great event.  It is not too late to do so.  There have been so many great ideas for creating lovely card sets including a matching box/bag to go with them. 

Our first challenge CherylAnn set us is to create a Project, Card, 3-D Item or Scrapbook Page going by this lovely spring photo. Isn’t that flower just gorgeous?

Measurements –
Base Card – More Mustard – 8 1/4″ x 4 1/8″ or 21cm x 15cm – Scored in the middle & folded in half
Layer 1 – Bravo Burgandy – 5 3/8″ x 3 7/8″ or 14cm x 10cm
Layer 2 – Very Vanilla – 5 1/4″ x 3 3/4″ or 13.5cm x 9.5cm

Supplies –
Stamp Set – Nature Walk, French Foliage
Inks – Bravo Burgandy, Garden Green, More Mustard, Always Artichoke
Cardstock – Bravo Burgandy, More Mustard, Very Vanilla
DSP – First Edition Speciality
Punches – Scallop Oval
Ribbon – 1/2″ Seam Binding – Always Artichoke
Accessories – Regal Buttons – More Mustard, Snail Adhesive, Mini-Glue Dots, Sponge Dauber, Very Vanilla Spritz, Paper Piercer, Silver Brad

Close up of Flower with Button
poking through….

I randomly stamped my images onto the piece of Very Vanilla Cardstock using Garden Green, Always Artichoke, More MustardBravo Burgandy Inks.  With the Always Artichoke Ink, I did stamp off twice prior to stamping onto the Very Vanilla Cardstock.

Inside Card….

I punched 5 scallop circles from the DSP with the Scallop Circle Punch, sponged around the edges using Bravo Burgandy Ink & Sponge Dauber prior to spritizing all 5 circles with the Very Vanilla Spritzer. This wet my circles so that I could scrunge & play with them.  It also made the sponging run a little & lighten the sponged Bravo Burgandy.
I carefully layered all pieces on top of each other, pierced a hole in the middle with my Paper Piercer, added a Silver Bard to the centre & squashed my flower until I was happy with the shape.

Once the flower was dry, I added a small button to the centre with a Mini-Glue Dot, tied a double bow with the Ribbon, attached to the card with another Mini-Glue Dot & adhered the flower in the centre of the bow, so that it looked a little like leaves.

Since the photo was taken, I again sponged the edges of the flower in Bravo Burgandy to bring out the colour a little more & to take away the pink tinge.

I haven’t added a greeting/sentiment to my card as you are probably all aware, I mostly post blank cards or will add the greeting later when I know what I am going to use it for.

Until next time, Happy Stampin’

Technique Class….

One of our techniques last sunday arvo was the “Reverse Spotlighting“.  what a fun, fun technique & we all enjoyed creating this card.  Not only was the technique used on the card, but we created an “Easel Card” as well.

Bottom of Easel…
Aren’t the colours gorgeous on this card.  This is the first time, this stamp set has been inked, but think it will be seeing a lot more ink somehow, as it stamps such beautiful images.
Have a great day!

Array of Sunshine…

I’ve had this set for a long time, but I am ashamed to say that it has not seen a lot of ink!  I have never been too sure if I liked it or, but after using it on today’s card, I have to admit that I love it!  I’ve found that it is the perfect set for layering.

The layout is the one we completed at our class at the Community Centre last Friday.  Included in the class was distressing & sponging.

Inside of Card…

Measurements –
Base Card – Very Vanilla – 8 1/4″ x 5 7/8″ or 21cm x 15cm – Scored in middled & folded in half
Layer 1 – Basic Black – 4″ x 5 3/4″ or 9.5cm x 14.5cm
Layer 2 – DSP – 3 7/8″ x 5 5/8″ or 9cm x 14cm
Layer 3 – Basic Black – 4″ x 3″ or 10.5cm x 7.5cm
Layer 4 – DSP – 3 7/8″ x 2 7/8″ or 10cm x 7cm

Supplies –
Stamp Set – Array of Sunshine (Hostess Set)
Ink – More Mustard, Elegant Eggplant, Always Artichoke
Cardstock – Very Vanilla, Basic Black
DSP – First Edition Speciality
Punches – Scallop Trim Border
Ribbon – Crochet Trim Chantilly
Accessories – Snail Adhesive, Stampin’ Dimensionals, Sponge, Antique Brads, Cutter Kit, Mini Glue Dots
NON-SU – Pearls

The Base Card – Very Vanilla was punched along the bottom using the Scallop Trim Border Punch.

I stamped the large flower image 3 times onto scrap Very Vanilla Cardstock, 3 in Elegant Eggplant  & 3 in More Mustard.  I cut around each image, so that I had 3 different layers for all 6 images.  The cut out pieces were then layered using Stampin’ Dimensionals & set aside.  The leaf was stamped onto scrap Very Vanilla Cardstock using Always Artichoke Ink, cut out & set aside.

I distressed all edges of both pieces of DSP using my Distressing Tool from the Cutter Kit & then sponged around the edges with Stampin’ Up! Sponge & More Mustard Ink.

The large piece of DSP was adhered to the large piece of Basic Black Cardstock, while the smaller piece of DSP was adhered to the smaller piece of Basic Black Cardstock, then to the top of the large piece of DSP, Crochet Trim adhered across the centre, ends tucked under & finally to the Base Card with Snail Adhesive.

A large leaf was stamped direct onto the DSP with Always Artichoke Ink, images adhered to the card with Stampin’ Dimensionals.  The cut out leaf was tucked under the Crochet Trim.

An Antique Brad was applied to the bow prior to adhering to the card with a Mini Glue Dot.  3 Pearls were applied to the top of the card & 3 to the bottom of the card.  I applied a Pearl to the centre of each flower which had been found in my stash of Pearls.  The fitted perfectly to the centre shape of the flowers.

I’ve left the card blank, but there is room for a sentiment/greeting to be added once I decide what I am going to use it for.

Until next time, Happy Stampin’

Technique Class…

I’ve suddenly realised I haven’t been posting our cards we have been creating in the Technique Class which is held every second Sunday at the Caloundra Community Centre.  In this class we created 2 cards using the technique, although they may be slightly variations from card to card.

Today’s card was held a couple of weeks ago now, but still think it a beautiful card.  The inspiration for the card came from our current catalogue.  The Technique we used was Black Magic….. 

I know what you are syaing “Why would I do green flowers?”  Yep, I thought the same.  I used a yellow on the flowers, but because of dark Cardstock & the Old Olive Cardstock used for the Base Card, over about an hour or so, the colour slowly turned to green.

I know, going mad, you say.  Well I had convinced myself that I used a green pencil to colour, but much to my relief the same thing happened to the ladies in the class…..

Don’t forget to pop back in a couple of days & I will show you the 2nd card we created using the same fun technique.

Until next time, Happy Stampin’