Gift Bags

As part of my Catalogue Launch I created a couple of Gift Bags using now retired DSP & the new Triple Banner Punch.

I grabbed a couple of pieces of DSP from each Pack – Neutrals, Subtles, Brights & Regals.  This way, I thought I would let my guests choose which one suited them.  Each bag was filled with Chocolates & retired Product – Ribbons, Brads, etc.

To create my Banners, I teamed them up with colours that I took from the DSPColour Coach.  I also used the “Work of ArtStamp Set to take away the blank look of the Whisper White Banner.  To close my Bags, I used the little Clothespins which I covered with matching DSP of each bag but using the opposite side.

I was really happy with theses bags & the ladies loved them.  Mind you, using the new Gift Bag Punch Board makes life so much easier.

Until next time, Happy Stampin’

Vicky

004wmee-blog

Products used –

Post It Notes

I created Post-It Notes for my last Christmas Market, which surprised me as they proved to be popular.  You can never tell month to month, so I only do a few to showcase & then take orders.

I wanted to try & create them like a card instead of just using DSP for the backgrounds.

I don’t have photos of all the ones I created but did take a photo of a couple.  Along with the photo of each one, I’ve listed what I used – that I can remember!

Post-It Notes #1014bb-blog

I stamped the “Swallowtail” image onto Whisper White CS with Chocolate Chip Ink.  The image was stamped so that once the Post-It Notes were adhered to the Frame, it would not be covered up.  I then randomly coloured the image with a Blender Pen, Pink Pirouette, Pear Pizzazz & Calypso Coral Markers.

A piece of Crochet Trim (Retired) was adhered to the top part of the card, ends tucked under.  I didn’t adhere the Trim across the Card as I wanted the trim to be tied on the top of the Frame.

The whole piece was then adhered to a piece of Pink Pirouette CS prior to sliding inside the Frame.  The Post-It Notes were adhered to the top, a knot tied at the top with the Crochet Trim & a small Biro attached to the top of the Notes.

Post-It Notes #2015bb-blog

I randomly tamped a piece of Very Vanilla CS in Crumb Cake Ink using the large Rose from the “Stippled Blossom” Stamp Set.  I again stamped 2 images onto scrap Whisper White CS in Crumb Cake & Early Espresso Inks prior to cutting out the images & adhering to the stamped Very Vanilla CS.  Leaves were punched from Early Espresso CS with the Bird Builder Punch prior to adhering to the card.

The piece was then layered onto Early Espresso CS.

A piece of retired Early Espresso Ribbon was adhered across the frame & a bow tied to the side.  The Post-It Notes were adhered to the frame front along with a matching Biro – not seen in photo.
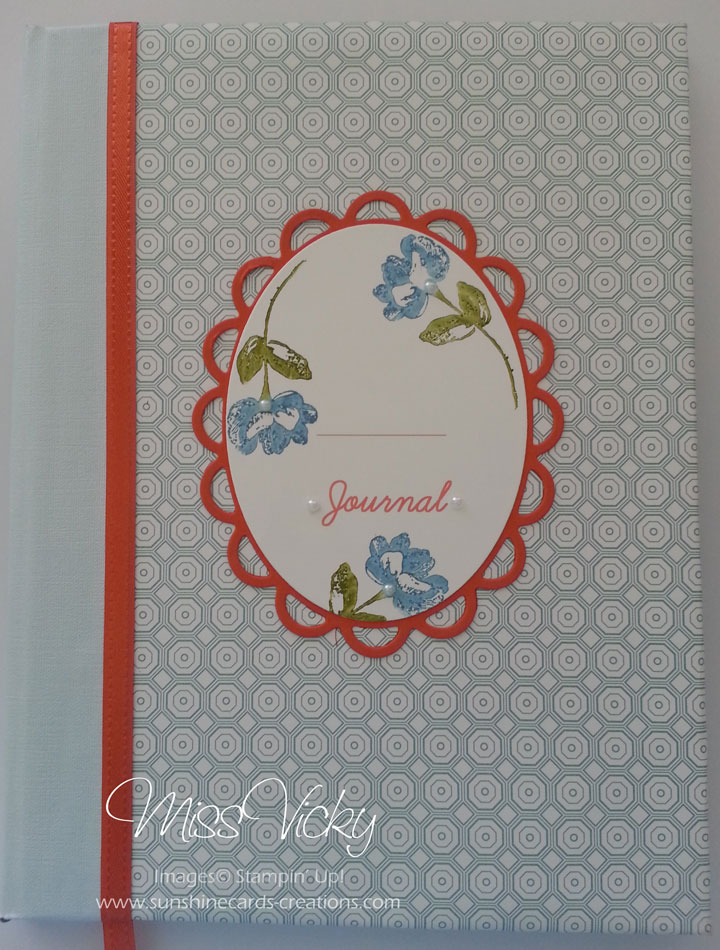
Post-It Notes #3

Leaves from “Kinda Eclectic” Stamp Set were randomly stamped onto a piece of Very Vanilla CS with Pear Pizzazz Ink and the splash image from the “Gorgeous Grunge” Stamp Set in Calypso Coral Ink.  This piece was layered onto a piece of Calypso Coral CS.

013bb-blogThe flower image from the “Blended Bloom” Stamp Set direct onto a scrap piece of Very Vanilla CS prior to colouring with Calypso Coral Blendabilities & cutting around images.

A small butterfly from the same set was stamped in Calypso Coral & punched with the corresponding “Bitty Punch” prior to adhering to the card, Pearls adhered to the centre prior to inserting into the Frame.

Post-It Notes were adhered to the front of Frame along with a small Biro.

Until next time, Happy Stampin’

Vicky

Box of Cards…

I’ve started creating Boxes of Cards for all Occasions.  These make great gifts & you just never know when they may come in handy.

Today’s box is one I create for a small Christmas Present for a friend.  In fact, I liked it so much, I created 2 sets.  I’m not sure011bb-blog if I have cased this from someone as it was a little while ago, so if you recognise it, please let me know so that I can give you the credit.

To be honest it did start out as Christmas cards but quickly turned into a set of Birthday Cards.  There are 4 cards in the box & they are a C6 (Australian) size ie 5 1/2″ x 3 1/2″.  I create a lot of cards this size as I think they are little more special than the normal standard size.

I embossed a piece of Very Vanilla CS with the Arrows EF before adhering a small narrow piece of Cherry Cobbler CS about 3/4″ from the top.

One large flower & 2 x small flowers were stamped onto scraps of Very Vanilla CS in Cherry Cobbler Ink before punching with the corresponding Pansy & Petite Petals Punches.  These were adhered to the card with Stampin’ Diimensionals.

Two leaves were in Garden Green CS were punched with the Bird Builder Punch prior to adhering to card.

The “Happy Birthday” is from the Hostess Set – “Express Yourself” – Retired, which was stamped onto a scrap piece of Very Vanilla CS, punched with the Modern Label Punch & adhered to a piece of Cherry Cobbler CS which just the ends punched with the same punch.

This whole piece was then adhered to the Base Card – Cherry Cobbler.  The greeting was then adhered to the card with Stampin’ Dimensionals.  To finish the card, I applied Pearls to the centre of the flowers & also to each end of the greeting.

I repeated this same step to create 3 more cards.  The top of the box was created the same way except I had the base as Very Vanilla & the bottom of the box in Cherry Cobbler.

Until next time, Happy Stampin’

Vicky

015bb-blog

Xmas Decoration…

G’day Stampers,

Today’s share is one we did in my volunteer class this afternoon.  In fact it was our last class for the year, so we had a bit of a little break up while creating something for our tree.

I’ve used all retired products for the project, which is a great way to use up all the lovely stuff that is still sitting on my shelves & can’t bear to part with as yet.  Anyhow, this is always the perfect time to use some of the retired products.

I created a Rosette from Whisper White CS & adhered strips of Crumb Cake & Cherry Cobbler Scalloped Tulle Ribbon to the centre.

I punched a large scallop circle in Whisper White CS with the 2 3/8″ Scallop Circle Punch, 1 circle in Crumb Cake CS with the 2″ Circle Punch & 1 scallop circle in Whisper White CS with the 1 3/4″ Scallop Circle Punch.  These were all layered together 001nb-blogwith the small scallop circle popped up with Stampin’ Dimensionals. I then created a doily from the Paper Doily Sizzlits (Retired) in Crumb Cake CS & adhered this to the top of the Ribbon Tulle.  The layered circles were adhered to the top of the doily.

I stamped 2 stars from the “Simply Stars” stamp set (Retired) direct onto Whisper White CS in Cherry Cobbler Ink. I cut around both stars creating a smaller star & adhering to the centre of the large star.  This was popped onto the Whisper White Scallop Circle with a Dimensional.

I printed “Merry Christmas” via MDS, cut it into the shape of a banner & adhered to the decoration.   A hole was punched in the top of the Rosette with the 1/8″ Handheld Punch & a piece of Cherry Cobbler Tulle thread through so that it could be hung from the Xmas Tree.

What decoration is complete without a little bit of bling?  I added a Basic Rhinestone Jewel to the centre of the star & randomly scattered them around the tulle.

Then for my Rosette, I repeated all the above to create the back.

Until next time, Happy Stampin’

Vicky

002nb-blog

Journal, Diary or …

… just a Notebook!006aablog

Today’s post is one I created last month for a local market I attend each month.  It was of the first items I sold.  I am even thinking of redoing it for myself!

I love the colours of the book.  I’ve used a lot of retired stuff – DSP, Ribbon & Stamp Set, but I was happy with the final result.

The word “Journal” was created using MDS along with the blue line.  the flowers are from the lovely retired Stamp Set – Oh, Hello which I have coloured with Marina Mist & Wild Wasabi Markers prior to stamping around the Oval, Ribbon from 2013 SAB & the DSP is the Gorgeous “Walk in the Park“.  I did say that I have a lot of retired DSP!  The Cardstock down the spine is Soft Sky.

Until next time, Happy Stampin!

Vicky