My Journal

This is another book I covered a couple of weeks ago.  They are great for your notes, etc.  I am always asked “where did I buy my book?”

Again, as with my last notebook, I have used retired DSP.  Yep, you have probably gathered – I have lots of the stuff left, but it is all good as I use it for the markets, my volunteer card class & also for family.  Great way to use it all up!

The colours for the journal were taken from the Ribbon, which was hanging in my stash from years ago & sort of just jumped out & into my hands!003blog

After covering the book with retired “Urban Garden” DSP, I added a bit of Night of Navy CS down the spine.  I thought the colours would pick up the blue in the DSP.  I then added the Ribbon down the front so that it worked as a Bookmark too.

I stamped the image shape from “Everything Eleanor” Stamp Set direct onto Whisper White CS in Chocolate Chip Ink.  The flowers from Petite Petals were stamped in Chocolate Chip & Marina Mist Inks, punched with the corresponding Petite Petals Punch & adhered to the top of the stamped shape with Stampin’ Dimensionals.

I rounded the bottom left corner of the Whisper White & the Chocolate Chip Layer with the Project Life Corner Punch prior to adhering Ribbon across the bottom part of the stamped Whisper White.  The Chocolate Chip Matt was adhered to the Whisper White & finally to the notebook front cover.

My Journal” was created using MDS, printed onto a scrap piece of Whisper White CS, adhered to a mat of Chocolate Chip CS prior to being adhered to the front with Stampin’ Dimensionals.

To complete the front, I added small Pearls to the centre of the flowers & one either side of “My Journal“.

Blues & Browns are some of my favourite colour combinations & I don’t think you can ever get bored with them.

Until next time, Happy Stampin!

Vicky

004blog

Work of Art

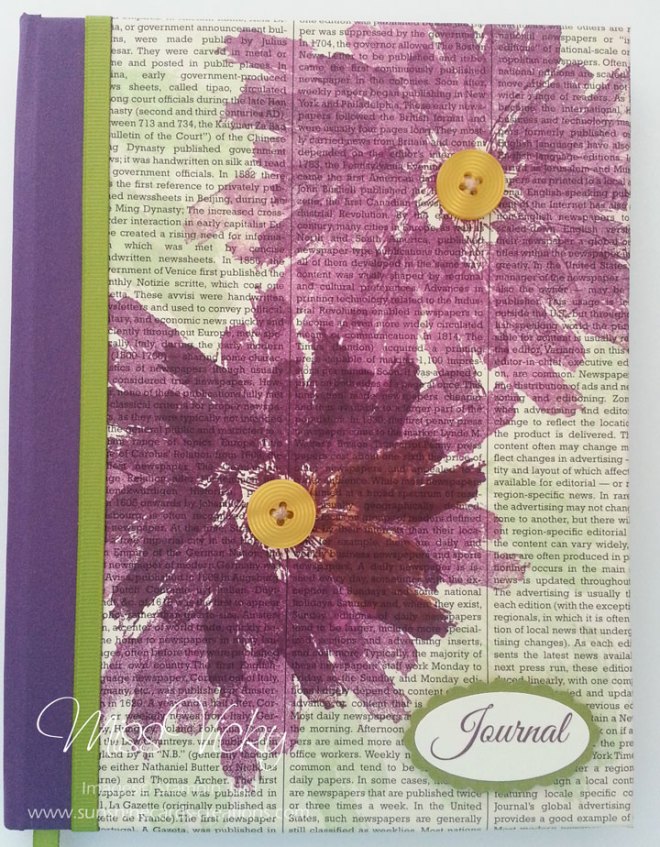
I found this great card on Pinterest sometime ago & it stuck in my head.  I loved the way the person had used the stamp to create her look.  Reminded me a bit of abstract art!

So many looks are able to be created using the fabulous “Work of Art” Stamp Set – gotta love it when you can achieve heaps with 1 set!

While using the same colours (I think), I’ve changed mine a little by using Buttons & Twine for the centre of the flowers.

So that I could stamp directly onto the now retired “First Edition Speciality” DSP, I temporary marked the front of my notebook prior to stamping.  I wasn’t too worried if the stamping would not all fit on the front, as it gives it a bit of a different look.

For the bottom flower, I stamped directly onto the DSP with Blackberry Bliss Ink, stamping in a circle.  I again repeated the same step, but this time stamping off prior to stamping direct onto the DSP.

For the top flower I stamped off once prior to stamping direct onto the DSP, again in a circle.  I repeated the same step, but this time stamping off twice prior to stamping direct onto the DSP.001-close-up-blog

With the little bits of green around the front, I used Old Olive Ink to match the Ribbon.

I then proceeded to cover my book with the DSP.  I covered the Spine with a piece of BlackBerry Bliss CS & adhered a piece of retired Old Olive Grosgrain Ribbon for the Bookmark, ensuring it was long enough once the book was open.

For the centres, I threaded a piece of Natural Linen Thread through 2 x Crushed Curry Buttons, tied at back & adhered with Glue Dots.  The same stamp as the flowers were used.

I printed the word “Journal” with MDS, punched with Oval Punch & adhered to a piece of Old Olive CS which had been punched with the Scallop Oval Punch.  This was then adhered to the book with Stampin’ Dimensionals.

To finish the cover, I lightly sprayed with Vanilla Shimmer Smooch Spritz.

I love the colours of Blackberry Bliss, Old Olive & a splash of Crushed Curry – they seem so very vibrant!

Until next time, Happy Stampin!

Vicky

001blog

2015 Calendar

Today’s share is my first calendar for 2015.  It is getting to that time of the year & with a market coming up this Sunday, thought it would be great 006-blogto make a start on my calendars for next year.  I enjoy creating them & find them to be very popular.

To download a free copy of the A5 Landscape 2015 Calendar, please click on the link at the bottom of this post.

To create my calendar, I printed out the year onto A5 photo copy paper, trimmed back a little from both sides, as I like a little of the coloured Card to be showing all around the edge.  I punched 2 holes with the Handheld 1/16″ Circle Punch at the top of the calendar & inserted a Mini Brad into each hole.

For the top of the calendar, I stamped 3 flowers from the Flower Shop Stamp Set, coloured with Coastal Cabana & Rich Razzleberry Blendabilities, added small dots with the White Stampin’ Chalk Marker before punching out with the Pansy Punch.

I adhered small strips of Coastal Cabana Card to a piece of Rich Razzleberry DSP prior to adhering to a piece of Whisper White Card & finally to a piece of Rich Razzleberry Card which I had cut back to 8 1/4″ x 9″.

The “2015” was printed onto a scrap of Whisper White Card, punched with the Large Oval Punch & adhered to a piece of Coastal CabanaCard which has been punched with the Scallop Oval Punch prior to adhering to top of calendar.

The flowers were adhered to the calendar top – centre one with a Stampin’ Dimensional & the other 2 with Multipurpose Glue.

To complete the calendar, the months were adhered to the bottom of the Rich Razzleberry Card leaving a small edge around all 4 sides.  Pearls were adhered to the centre of each flower as well as randomly scattering around the top of the calendar.

Be sure to check back over the next couple of weeks, as more will be added, including different calendar sizes.

Until next time, Happy Stampin’

Vicky

005-blog

PDF 2015 Landscape Calendar

Products used to create Calendar –

Stippled Blossoms

G’day Stampers,

Today’s post is yet another “Bag of Cards” for our C5 cards (Australian size). The bag could easily be adjust to fit US cards too.003

The Gorgeous “Afternoon Picnic” DSP is one I had a lot of trouble using. I decided that it was going to be the main focus for my “April Kit of the Month“.  Imagine my surprise when the cards all come together so quickly.  I couldn’t believe that the paper had just sat on the shelf for nearly 12 months & I had not cut into it.

Once I had created the cards, I then decided that it would be nice to have something to put them into.  So I set about creating yet another Bag for my cards.  The 1st Bag may be seen by scrolling down to the post below.

Of course, there is not that much of the DSP left now even though I had purchased more for the kits.

I will be posting the Tutorial on my Tutorial Page in the next day, so be sure to pop back to check it out!

Afternoon Picnic Bag

004-(2)

Until next time, Happy Stampin’

Products used for Bag only –

To place an order for any of the product used, simply click onto the photo where it will take you direct to my store.

Bag of Cards

I created this bag some time ago for a set of cards. It will fit 4 standard size Australian size cards. I did see something familiar on Pinterest or via Google I am not too sure now. Of course, when I went looking for it to give credit, I am unable to find it as I didn’t save it either. I do know that when I saw the photo I had to have a go at recreating it to suit our size cards.

Today’s Bag & cards use my favourite DSP – Polka Dot Parade which I am really going to miss.  The set of cards was actually one of my August Monthly Kits using the lovely little, but oh so versatile Stamp Set – Summer Silhouettes.

I do have instructions for the bag, but first I have to find them & will post in a couple of days along with another sample.

Bag of Cards

012a

Bag

015a

Until next time, Happy Stampin’

Products used for Bag only –

To place an order for any of the product used, simply click onto the photo where it will take you direct to my store.