Old Friend…

I’ve dug out another old stamp set – Great Friend for today’s card.  This woud have to be one of my all time favourites & ask myself “why don’t I use it more?”  Good question, so fingers crossed you will see more of it this year!
The sketch is from Utah Divas International
Cut base card in Pear Pizzazz – score & fold in half
Cut Early Expresso – 5 5/8″ x 3 7/8″
Adhere to base card
Cut 4 pieces of DSP Patterns – Blushing Bride – 2 1/2″ x 1 7/8″
Adhere to Early Expresso Cardstock
Using Circle # 2 Bigshot Die & Early Expresso Cardstock, cut out circle
Using Circle # 2 Bigshot Die & Whisper White Cardstock, cut next size down for top circle
Stamp leaf image randomly over Whisper White using Pear Pizzazz Ink
Adhere to Early Expresso circle
Apply Stampin’ Dimensionals to back of Early Expresso, adhere to centre of card base
Stamp 2 butterfly images onto scrap of Whisper White Cardstock using Blushing Bride Ink & cut around images
Adhere to top of circle
Apply Jewels to the centre of butterflies
Stamp sentiment directly onto DSP – if desired
Again, I have left my sentiment off until such time as I go to use it & then I will stamp my sentiment directly onto my card
Supplies –
Stamp Set – Great Friend
Ink – Blushing Bride, Pear Pizzazz
Cardstock – Pear Pizzazz, Early Expresso, Whisper White
DSP – Blushing Bride
Bigshot Dies – Circle # 2
Accessories – Snail Glue, Stampin’ Dimensionals, Jewels
Until next time, enjoy!

Bugs, Bugs & Bugs…

As one of my aims this year is to use more of my old stamp sets, I thought this sketch would be a great way to start.  It is one of my favourites for a kids card.  With a lot of birthdays coming up in the next month, this card will come in handy.

The sketch is from Stamping 411  It also includes all the measurements you require to make the card.  How much easier can it get?  All the hard work is done for you

Layer 1  –  Cardbase cut 8.5 x 5.5, scored & folded in the middle to form card
Layer 2  –  4″ x 5.25″
Layer 3  –  4 x 1.75″ – punch edge with Border Punch
Layer 4  –  4 x 1 3/8″
Layer 5  –  2.25 x 3.25″
Layer 6  –  2 x 3″ – add tags, tabs & embellishments as desired

Supplies –
Stamp Set – Bugs & Kisses, Teeny Tiny Sentiments
Ink – Baja Breeze, Pumpkin Pie, Pear Pizzazz
Cardstock – Whisper White, Pear Pizzazz, Daffodil Delight
DSP – Greenhouse Gala
Punches – Jewelry Tag medium, Word Window Large, Eyelet Border
Accessories – Snail Adhesive, Stampin’ Dimensionals, Brads – Pumpkin Pie,
Linen Thread, Stampin’ Write Journaler – Basic Black
Until next time, Enjoy!

Inspired…

This card is for the challenge over at JUGS  I wasn’t too sure of the stamp set I wanted to use, but knew I wanted to used the DSP – Lap of Luxury.  I have ony cut into this paper & it is just stunning!

For my card –
Cut base card using Concord Crush Cardstock, score in half
Cut smaller piece of Basic Gray Cardstock & adhere to base card
Cut smaller piece of DSP – Lap of Luxury & adhere to Basic Gray Cardstock
Cut piece of Cardstock in Concord Crush – 2.5″ x 4″
Cut piece of DSP – Lap of Luxury – 2 3/8″ x 3 7/8″
Adhere DSP to top of Concord Crush
Cut piece of Basic Gray Cardstock – 4″ x .75″ & adhere to top of DSP
Adhere Concord Crush Ribbon to top of Basic Gray & tuck ends of ribbon under

Tie Ribbon LHS
Adhere entire piece over top of DSP which is your card
Cut piece of Concord Crush Cardstock – 4 5/8″ x 2 1/8″
Cut piece of DSP – 4 1/2″ x 2″
Using Shimmer Paint – Frost White, randomly spread over DSP & let dry

Ink image with Versamark & then with Concord Crush ink, stamp image directly over top of DSP
Apply Clear Embossing Powder & using Heat Tool, heat stamped image

TIP – This will not give you a raised image, but will allow parts of the Shimmer Paint to come through onto your image

Adhere DSP to top of Concord Crush Cardstock & apply to card

TIP – I sometimes leave the sentiment until such time as I am looking for a particular card, then I will include a sentiment.  It allows you to be more flexible with your cards, while at the same time not having to make another card

Supplies –
Stamp Set – Inspired by Nature
Ink – Concord Crush, Versamark
Cardstock – Basic Gray, Concord Crush
DSP– Lap of Luxury
Ribbon – 1/2″ Stitched- Poly – Concord Crush
Accessories – Snail Glue, Stampin’ Dimensionals, Shimmer Paint – Frost White,
Heat Tool, Embossing Powder – Clear
Until next time, Enjoy!

Mojo Monday on a Saturday…

Happy New Year!

I completed this card a couple of days ago & realised that I had not posted it, so here goes.

The card is for a challenge over at Mojo Monday –  I elected to go with the Square one.

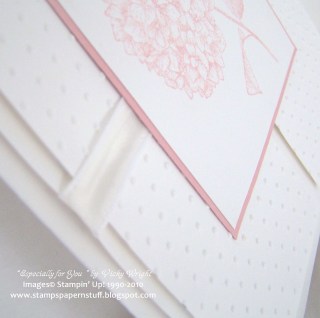
For my card I used the Level 1 Hostess Set – Because I Care

Cut Whisper White Cardstock & score to form a square fold
Cut smaller piece of Whisper White Cardstock
Cut 4 x squares in Whisper White & run through your Bigshot using the Perfect Polka Dots Embossing Folder
Using Stampin’ Dimensionals, adhere these 4 pieces to the smaller piece of Whisper White
Adhere Taffeta Ribbon – Whisper White across the centre of 4 squares & tuck ends under
Adhere to base card
Cut square piece of Cardstock using Blusing Bride
Cut smaller piece of Cardstock in Whisper White
Using Blushing Bride ink, stamp image onto Whisper White
Adhere to Blushing Bride
Adhere to base card
Cut butterflies using your Embosslits Die – Beautiful Wings
Attach smaller butterfly to larger butterfly
Adhere to card
Attach Jewels – Basic Pearls

Tip – When layering same colour on same colour, use Stampin’ Dimensionals.  This will highlight your card!
Supplies –
Stamp Set – Because I Care
Inks – Blushing Bride
Cardstock – Whisper White, Blushing Bride
Embosslit Dies – Beautiful Wings
Embossing Folders – Perfect Polka Dots
Ribbon – Taffeta – Whisper white
Accessories – Snail Adhersive, Multipurpose Liquid Glue,
Stampin’ Dimensionals, Jewels – Basic Pearls
Until next time, Enjoy!

Birthday…

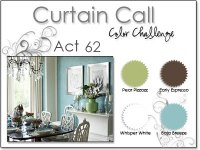
I’ve created today’s card using the Colour Challege over at stampinwithstacey Love these colours together – very clean & fresh. 

I have also combined my colours with Mary Jo’s sketch challenge.
For my card –
Cut your basic card using Early Expresso Cardstock – Square
Layer a piece of DSP Patterns – Pear Pizzazz over Early Expresso
Cut long piece of Early Expresso and adhere a piece of DSP – Pear Pizzazz on top of this.  I choose to have the opposite side to the base card
Adhere to base card
Cut anoher piece of Early Expresso Cardstock and a smaller piece of Whisper White Cardstock
Stamp image onto Whisper White, using Baja Breeze ink
Adhere Whisper White to Early Expresso
Using Baja Breeze Ink, stamp sentiment onto Whisper White & punch using Extra-Large Oval Punch
Adhere to Card using Stampin’ Dimensionals
This makes for a great male card.
Supplies –
Stamp Set – Mediallion, Well Scripted
Ink – Baja Breeze
Cardstock – Early Expresso, Whisper White
DSP – Pear Pizzazz
Punches – Extra-Large Oval
Accessories – Snail Adhesive, Stampin’ Dimensionals
Until next time, Enjoy!