August Stamp & Card Club

G’Day Friends,

I’m happy to say that our August stamp & Card Club is now open for subscription.

if you have ever wanted to create your own cards, then this club is for you!  Each month you will receive kits to create 6 cards – 2 of 3 designs.  Oh did I mention, you will receive a PDF Tutorial for 6 projects including a Fun Fold & a 3D Project!

Wanna see a sneak peek of one of the projects?

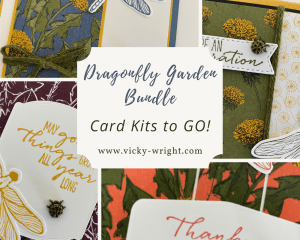
August is all about the lovely Celebrate Sunflowers Stamp Set from the Annual Catalogue & oe set that I love.  It’s been teamed up with the Design a Daydream Designer Series Paper also from the Annual Catalogue.  I think these projects match perfectly with each other!

This club runs on a monthly subscription, posted right to your door where you are able to stamp at home & in your own time.

You are able to cancel your subscription at any time, but if you subscribe for 6 months, you will receive a surprise in the post!

***   JOIN ANYTIME!   ***   CANCEL ANYTIME!   ***

For more information & to subscribe today, click HERE

Thank you for visiting my blog today.

Please feel free to contact me if you have any questions.

Happy Stamping!

August Events & Specials – Click on the links to Register
123 Stamp FREE Online Class

August PDF Tutorial Bundle

Spend over $50 in my Online Shop to receive it for free
Subscribe to The Craft Room

Celebrate Sunflowers

G’Day Friends,

I know what you are thinking?  Why am I posting on a Sunday?  Well, I did a FB Live in my group on Thursday & I thought I would share it with you, even though it is a simple & easy one but hey, who can go past Sunflowers or in the case of the 2nd card – Daisies or Gerberas?

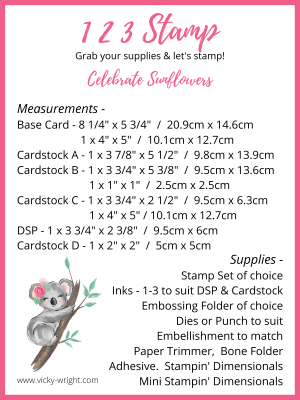
These are the measurements I gave the group so that they could stamp along with me.

This is my first card I created used Daffodil Delight, Basic White, Smokey Slate & Shaded Spruce.  For those that know me, it isn’t very often I create 2 of the same card.

I then decided to switch it around a little by changing out the colours to Fresh Freesia, Basic White, Soft Sea Foam & Grey Granite.  I also decided to go with the original sketch layout – see above.  This way I get 2 different cards but using the same layout & supplies!

Why not give the sketch layout a go.  It is one that you can use over & over again & not think it the same layout.

Click the photo below to watch the Live.

  • Place an order before Monday, 21 February, 5pm using the Host Code – Y7CPFNKQ.
  • Place a $50 order & receive the Card Kit & PDF Tutorial
  • Place a $90 order & receive the Card Kit, PDF Tutorial & earn a FREE Sale-a-Bration Item
  • Place a $180 order & receive the Card Kits, PDF Tutorial, Pack of 2021-2023 In Colour Jewels & Earn 1 x Level 2 or 2 x Level 1 Sale-a-Bration items

Need supplies to create today’s project at home?  Don’t forget to use February’s Host Code – Y7CPFNKQ –  if your order is under $250.   All orders receive a Handmae Thank You Card.  You will also receive a PDF Tutorial, the February DSP Card Kit  when spending over $50 PLUS & a small gift when spending over $80.  Please note that there is only one small PDF Tutorial, Gift & Kit per customer per month.

Please feel free to contact me if you have any questions.

Happy Stamping!


Beautifully Penned DSP #3

G’Day Stampers,

Today is Day 3 of showcasing the  lovely  Beautifully Penned DSP today from Sale-A-Bration.

This lovely paper can be yours for FREE when spending $90 or more.  Check it out here.

This DSP is so versatile as it can be used for all occasions including Female & Male.  I’ve shared a male card, a Christmas card & now today it is all about the females.

Keeping with the back & white theme, I’ve added a little bit of Polished Pink in the flower along with Evening Evergreen Ink for the leaves.  I’m loving these colours together, are you?

Please feel free to contact me if you have any questions.

Happy Stamping!

~~~~~~

PDF Tutorials for Sale have been updated

Check them out by clicking on the photo below

~~~~~~

Register TODAY!

~~~~~~

~~~~~~

~~~~~~

~~~~~~

~~~~~~

~~~~~~

August Specials –

  • A special Handmade Card created just for you each month when shopping through me!
  • Please use August’s Host Code T7XFDDSX in your Shopping cart when shopping online
  • If you would like a copy of either the 2021-2022 Annual Catalogue, July – December Mini or the Sale-a-Bration Catalogues, please let me know
  • Subscribe to my Newsletter 

Celebrate Sunflowers #3

G’Day Friends,

I do hope you all had a lovely weekend.

I am a little late in sharing my 3rd project with you featuring the Celebrate Sunflowers Bundle.

I am not normally a green person but I am loving the colour combination with this one.  I’m not sure if it is the touch of Pumpkin Pie in the sunflower or what it may be.

I’ve teamed Mint Macaron, Old Olive with touches of Pumpkin Pie & Soft Suede to create this one.

Sometimes we don’t know where our creations are heading but we keep pushing on with them so that the end result is as much a surprise to us as it is to you.

I’ve completed the card with a couple of Holiday Rhinestones.

~~~~~~

~~~~~~

~~~~~~

~~~~~~

~~~~~~

~~~~~~

April Specials –

Please feel free to contact me if you have any questions.

Happy Stamping!

This image has an empty alt attribute; its file name is sigature-011020-1.png

Celebrate Sunflowers

G’Day Friends,

Thanks so much for popping in today!  It is always very much appreciated.

Today I thought I would do something a little different & share with you a project with one of the Bundles I love – Celebrate Sunflowers!

In fact, you will be happy to know that I will be sharing projects I’ve created with this Bundle all week just for you.

I was playing around with my Blending Brushes the other day & had a spare piece of Cardstock left over.  So as not to waste it, I thought it perfect to create a simple card to share with you today.

A piece of Basic White Cardstock has been blended with Bumblebee Ink & a Blending Brush.

I temp adhered this piece to a piece of Basic White Card prior to stamping the large sunflower direct onto the blended area plus ensuring that part of the image stamped over onto the Basic White Cardstock too.

To create a mask, I stamped the same image onto scrap paper prior to fussy cutting along the stamped lines.

This mask was temp adhered to the stamped image prior to stamping the single leaf image around the sunflower in Early Espresso Ink.

I carefully removed the mask & the sponged Cardstock before adhering the panel to a piece of Early Espresso Cardstock.

I adhered this piece to the partially stamped Basic White ensuring that all images are matched in perfectly or as close as can be.

The sentiment is from the Peaceful Moments Stamp Set & was stamped straight onto the Basic White layer in Early Espresso prior to adhering to a Bumblebee Base Card.

The card was completed by adhering 5 x Bumblebee Enamel Dots to the Card Front.

Tip – You could always die cut a piece of Early Espresso Cardstock with the Sunflowers Dies & add to the top of the stamped sunflower.

If you have enjoyed my card today, be sure to pop back in a couple of days when I will be sharing my 2nd project with you.

~~~~~~

~~~~~~

~~~~~~

~~~~~~

~~~~~~

Clearance Rack & it’s been Updated

~~~~~~

April Specials –

Please feel free to contact me if you have any questions.

Happy Stamping!

This image has an empty alt attribute; its file name is sigature-011020-1.png