Have you taken advantage of the Last Chance Products Sale? At least 50% off on some of the Annual Catalogue items.
To place your online order or to check out the products – click HERE or on the photo. You can also contact me & I will place your order for you.
My Feature of the Week are the 2020-2022 In Colours. I must admit I wil miss most of these colours except for Cinnamon Cider! Not a fan, although in saying that when I do create with it I am happy with the combination & end result.
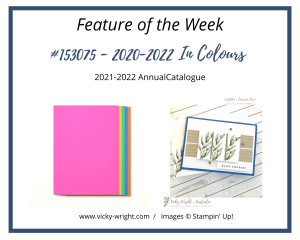
A piece of Basic White Cardstock was embossed with the Tasteful Textile 3D Embossing Folder before being adhering to a Magenta Madness Base Card.
The Crumb Cake DSP is from the Neutrals 6 x 6 Pack of Designer Series Paper. Great way of using scraps of DSP.
Supplies –
Stamp Set – Forever Fern, Waves of Inspiration
Inks – Mossy Meadow, Misty Moonlight
Cardstock – Basic White, Misty Moonlight
DSP – Neutrals 6 x 6
Embossing Folder – Tasteful Textile 3D
Embellishments – Brushed Metallic Dots
Dies – Stitched Rectangles
Need supplies to create today’s project at home? Click on this link to shop in my Online Store. Don’t forget to use April Host Code – P96SJBGR – if your order is under $250. All orders receive a Handmae Thank You Card. You will also receive a PDF Tutorial, the April DSP Card Kit when spending over $50 PLUS & a small gift when spending over $90. Please note that there is only one small PDF Tutorial, Gift & Kit per customer per month.
Please feel free to contact me if you have any questions.
Happy Stamping!
April Events & Specials – Click on the links to Register
I know what you are thinking? Why am I posting on a Sunday? Well, I did a FB Live in my group on Thursday & I thought I would share it with you, even though it is a simple & easy one but hey, who can go past Sunflowers or in the case of the 2nd card – Daisies or Gerberas?
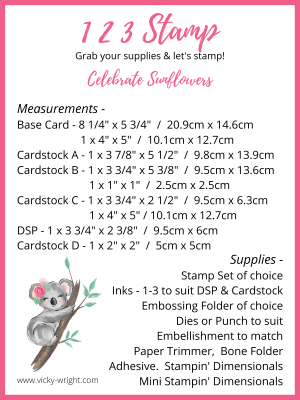
These are the measurements I gave the group so that they could stamp along with me.
This is my first card I created used Daffodil Delight, Basic White, Smokey Slate & Shaded Spruce. For those that know me, it isn’t very often I create 2 of the same card.
I then decided to switch it around a little by changing out the colours to Fresh Freesia, Basic White, Soft Sea Foam & Grey Granite. I also decided to go with the original sketch layout – see above. This way I get 2 different cards but using the same layout & supplies!
Why not give the sketch layout a go. It is one that you can use over & over again & not think it the same layout.
Click the photo below to watch the Live.
Place an order before Monday, 21 February, 5pm using the Host Code – Y7CPFNKQ.
Place a $50 order & receive the Card Kit & PDF Tutorial
Place a $90 order & receive the Card Kit, PDF Tutorial & earn a FREE Sale-a-Bration Item
Place a $180 order & receive the Card Kits, PDF Tutorial, Pack of 2021-2023 In Colour Jewels & Earn 1 x Level 2 or 2 x Level 1 Sale-a-Bration items
Need supplies to create today’s project at home? Don’t forget to use February’s Host Code – Y7CPFNKQ – if your order is under $250. All orders receive a Handmae Thank You Card. You will also receive a PDF Tutorial, the February DSP Card Kit when spending over $50 PLUS & a small gift when spending over $80. Please note that there is only one small PDF Tutorial, Gift & Kit per customer per month.
Please feel free to contact me if you have any questions.
Happy Stamping!
February & March Events & Specials – Click on the links to Register
Thank you so much for stopping by today. It is always very much appreciated.
It’s Monday & that means its Manly Monday! This time round I decided to recreate a card that popped up in my Pinterest Feed. It is one that I created last year during Sale-a-Bration, so I thought why not try & re-create it & do it for the males.
You can see the original card HERE if you wish. There is also a PDF Tutorial that you are able to download.
I just changed out the colours to Merry Merlot, Night of Navy, Smokey Slate & Basic White.
The sentiment is from the Happiest of Birthdays Stamp Set while the images are from the Tasteful Touches Stamp Set.
Looks totally different, don’t you think?
In fact I enjoyed creating this card again that I may do a few more this way so be on the lookout for more “throwbacks”.
Want to create my project at home? All the supplies are available in my Online Stampin’ Up! Store. Add all the items to your Shopping Cart by clicking on the photo below or just pick & chose what you would like to add to your Shopping Cart.
Please feel free to contact me if you have any questions.
We had a little much needed rain during the night & by all accounts it could be a wet week but I don’t mind as we need the rain deparately.
It’s Monday & that means Manly Monday. I have had an idea in my head for sometime but that went out the window when I saw this card on Pinterest. Mine is a little different but using still using the Tailored Tag Punch in the same way.
I opted to go for Very Vanilla, Soft Suede, Shaded Spruce & Crushed Curry. They DSP is from the Neutrals 6 x 6 Pack. The colours are way out of my comfort zone but perfect for the males.
The sentiment is from the Best Year Stamp Set. I must admit I seem to be using this set more & more all the time – perfect for all occasions!The shapes have been punched with the Tailored Tag Punch. A little different but I am loving the look of the layering.
To complete the card I tied a small double bow with Linen Thread & adhered it to the Very Vanilla shape with a Mini Glue Dot.
This card could also be used for any occasions including female. All you have to do is change out the colours & add Ribbon in lieu of the Linen Thread.
Want to create my project at home? All the supplies are available in my Online Stampin’ Up! Store. Add all the items to your Shopping Cart by clicking on the photo below or just pick & chose what you would like to add to your Shopping Cart.
Please feel free to contact me if you have any questions.
Today is Monday & that means it is Manly Monday where I share with you a project created especially for the males in our lives.
I’ve been wanting to use the Stitched Triangle Dies for some time now & always seemed to find an excuse until I saw this card on Pinterest. Thank you so much for your inspiration. It has now opened up so many ideas & possibilities.
I then decided to go with colours that were a little out of my comfort zone – So Saffron & Garden Green. Of course, I had to toss in Early Espresso along with Very Vanilla.
The DSP is the Packs of 6 x 6 – Subtles, Neutrals & Regals. Don’t you just love how well they go together?
The sentiment is from Biggest Wish Stamp Set, stamped onto Very Vanilla in So Saffron & Early Espresso Inks.
The shapes have been die cut with the Stitched So Sweetly Dies.
Please feel free to contact me if you have any questions.
At our Christmas Party last year, we got to talking about recipes & one of the ladies asked if it was possible if we could swap recipes at our Friday class…… I immediately said I didn’t have a problem with it & after some thinking & how to go about it, today starts a new class which will be held the last Friday of the month.
I am really excited about this venture, as I want to create pages that resemble cards, not the traditional recipe pages, while at the same time, still doing different techniques, layouts, etc. We will be completing 2 pages per month & maybe some months a couple of extra pages.
Now, this is a big step for me as I will be the first to acknowledge I HATE cooking!!!!! Yep, I cannot understand how people can be so passionate about it, but when you love it, you LOVE it!!!! I suppose they would say the same about my craft! To me cooking is just a means of surviving, but I love all those cooking shows & the kitchen shops….. I would be quiet happy to have a home with NO kitchen & if I have to cook, the Barbie would be enough for me, as I LOVE barbies…..
The layout for this page came from Peg sometime ago. I thought it clean & easy, perfect colours for our first card as well as a yummy Homemade Vegetable Soup……. Not the traditional winter colours, but bright & cherry!
Maybe, just maybe, I may be tempted to try some of the recipes….. Maybe????????
Measurements – Base – Basic Black – 8 1/4″ x 5 3/4″ or 21cm x 14.5cm Layer 1 – DSP – 8 1/4″ x 3 1/4″ or 14.5cm x 8cm Layer 2 – Lucky Limeade – 8 1/4″ x 1″ or 14.5cm x 2.5cm Layer 3 – Lucky Limeade – 5 3/4″ x 3″ or 14.5cm x 7.5cm Layer 4 – Whisper White – 5 5/8″ x 2 7/8″ or 14cm x 7cm Layer 5 – Lucky Limeade – 4″ x 3″ or 10cm x 7.5cm Layer 6 – Whisper White – 3 7/8″ x 2 7/8″ or 9.5cm x 7cm
1. Punch along one of the longer sides of the 1″ piece of Lucky Limeade using the Scallop Trim Border Punch 2. Adhere DSP to the top of the punched piece of Lucky Limeade & then to the Base Card – Basic Black 3. Adhere Ribbon along the bottom half, tuck ends under & tie a knot off to the right hand side 4. Randomly stamp images onto the piece of Whisper White – 5 3/4″ x 3″ – with Lucky Limeade & Basic Gray Inks. I stamped off once prior to stamping with the Basic Gray 5. Adhere to the matching piece of Lucky Limeade – 5 5/8″ x 2 7/8″ & then to the Base Card 6. Adhere your recipe card to the smaller piece of Lucky Limeade & then to the Base Card
Don’t forget to check back in a couple of days for the 2nd page we completed.
I love how easy this card come together. The technique is fantastic & very easy to complete. Makes for a great male card – we all have trouble with creating them sometimes.
This will be one of the cards we are going to create in our next technique class – details below – “Faux Wood“…..
I’ve used colours that are not normally used in the everyday wood you see around the place, as I wanted to try someting different & to see if I could create a completely different look. To lift the colours a little, I decided to add a little bit of Real Red. I’m glad I did, as it brough the whole card alive, including the background.
?I want the card to be for a male, but instead of for the traditional stamps, eg cars, trees, etc, I thought “why not a Rosette?” Who says these can’t be for the males? I’m really happy with the final result, but would love to hear what you think.
Venue Caloundra Community Centre 78 Buderim Street, Currimundi Cost $15.00 Time 1.00pm – 4.00pm BYO Tool Kit & Adhesives Date Sunday, 7 October
?
Close Up of Faux Wood & Rosette…
Don’t forget to check back in a couple of days time & I will show you the 2nd card we will be crating using the same technique.
Our challenge this week is to use Black & White only on our cards as well as going by the sketch. Usually I don’t have a problem with this sort of thing, but for the life of me, hard a hard time. Thanks Kris!
Measurements – Base Card – Basic Black – 8 1/4″ x 5 7/8″ or 21cm x 15cm – Scored in the middle & folded in half Layer 1 – Whisper White – 5 1/2″ x 3 3/4″ or 14cm x 9.5cm Layer 2 – Basic Black – 5 3/8″ x 2 1/4″ or 13.5cm x 5.5cm
My piece of Whisper White was run through the Big Shot using the Square Lattice Embossing Folder prior to adhering to the Base Card – Basic Black.
Prior to adhering the piece of Basic Black to the card, I applied the Faux Leather Technique to it, punched along one of the edges with the Scallop Trim Border Punch & adhered to the Card with Tombow Glue.
For my Rosette, I cut a 12″ strip of DSP at 1 1/4″ wide, scored with my Simply Scoring Tool, punched along one edge with the Scallop Trim Border Punch & put together with Sticky Strip prior to adhering to the Base Card.
I stamped my sentiment twice onto a scrap piece of Whisper White Cardstock, punched 1 with the Scallop Circle & the middle of the 2nd one with the 1″ Circle Punch. I adhered the smaller piece to the large piece with a Stampin’ Dimensional prior to adhering to the Rosette with Tombow Multi Purpose Glue.
A very easy & simple card but a couple of different techniques to complete my card.
??????????Our card last Friday at Crafty Creations was to do the Technique – Basic Masking. I choice to go with Chocolate Chip, Certainly Celery & Pink Pirouette– not colours I would normally put together, but I am really loving the final result. Mind you, when I started the card, I had no idea where I was going, only knowing that I wanted to use the stamps I had sitting on my desk.
????
Inside Card….
I am also finding myself going back to the softer colours which I think are sadly being neglected – by me anyhow! ? Measurements – Base Card – Chocolate Chip – 8 1/4″ x 5 7/8″ or 21cm x 15cm Layer 1 – Certainly Celery – 5 3/8″ x 3 5/8″ or 14cm x 9.5cm Layer 2 – DSP – 5 1/8″ x 3 3/8″ or 13cm x 8.5cm Layer 3 – Pink Pirouette – 3″ x 2″ or 8cm x 5cm Layer 4 – Certainly Celery – 3″ x 2 3/8″ or 7.5cm x 6cm Layer 5 – Whisper White – 2 7/8″ x 2 1/4″ or 7cm x 5.5cm
I adhered a piece of Ribbon across the middle of the DSP, tucked ends under, adhered to the piece of Certainly Celery & finally to the Base Card – Chocolate Chip, all with Snail Adhesive.
The piece of Pink Pirouette Cardstock was torn along the bottom, sponged across the tear & around the edges & adheredd over the top of the Ribbon using Snail Adhesive.
I stamped my flower image onto the piece of Whisper White Cardstock with Pink Pirouette Ink, stamped again onto a scrap piece of paper, cut it out & used this one piece for my Mask. While the stamp was inked in Pink Pirouette, I again stamped onto a scrap piece of Glossy Cardstock, cut out & set aside. This was by accident as I didn’t realise it was glossy until I was cutting it out, but decided to leave it the way it was.
I stamped the leaf images around the flower & created 2 Masks for the leaves.
After applying Dotto to the back of my Masks, I adhered them over the matching images prior to inking my background stamp in Chocolate Chip, stamping off twice & then stamping onto the piece of Whisper White Cardstock & over the masked images.
This piece was adhered to the piece of Certainly Celery & finally to the Base Card. I adhered the Glossy image to the top of the stamped image with Stampin’ Dimensionals, added some Dazzling Diamonds to the middle with my 2-Way Glue Pen & popped a Rhinestone in the middle.
I tied a bow with the Ribbon & adhered to the card with a Mini Glue Dot. The sentiment was stamped onto the bottom of the piece of Pink Pirouette in Chocolate Chip Ink.
The new weekly challenges begins today over at Sunny Challenges & Creations & it was my turn to create the challenge. This time round, along with the sketch, it is to use Ribbon on your layout. How easy can it get?
My card has been created for a friend of mine who is celebrating her birthday today. As she lives on acreage, I decided to go with colours that best represent the bush in Australia – Green, Gold & Brown. I’ve never used these colours together & really like the effect they have created.
On the spur of the moment, I decided to try & use a Stampin’ Up! Wheel somehow in the design.
Measurements – Base Card – Daffodil Delight – 8 1/4″ x 4 1/8″ or 21cm x 15cm – scored in the middle & folded in half Layer 1 – DSP – 5 1/2″ x 3 3/4″ or 14cm x 9.5cm Layer 2 – Old Olive – 4 1/2″ x 1 5/8″ or 11.5cm x 4cm Layer 3 – Whisper White – 4 3/8″ x 1 1/2″ or 11cm x 3.5cm Layer 4 – Old Olive – 3 1/8″ x 2″ or 8cm x 5cm Layer 5 – Whisper White – 3″ x 1 7/8″ or 7.5cm 4.5cm
Inking my Wheel, I ran it over the long piece of Whisper White Cardstock, ensuring that the image was up the correct way, which meant that I had to run the wheelacross the Card 3/4 times, ensuring coverage was all over.
Grabbing my Blender Pen & a Stampin’ Up! Marker – Daffodil Delight, I coloured the flower from the wheel. As I didn’t want this part of the card to be the main focal point, I left it as is. This piece was then adhered to the longer piece of Old Olive Cadstock with Snail Adhesive.
Inking up the stem image with SU! Marker – Old Olive, I stamped it direct to the smaller piece of Whisper White Cardstock, run it through the Bigshot using the Embossing Folder – Perfect Polka Dots, adhered it to the piece of Old Olive Cardstock using Snail Adhesive & finally to the piece of DSP ensuring I followed the sketch before adhering DSP with Multipurpose Glue.
I stamped 3 large flower images with Daffodil Delight onto Whisper White Cardstock & 3 using Soft Suede. These were cut out prior to attaching to the card with Snail Adhesive for the front flower & Stampin’ Up! Dimensionals for the back 2 flowers. All 3 smaller flower images were adhered to the middle of the larger flowers with Snail Adhesive.
I run a piece of Satin Ribbon across the bottom part of the DSP, tucked ends under, tied a knot & adhered the whole lot to the Base Card – Daffodil Delight with Snail Adhesive.
The sentiment was stamped onto a scrap piece of Whisper White Cardstock in Old Olive Ink, punched using the Large Oval Punch, adhered to a piece of Daffodil Delight piece which had been punch with the Scallop Oval Punch & finally to the card with Snail Adhesive.
I popped 3 Pearls into the centre of each small flower to finish
I hope you will join us this week. Don’t forget to pop over to Sunny Challenges & Creations & check out what Kris, Gwen & our Guest Designer for the week – Sarah – have created.