Let’s Set Sail #3

G’Day Friends,

It’s Day #3 of featuring the Let’s Set Sail Bundle.  Can you believe it?  Where does the time
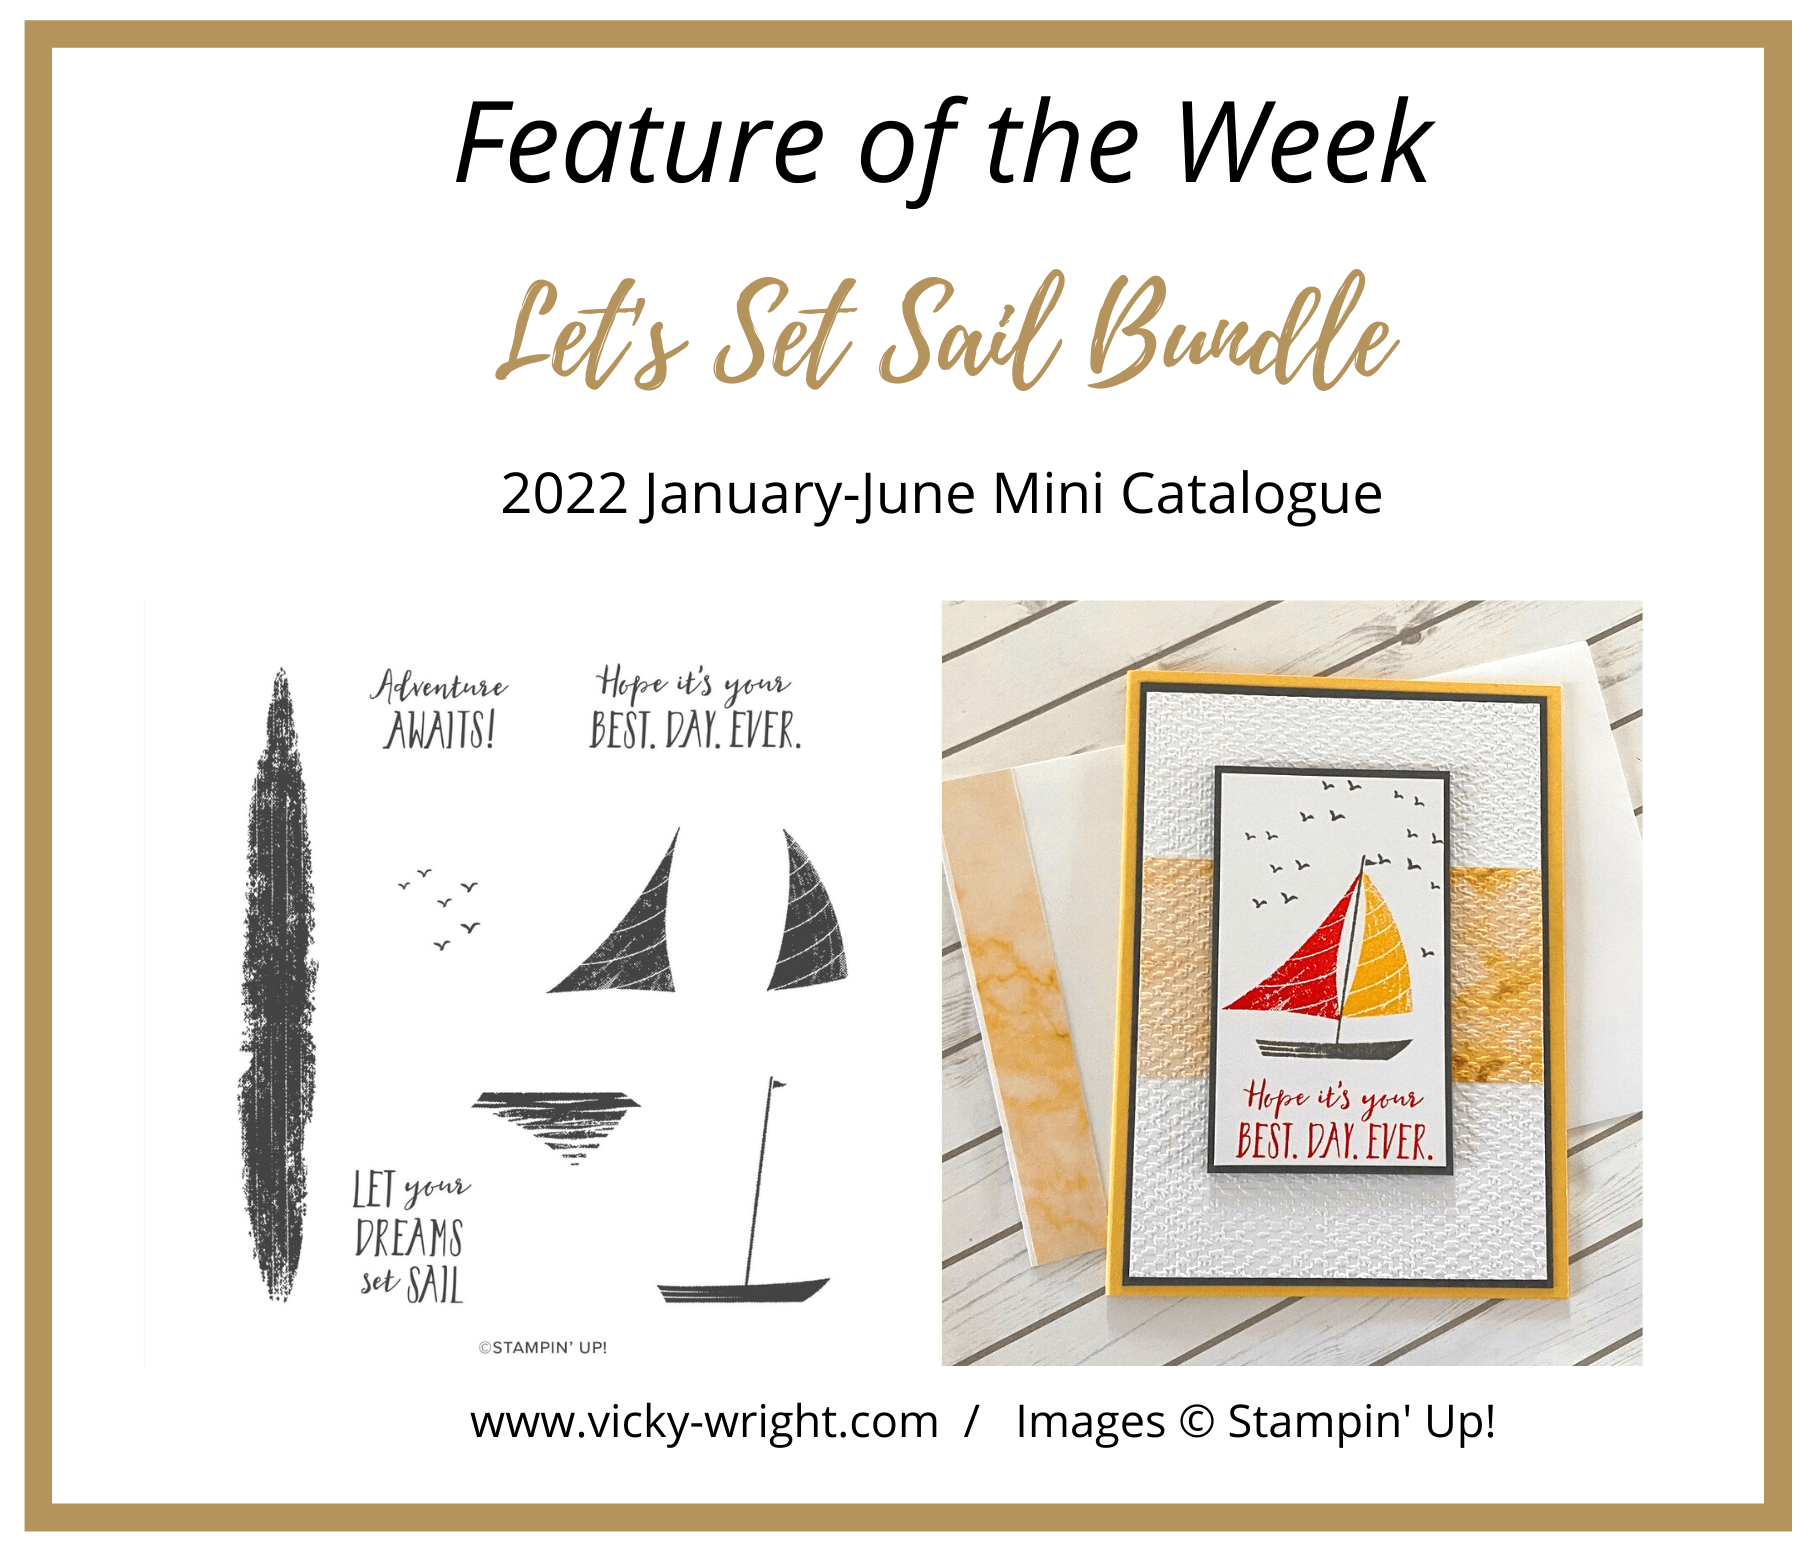
  go?

Did you know this Bundle is an Add-On Classes for our March Stamp Camp?

Register for Option 1, Class & PDF Tutorial by clicking on this LINK.

For some reason I am loving the colours in this card.  Not my usual colours & a little out of my comfort zone but happy none the less.

A small piece of the lovely Simply Marbleous DSP was adhered to a piece of Basic White Cardstock berore being embossed with the Tasteful Textile 3D Embossing Folder.

This Paper is from Sale-a-Bration which is a Level 1 & could be yours for free when spending $90AUD.Supplies –

Stamp Set – Let’s Set Sail

Inks – Rezl Red, So Saffron

Cardstock – Basic White, Grey Granite, So Saffron

DSP – Simply Marbleous

Punch – Sailboat Builder Punch

Need supplies to create today’s project at home?  Don’t forget to use February’s Host Code – Y7CPFNKQ –  if your order is under $250.   All orders receive a Handmae Thank You Card.  You will also receive a PDF Tutorial, the February DSP Card Kit  when spending over $50 PLUS & a small gift when spending over $80.  Please note that there is only one small PDF Tutorial, Gift & Kit per customer per month.

Please feel free to contact me if you have any questions.

Happy Stamping!


Celebrate Sunflowers

G’Day Friends,

I know what you are thinking?  Why am I posting on a Sunday?  Well, I did a FB Live in my group on Thursday & I thought I would share it with you, even though it is a simple & easy one but hey, who can go past Sunflowers or in the case of the 2nd card – Daisies or Gerberas?

These are the measurements I gave the group so that they could stamp along with me.

This is my first card I created used Daffodil Delight, Basic White, Smokey Slate & Shaded Spruce.  For those that know me, it isn’t very often I create 2 of the same card.

I then decided to switch it around a little by changing out the colours to Fresh Freesia, Basic White, Soft Sea Foam & Grey Granite.  I also decided to go with the original sketch layout – see above.  This way I get 2 different cards but using the same layout & supplies!

Why not give the sketch layout a go.  It is one that you can use over & over again & not think it the same layout.

Click the photo below to watch the Live.

  • Place an order before Monday, 21 February, 5pm using the Host Code – Y7CPFNKQ.
  • Place a $50 order & receive the Card Kit & PDF Tutorial
  • Place a $90 order & receive the Card Kit, PDF Tutorial & earn a FREE Sale-a-Bration Item
  • Place a $180 order & receive the Card Kits, PDF Tutorial, Pack of 2021-2023 In Colour Jewels & Earn 1 x Level 2 or 2 x Level 1 Sale-a-Bration items

Need supplies to create today’s project at home?  Don’t forget to use February’s Host Code – Y7CPFNKQ –  if your order is under $250.   All orders receive a Handmae Thank You Card.  You will also receive a PDF Tutorial, the February DSP Card Kit  when spending over $50 PLUS & a small gift when spending over $80.  Please note that there is only one small PDF Tutorial, Gift & Kit per customer per month.

Please feel free to contact me if you have any questions.

Happy Stamping!


Hello Ladybug & Across the Waves

G’Day Friends,

Thank you for visiting my blog today as I have something special to share with you.

Robbie from Creations in Paper & myself have teamed up to give you Across the Waves Mini Blog Hop.  Each Wednesday we will be sharing & featuring a project created with a nominated Stamp Set or Bundle.

For all of February, the fun Hello Ladybug Bundle will be the star!   It is available from the current Mini Catalogue & is such a fun Bundle .  One that I am having lots of fun with.  Have you purchased your Bundle yet?

To create my card I decided to go with the colours of Pale Papaya, So Saffron, Old Olive, Calypso Coral & Basic White.

A layer of Basic White was embossed with the Timber 3D Embossing Folder while another piece of  Basic White was created with one of the masks from the Plenty of Patterns Decorative Masks which is available from the Annual Catalogue.

The large leaf has been stamped in Old Olive Ink prior to being fussy cut.  By the way, did you know if you chop off the top part, it turns into such alovely shape heart – perect for Valentine’s Day or any day for that matter.

To complete the card I randomly adhered the a couple of the Bronze Brushed Metallic Adhesive Backed Dots to the Card Front.

Need supplies to create today’s project at home?  Don’t forget to use February’s Host Code – Y7CPFNKQ –  if your order is under $250.   All orders receive a PDF Tutorial & a Handmade Card from me.

Thank you so much for joining me today & for our very first Across the Waves Mini Blog Hop.  To check out what Robbie has created, be sure to click on the photo below.

Did you know that this is the Bundle we are using in our Online March Stamp Camp?  I can’t wait to share our projects with you.  In fact, I want to share them all with you now but shhhhhhh….  you are gonna have to wait.  I know you are going to love them as much as we do.

You have 3 Options to select for this fun Camp including 2 Add-On Classes – Flowing Flowers Stamp Set & Let’s Set Sail Bundle.

Be sure to REGISTER for this fun Camp before Monday, 7 February!

Please feel free to contact me if you have any questions.

Create to Share!

Friends are like Seashells

G’Day Friends.

I do hope you are enjoying your day so far.

I have been playing with the lovely Friends are like Seashells Stamp Set of late & thought I would share a project that I’ve created from bits & pieces left over on my desk.

A piece of Very Vanilla Cardstock has been embossed with the Seashells 3D Embossing Folder before randomly being chopped into 6 pieces & then put back together by adhering each piece to a layer of Blackberry Bliss Cardstock.  This layer was then adhered to a Crumb Cake Base Card.

The large shell was stamped onto Very Vanilla Cardstock in Crumb Cake Ink, die cut with the Seaside Seashells Dies before being embossed with the Seashells 3D Embossing Folder & adhered to the card front with Stampin’ Dimensionals.

The seniment was stamped onto scrap Very Vanilla in Real Red Ink, die cut with a die from the Stitched Rectangles Dies & adhered to the front with Stampin’ Dimensionals.

I am loving this colour combination – a combination I would never have selected but one I think I will be using again.

It’s always good to get out of your comfort zone, right?

Need supplies to create today’s project at home?  Don’t forget to use December’s Host Code – N4ABBA4T –  if your order is under $250.

Please feel free to contact me if you have any questions.

Happy Stamping!

Be Jolly #3

G’Day Friends,

I have another card to share with you today created with the Be Jolly Stamp Set.

In saying that, this will be my last Christmas card for the year!  Can you believe that the “man” himself will visiting all the little kids AND big kids tonight!

A piece of Basic White Cardstock was embossed down the left side with the Polka Dot Embossing Folder from the Checks & Dots Embossing Folder.

3 scored lines were scored down the right side of the embossed area prior to being adhered to a Garden Green Base Card.

The tree was stamped onto a piece of Basic White Cardstock in Memento Tuxedo Black Ink, coloured & blended with Stampin’ Blends.  I stamped the sentiment direct onto the same Cardstock in Real Red Ink.

A piece of Real Red Cardstock was die cut with the Stitched So Sweetly Dies.  The Basic White piece was then adhered to this piece & then to the card front with Stampin’ Dimensionals.

To finish it off, I randomly scattered Clear Rhinestones to the Basic White Panel.

Don’t forget this cute Be Jolly Stamp Set is on the Last Chance Product List & will be retiring very soon.

Need supplies to create today’s project at home?  Don’t forget to use December’s Host Code – N4ABBA4T –  if your order is under $250.Please feel free to contact me if you have any questions.

Happy Stamping!