Sc 021/11…

Merry Christmas Eveyone!!!!!  Have a great day with your family & friends!

This week’s challenge over at Sunny Challenges & Creations is one which I am sure will appeal to everyone.  Anything BUT Christmas.  Yep, you have a free reign!  Be sure to check out what Gwen & Kris have created.

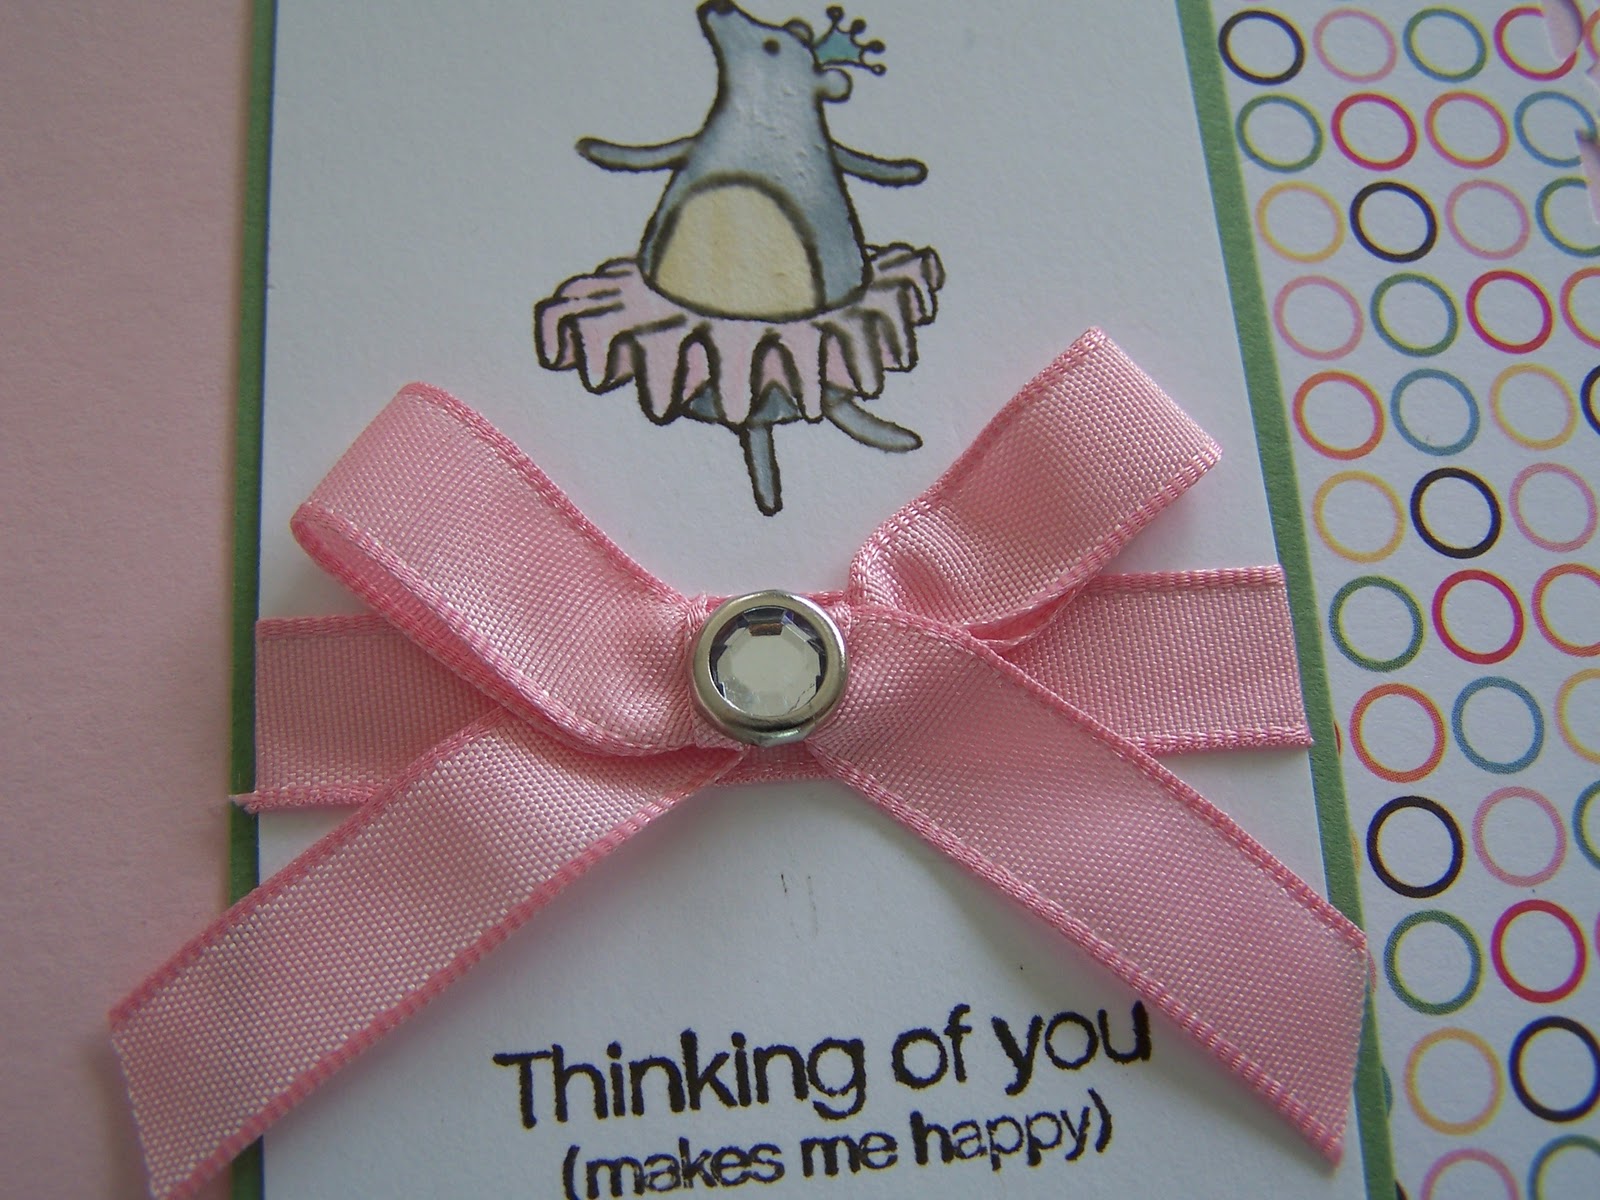
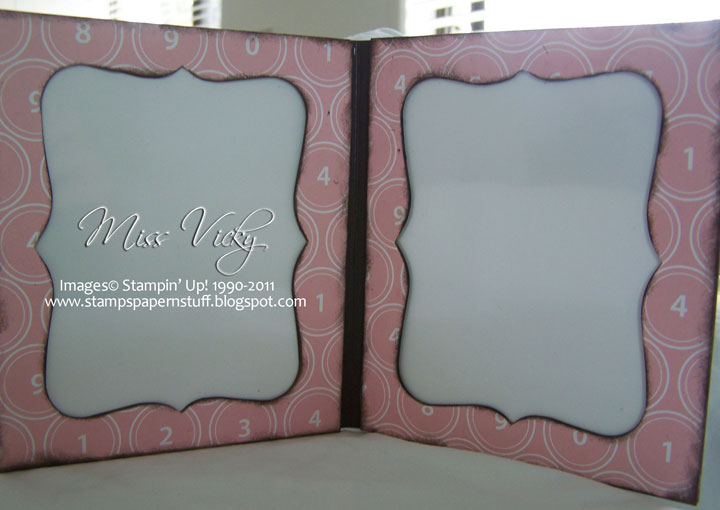
For my sample, I decided to create a Free Standing Double Photo Frame  as a small Chrissie Pressie for my Aunt.

With having Christmas at my cousins, I thought it be a great idea to create this so that she could put a couple of photos of her great-granddaughter in it.  Ally is only 2 years of age & it is her grandparents we are having lunch with.

This idea has been forming in my mind for a couple of weeks now, & to see it come to life is something else.  I am really happy with the final result.  Mind you, so many ideas have popped into my head about what I will do for my next one.
Once I had assembled the inside of the frame, I then decided to make the front into a card – Jill won’t be expecting the inside!  She will only think it is just another card!

For the card front, I wanted to make it all “girly girly” while not being too bright!  I think I have pulled it off!

Mind you, it is still sitting on the kitchen cupboard waiting to be wrapped.  I also created a matching envelope & matching Tissue Paper to wrap the envelope – sorry no photos as I did that last night after I had taken all the photos.

Supplies –
Stamp Set –  Under the Big Top
Ink – Early Expresso
Cardstock – Early Expresso, Wild Wasabi, Whisper White, Pink Pirouette, Window Sheet
DSP – Just Add Cake
Dies – Top Note
Ribbon – 3/8″ Taffeta – Pretty in Pink
Punches – Scallop Trim Border
SU Markers – Early Expresso, Basic Gray, So Saffron, Baja Breeze, Pretty in Pink, Pink Pirouette
Accessories – Rhinestones, Crystal Brad, Sticky Strip, Snail Adhesive, Multipurpose Glue, SU Sponge Dauber, 2-Way Glue Pen, Dazzling Diamonds, Stampin’ Dimensionals, Blender Pen, Big Shot
Non-SU – 3mm Cardboard
Now head over to Sunny Challenges & Creations & add your creation to Mr Linky.
Merry Christmas!

Easy 5m Card…

I have had to create 60 Christmas Cards for the Volunteers at the Community Centre.
To make it easy for me & not expensive for the Centre, I decided to see what I can come up with using the minimum supplies. 
This is the first of my 6/7 designs.
I stamped the images direct onto Whisper White Cardstock using Rich Razzleberry Ink & then drew the lines with my Rich Razzleberry Marker.
I scored 3 lines down the LHS using a ruler & my Bone Folder.
I stamped the Sentiment onto the card with Old Olive Ink.
That is it – 5 minutes tops!!!
Supplies –
Stamp Set – Tree Trimmings, Short & Sweet
Ink – Rich Razzleberry, Old Olive
Accessories – Bone Folder, SU Markers – Rich Razzleberry
Until next time, Enjoy!

Inspired by Nature…

The layout for these pages have been inspired both by the photos & of course the Stamp Set – Inspired by Nature.  I think this set is perfect for these photos without taking away from the photos.  I love to scrap my photos, while at the same time not have the photo/s become lost on the page.
Page 1 –
I matted my photo onto Crumb Cake & then onto Garden Green Cardstock.  I inked my image with Crumb Cake Ink & radomly stamped around Very Vanilla Cardstock.  I tried to bring the weeds from the photo onto the page.
Wanting to add a little bit of green & the colour of the T-Shirt Amber is wearing, I decided to ink the flower image using Garden Green, So Saffron & Pacific PointSU Markers & stamp over the top of the reeds.  I repeated this step twice.  I then applied Crystal Effects to the flowers so that the colours would pop out more.
Once the Crystal Effects had dried, I adhered my photo to the page.
Using my Basic Black SU Marker, I wrote onto a scrap piece of Vanilla Vanilla, punched out using my Oval Punch & adhered to a piece of Pacific Point Cardstock, which had been punched with my Scallop Oval Punch
I punched a hole either side of the oval with my Handheld Punch & thread a piece of Linen Thread through either side.  I think this blends in well with the whole scrub theme.
Page 2 –
This page was really very easy & took all of about 5 minutes.
I matted my photo onto Crumb Cake & then to Marina Mist Cardstock.

I stamped my reeds onto Very Vanilla Cardstock with Crumb Cake Ink.  I again inked my flower image with Pacific Point, Garden Green & So Saffron SU Markers & stamped them onto the page.  I applied Crystal Effects to the flowers & set aside to dry.

 I adhered my photo the centre of the page & with my SU Basic Black Marker, wrote a little bit of “What’s Happening
Supplies –
Stamp Set – Inspired by Nature
Ink – Crumb Cake
Cardstock – Pacific Point, Very Vanilla,
Garden Green, Crumb Cake
Punches – Handheld, Scallop Oval, Oval
Accessories – Linen Thread, Snail Adhesive, Crystal Effects, SU Markers
Unti next time, Enjoy!

Make & Take – Scrap…

One of our Make & Take Projects from Regionals was this 6″ x 6″ scrap page featuring “Under the Big Top” stamp set.  I have had my eye on this set since the new catalogue come out as it is perfect for colouring in.  Oh, how I LOVE to colour!  Luckily, I never got round to purchasing it, as this was given to us at Regionals – how great is that?????

The colours for this page are so bright & cherry!  I knew immediatley the photo I wanted to use, as the little clown in this set reminds me of “Ronald MacDonald“.  It was when Julie & I went to Bali for a much deserved break from Timor – the first stop on our venture being MacDonalds.  Julie had been craving it for 6 months, so there was no stopping her!!!!!
Don’t you think this is the perfect photo?????
It was a fairly easy & fun page to put together & didn’t take long to complete at all.  I only wish the pages I am working on at the moment would be so co-operative!!!!!!
Great page for a workshop!!!!

Until next time, Enjoy!!!!

SC 013/11…

Crikey, can you believe it!!!!!  This is week 13 of our challenge – time does fly when you’re having fun.

This week, the challenge was brought to you by our own Gwen & boy, has she made it very easy for us  – NO 2nd part of the challenge!!!!!  Yep, you read right – NO 2nd part of the challenge!!!!  In other words, you have a free hand on what you create as long as you stick basically to the sketch!!!!!!
Now, my mind went into overdrive & had so many ideas, but this is the one I ended up going with, as when I first saw the sketch, a kid’s birthday card popped into my head.  This card can be used for boy/girl!!!!
To check out my 2nd card, pop back in later on in the week!

Base Card – Poppy Parade – 8 1/4″ x 5 7/8″ or 21cm x 15cm – Scored & folded in half landscape
Layer 1 – Whisper White – 4″ x 5 3/4″ or 10cm x 14.5cm
Layer 2 – DSP – 3 7/8″ x 5 5/8″ or 9.5cm x 14cm
Layer 3 – Poppy Parade – 4″ x 2 3/8″ or 10cm x 6cm
Layer 4 – DSP – 3 7/8″ x 2 1/4″ or 9.5cm x 5.5cm

I layered my DSP onto Whisper White Cardstock & then onto the Base Card – Poppy Parade, using Snail Adhesive.  I layered the smaller piece of DSP onto the piece of Poppy Parade Cardstock, then onto the middle of the Base Card with Snail Adhesive.

I punched a piece of Whisper White Cardstock with my Scallop Circle Punch & layered a piece of Wild Wasabi Cardstock onto it.  This piece had been punched with the 1 3/8″ Circle Punch.  I punched a So Saffron circle from my 1 1/4″ Circle Punch & adhered to the top of Wild Wasabi circle.
?

With Envelope…

?
With my Early Expresso Ink, I stamped the bottom of the cupcake, while the top was stamped using So Saffron Ink.  I punched both pieces with my Cupcake Builder Punch, stamped over the So Saffron top with Early Expresso Ink – this put the “chips” onto the “icing” & adhered this piece to the top of the cupcake bottom with Snail Adhesive.  I drew dots around the circle with my SU Marker – Early Expresso & adhered the whole cupcake to the So Saffron Circle with Su Dimensionals.

I stamped the greeting in Early Expresso Ink onto a scrap of Whisper White Cardstock, cut around it ensuring I allowed enough card at both ends of the greeting, one end to slide under the Scalloped Circle, while the other end, I snipped a “V” into it.  I then used my scissors to shape the pennant & adhered the left hand end to the card with Snail Adhesive.

For something a little different, I decided to have another cupcake for the inside, but I wanted it to pop up when opened.  For this, I cut a piece of Whisper White Cardstock 4″ x 5 3/4″ or 10cm x 14.5cm, measured the middle along the long side & marked with a pencil.  To get the bit to stand, I measured 1/8″ or 3mm either side of the halfway mark.  I then drew a line on both sides about 1 1/8″ or 2.5cm down, scored across the bottom to where both sides meet & cut along the lines to the score mark.
?

Inside – Pop Up Cupcake…

?
I again stamped my images using Early Expresso & So Saffron Inks onto Whisper White Cardstock, punched using my Cupcake Builder Punch & adhered to the piece with Snail Adhesive.  I punched the cherry from DSP with the same punch.  I inked my wording with my SU Marker – Poppy Parade & stamped in the middle. 

For the bottom half, I cut a strip of DSP, adhered to a piece of Early Expresso Cardstock, then to the Whisper White Cardstock, allowing a small edge of the White to show at the bottom.

All in all a very simple card but with a bit of a WOW, I think!!!!!  I would relly like to know what you think?

Supplies –
Stamp Set – Create a Cupcake, A Word for You
Ink – Early Expresso, So Saffron
Cardstock – Whisper White, Poppy Parade, Wild Wasabi
DSP – Just Add Cake
Punches – 1 3/8″ Circle, 1 1/4″ Circle, Scallop Circle, Cupcake Builder
Accessories – SU Dimensionals, Snail Adhesive, SU Markers – Early Expresso & Poppy Parade
Don’t forget to hop over to Sunny Challenges & Creations to check out what Gwen & Kris have created using the same sketch.  While there, create your own card, link it to your blog or online group.forum with Mr Linky.  Both Mr Linky & ourselves would really love to see your creation.  Who knows, you could be our next “Ray of Sunshine“.
Until next time, Enjoy!